How to Create a List View Component in Phaser Editor v3

What’s up guys.

As I continue working on the multiplayer Poker game, I’m working on adding a game lobby to it. There, you’ll be able to see who else is online, join existing games in session, or start your own game for others to join.

I realized that in order to create the list of players and games, Iโ€™ll need to build a list view. And since Iโ€™m using Phaser Editor v3 and its User Components functionality, I decided to build the list view, similar to how I made the button component.

What’s a List View?

A list view, also known as a list box, is a user interface control that allows you to select one or more items (usually lines of text) from a vertically aligned list of “list items”.

On a side note, this list view class was inspired by a similar custom list view class I wrote in Flash using ActionScript 3 several years ago. I needed a way to be able to display custom list items, instead of just plain ol’ text (games are usually more visually appealing than their non-game compadres).

You’ve likely used list views many times. They are often presented in the form of a drop-down combo box, where you click on a box of text, and a list of items appears underneath, allowing you select one of them. Today, we’re focusing on the actual list itself. I decided to make a test app to develop the list view component. Have a look below; it’s a short clip of the demo app I’ve created.

Here’s a short demo of a list view.

Best part? You can play around with the list view demo here! ๐Ÿ˜

Building a List View

As you can see, this list view:

  • is a collection of buttons (the list items) inside a container
  • is masked so the list items are only visible within the container
  • is scrollable, so you can view more items (sliders, swipe, or mouse wheel)
  • allows multiple items to be selected

It seems simple on the surface, but actually coding the damn thing took me a minute! ๐Ÿ˜…

Note: I won’t cover every single aspect of the list view in this article, so I’ll try to cover the essentials. Also there are some aspects of the list view component that will not be covered in this article, such as sliders (scrollbars). However, the project is on GitHub if you want to examine the play with the demo or code.

Setting Up The List View Component

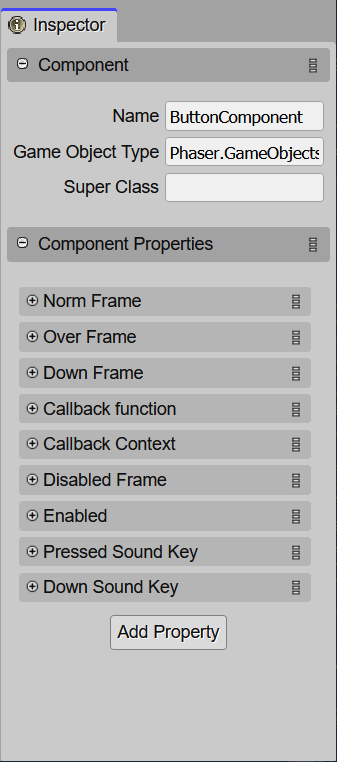
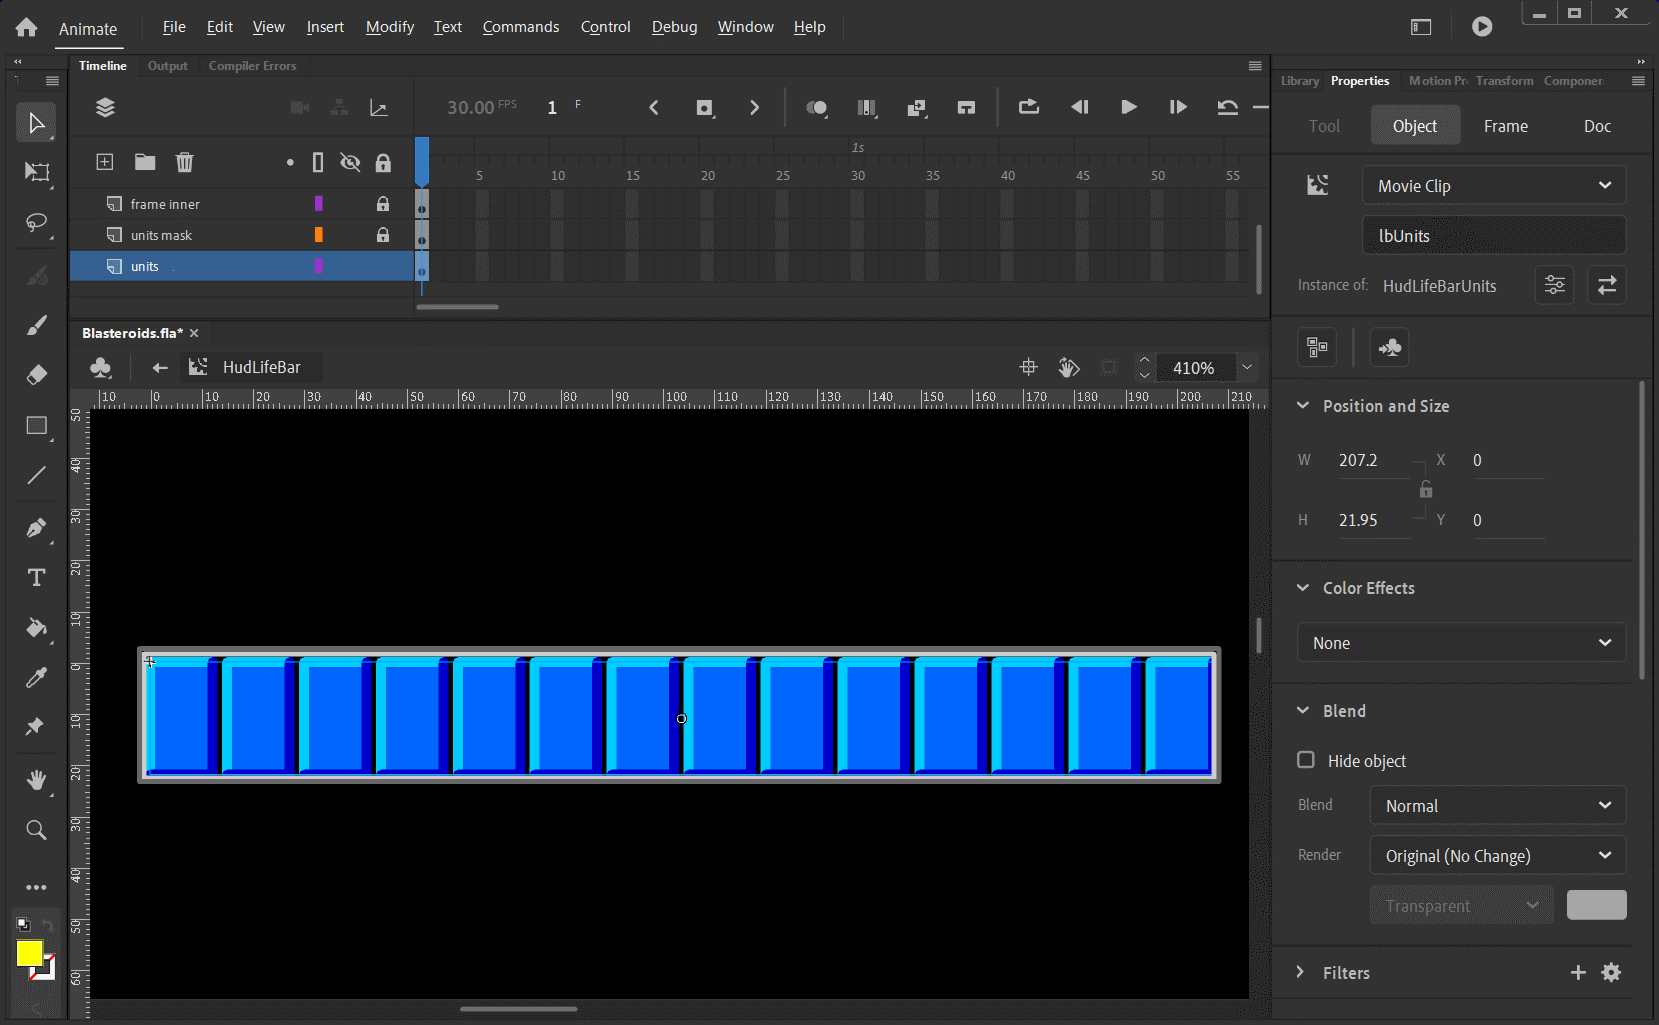
First, let’s have a look at the list view User Component in Phaser Editor:

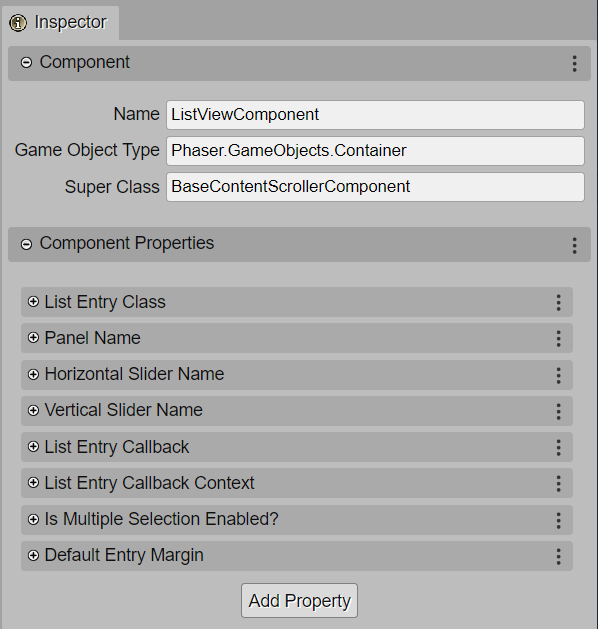
Note that the Game Object Type is Phaser.GameObjects.Container. That’s because the list view will ultimately contain several other game objects.

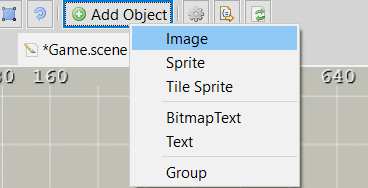
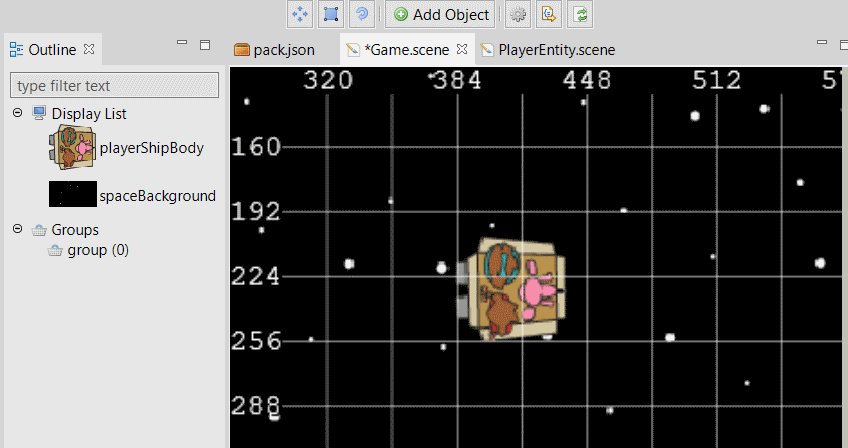
When setting up a list view component in your scene, first I created that empty container. Then I add the ListViewComponent to is. Then, I added the following game objects inside the container:

  • An image. Assign this a square/rectangular texture, which serves as the visual background. This image also determines the size of the mask. (The mask is what keeps lots of items from being visible if they are scrolled outside the list view.)
  • Two more containers inside this container. These would represent the horizontal and/or vertical sliders/scrollbars. Note that the slider is an additional component not covered in this article.

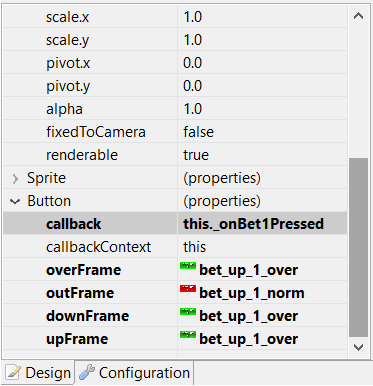
Let’s go over each of the component properties.

  • List Entry Class: The class that list entries will use when added to the list view. This allows you to customize how each list entry will look. There is no default class, so you must specify one. But don’t worry; setting up a custom is easy. This custom class must extend the ListView class. More on that later.
  • Panel Name: The property name of the back panel image. We need a way to for the list view to reference other game objects instances from withing the editor. Since we cannot name an instance within the editor, I decided to reference them by using their property variable name. The panel should be a rectangular image that represents the background and visual area of your list view.
  • Horizontal Slider Name and Vertical Slider Name: The property names of the game object containers that represent the horizontal and vertical sliders. Sliders are optional, and if you know ahead of time how your list view will scroll, you need only specify the appropriate slider name. The containers themselves also have a SliderComponent User Component added to them.
  • List Entry Callback: A function that is called when a list entry is pressed.
  • List Entry Callback Context: The context (this) to be used when calling the callback function.
  • Is Multiple Selection Enabled?: Specifies if multiple items can be selected at once. When enabled, you can Shift+Click or Control+Click (on a keyboard, which means desktop machines) to select multiple entries.
  • Default Entry Margin: When adding entries to the list view, this determines the vertical spacing in between them. By default, there is no margin, meaning entries are directly adjacent to each other.

Notes:
1. When setting up objects to be referenced by property name, make sure those objects are using Class or Public scope, so property names can be created for them in the scene.
2. The list entries are also inside a sub-container, which is automatically created by the list view component.

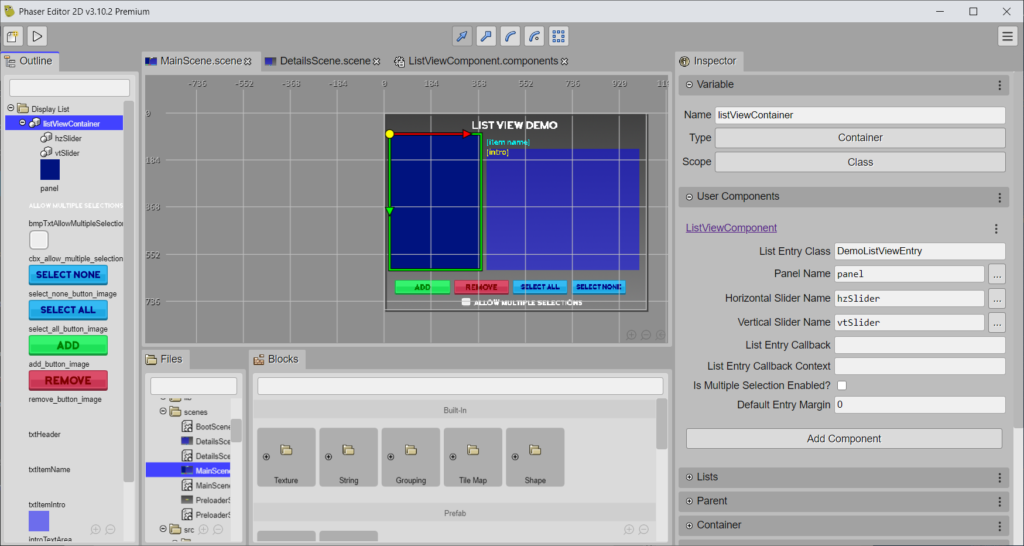
This following image shows the setup of a ListViewComponent on a Phaser Container, as well as the game objects inside the container.

The property names must match up with the names specified in the component.
Setting up the Custom List View Entry Component

When setting up your list view, it needs to know what each list entry will look like, so a custom class must be defined here. Have another look at the image above. It the ListViewComponent properties, the List Entry Class is set to a DemoListViewEntry. This is the custom list view entry class class that we’ll use for this demo. To accomplish this, we’ll explore another User Component to go with the list view component: ListViewEntryComponent.

The list view entry component looks like the following:

The Game Object Type is set to ListViewEntry, which is the base class that your custom list view entry class will extend. The ListViewEntry itself extends the Phaser.GameObjects.Container class. When you create your custom list view entry class, it will actually be a Phaser Editor prefab. That prefab will have its Super Class set as ListViewEntry, but more on that later. First, let’s examine this component’s properties.

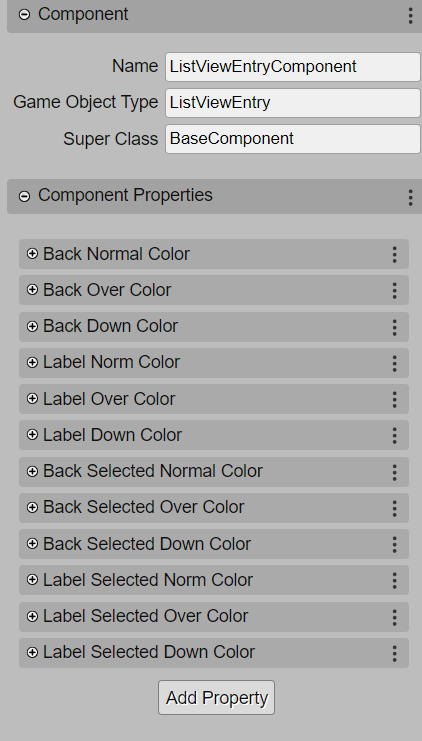
There are two basic visual elements of a list view entry:
1. Back: the background of the entry. This is a Phaser.GameObjects.Rectangle that is created internally by the list view entry class, so you do not place anything in your prefab scene for this. The list view entry internally creates this button for you. It also serves as the button (a ButtonComponent) of the entry and response to input events.
2. Label: the text of the entry. This can be either Phaser.GameObjects.Text or Phaser.GameObjects.BitmapText, but it must be named txtLabel, and Scope set to Public.

That said, you can see that the properties are all about either the back or the label. You’ll also notice that there are two selected “states” for each element: Selected or not. Finally, there are button states – the same as the button component: Norm, Over, and Down. Each of these would specify a number which represents the RGB color of the entry when it’s selected or not, and corresponding to the button state.

The list entry creates its own button, which handles the state changes for itself and for the label as it responds to your user input.

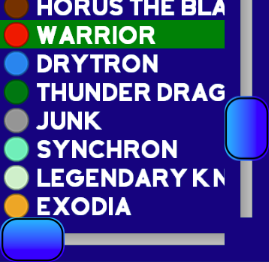
Now, let’s have a look at the custom entry defined for this demo, the DemoListViewEntry.

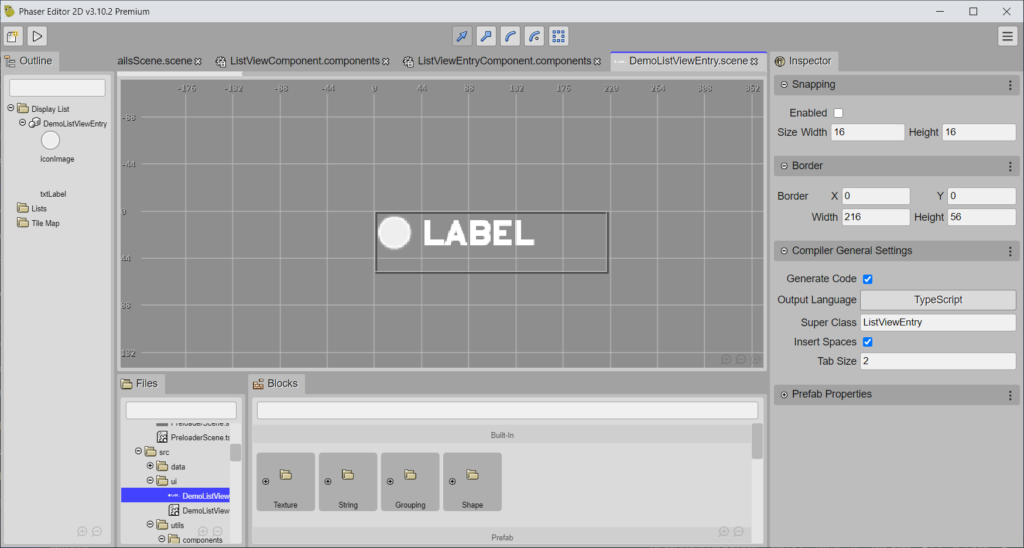
Notice that the Super Class is set to ListViewEntry, as I mentioned previously. You’ll also notice the “LABEL” graphic, which is a text object named, txtLabel.

You would attach the ListViewEntryComponent to the container of your custom list view prefab entry, as in this following image:

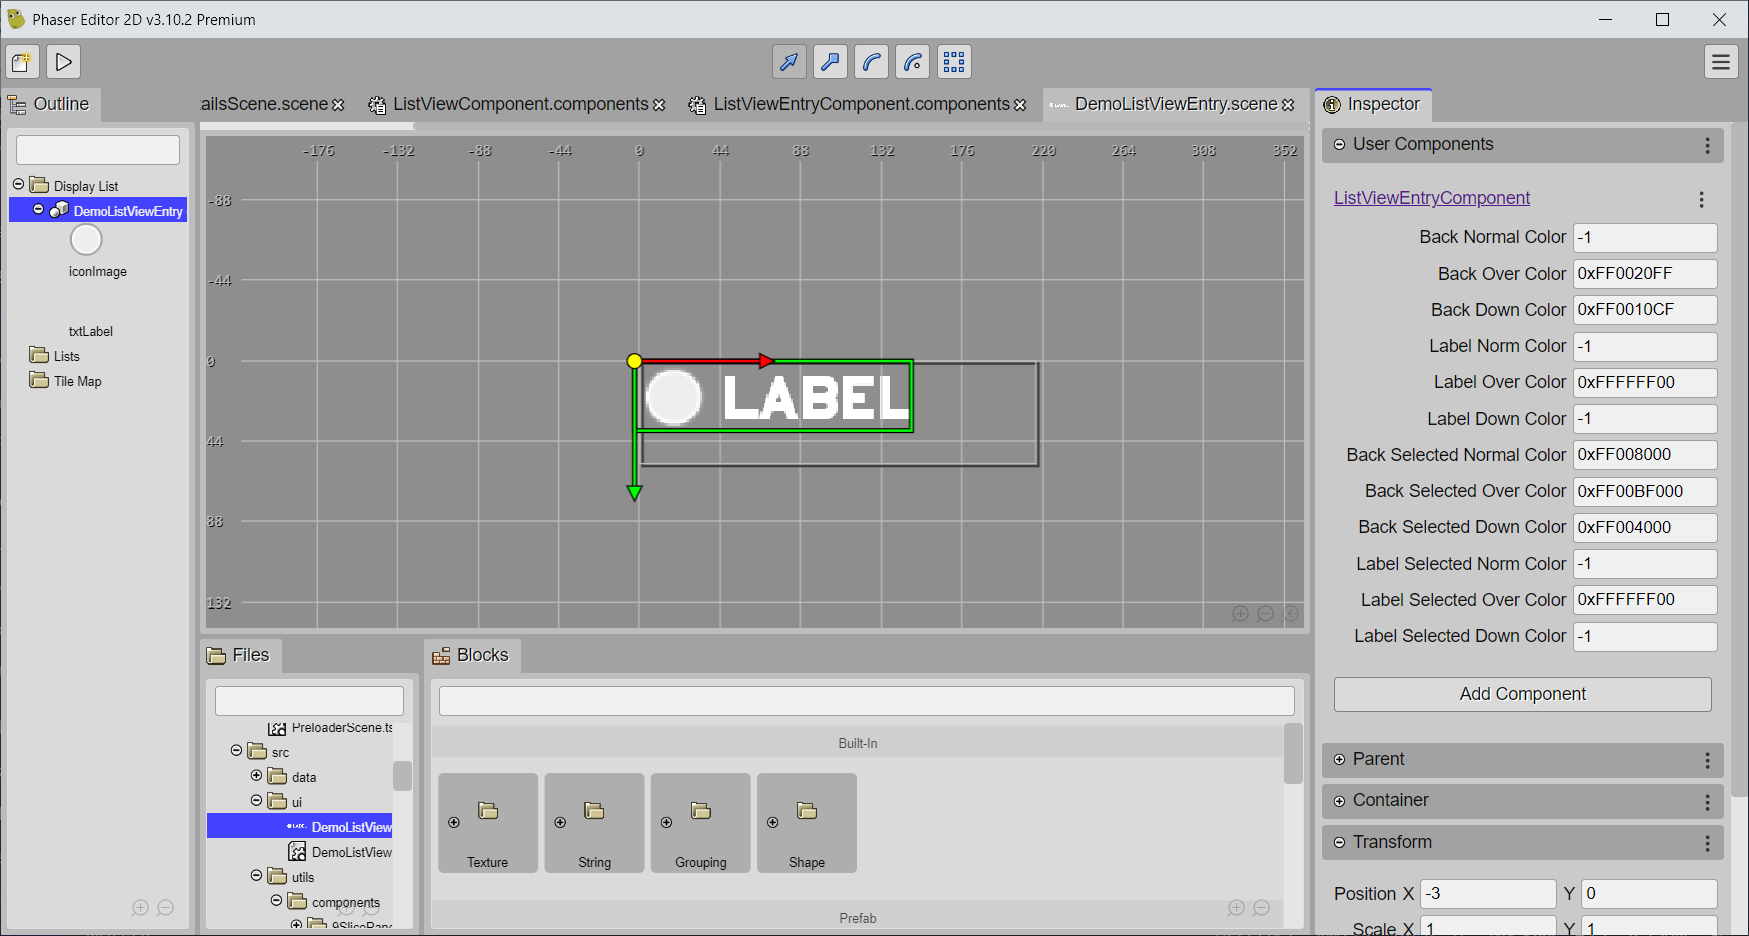
Notice that the various colors for the back and label have also been specified.

Note: If your list has more items in it than it can display, it;ll only create enough list view entry objects that are needed. In other words, say you added 30 items to your list, and it is only tall enough to display, 12 of them, it won’t create 30 entry objects. Instead, it will recycle the 12, reassigning their data as they scroll in and out of view. Pretty cool, huh? ๐Ÿ˜

Using the List View

The final section of this article talks about how to use the list view component in your app.

But first, here are the steps to add one to your scene:

  1. Add a container to your scene.
  2. Add the ListViewComponent User Component to that container. Assign it a variable name. For these steps, let’s use listViewContainer. By default, the component will have the variable names of the panel and sliders populated. You can use the default names, or change them.
  3. Set a custom class for the List Entry class property. From the demo, you can use DemoListViewEntry.
  4. Specify a function name for the “List Entry Callback” property. You’ll create this function later in the scene’s source code file.
  5. Set the “List Entry Callback Context” property to this. This makes the scope of the callback function the scene itself.
  6. Add an image inside the main container, and assign it a square/rectangular image. This will be the panel (background) of the list view. Set its variable name to match up with the “Panel Name” property specified in the list view component.
  7. Create another container inside the main container, and add the Slider component it. Check the “Is Horizontal?” box for one slider to make it the horizontal slider. Set its variable name to match up with the “Horizontal Slider Name” property of the list view component.
You’ll need to set the images for the body, and for the handle. The handle acts as a button, hence the norm, over and down state images.
  1. Create one more container inside the main one, and add the Slider component to it as well. For this one uncheck its “Is Horizontal?” box to make it the vertical slider. Set its variable name to match up with the “Vertical Slider Name” property of the list view component.
  2. In the source file of your scene, create a function using the name you specified in the “List Entry Callback” property of the list view component. The function signature looks like this (TypeScript):
    function listViewCallback(data: IListViewCallbackData): void {
      console.log(data.item);
    }
  3. Each time an item is selected in the list view, that function is called. The data parameter will describe the item that was clicked:
    interface IListViewCallbackData {
      item: IListViewItem;
      index: number;
      listViewComponent: ListViewComponent;
    }
  4. The item property will contain the label of the item, as well as any custom data that is assigned to the list item:
    interface IListViewItem {
      label?: string;
      data?: unknown;
    }
  5. To add an item to your list view, consider this code:
    const listView = ListViewComponent.getComponent(this.listViewContainer);
    listView.addItem('first label', 12345);

    listView.addItem('second label', 23456);
    listView.addItem('third label', { key: 'some key', value: 'some value' } );
    The first param is the label of the list item, and the second is the custom data of the item.
  6. After running the app, adding an item to it, and pressing on that item, you should see some output in your console. If you inspect the output, it should find in it the same data that you added with the addItem method.

To see the scroll bars at work, you’ll need to add more items than the list view can display.

Then, you should be able to scroll the list.

I know a lot is presented in this article, and not every aspect of the list view component is covered. My intended audience is not other game developers; it’s those who themselves don’t do the technical part of building games, but are looking for a game programmer to help them with their project. However, some of my articles will include lower-level coding and topics like this one. Nonetheless, for the list view, code is your thing (or you’re curious), feel free to examine the list view demo on GitHub.

That’s it for this article. If you’ve any questions (you probably will if you’re trying the demo code), shoot me a message.

Talk to you later,

– C. out.

Using Sothink SWF Decompiler To Convert Flash Games To HTML5

Hey guys,

If you’ve been following me for a while, you’re aware that one of the services I offer is to convert Flash games to HTML5 canvas. I’ve done this with the game Blasteroids, which was originally a Flash game I coded for a client.

Now, when doing the conversion, if you have the all the original code and assets, including any Flash FLA files that Adobe Animate use, that’s the best option. Some smaller Flash projects (and I mean very small) may use a single FLA file with all the code and assets built into it. Usually, that will not be the case…

But for the sake of this article, let’s assume that is the case. But!… You do not have this FLA file or any of its assets! And without that FLA file, you’re f*cked right? Well, maybe not! That’s where a tool called Sothink SWF Decompiler may come to the rescue!

This tool is designed to extract code and assets from Flash files so you can use them to rebuild the game in HTML5 canvas. The tool can even extract any FLA files it finds, and there is even a function to export to HTML5 format (more on this later).

Remember: When converting a Flash game to HTML5, you will need to rebuild the game from scratch, particularly, the coding and functionality.

I’ve been working with a client who has several Flash games that needed to be converted. He does not have the FLA files for most of them. And the only way for me to even get SWF files was to download them by accessing the developer console within the browser.

Trying Out Sothink SWF Decompiler

Without the FLA files, I decided to give Sothink SWF Decompiler a try. I told the client that there may not be a guarantee that the decompiler might not be able to assist with converting all his SWFs (because you don’t know what you’re dealing with – it would be dumb to assume you can do the job without having seen how anything works yet).

Fortunately, the makers of the decompiler, SourceTec Software, allow you to download a trial. They even allow you to send them a SWF file, and they will decompile the SWF and inform you the test result (albeit they keep the resultant FLA file).

I opted to try the latter option, and to my surprise, they were able to successfully extract assets from the SWF!

Deciding to take a risk, I went ahead and bought the full version of the decompiler, and took on the client’s request to convert all his requested games (or to let him know of any that could not be converted).

And so far, the decompiler has delivered! I’ve been able to extract the main FLA file, as well as all the necessary code and assets from the every SWF encountered.

You can extract pretty much any element from the SWF file to your computer to reuse it when you build the game as HTML5 from the ground up.

Exporting the FLA File from the SWF

When you open a SWF with the decompiler, it will attempt to run the SWF and display the output in the main window. The Export panel to the right will allow view and extract individual elements found within. You can press the Export FLA/FLEX button to attempt to extract an FLA file it finds.

The only issue I’ve encountered so far is how it handles text. The text inside TextField objects may not display properly you export them has TextFields. You can export them as graphics and they’ll appear correctly, but you won’t be able to edit the text should you need to.

Exporting Code And Assets From The SWF

When you open the the FLA file using Adobe Animate, it will contain all assets inside. However, you can still all the extract individual assets to separate files (many will be contained inside smaller FLAs) using the Export Resources button.

For some resources, you can specify the format you want them to export to. I find FLA useful for things like buttons and actions.

This method can be useful if you want to export graphics and button images, because the FLA files that they are contained within will already have the stage size to match the graphic you’re exporting.

As for the ActionScript code, if there was any code placed inside timelines of the FLA, they will be preserved in the conversion process, which is super. Your task here – and this is the most laborious part of the process – would be to rewrite all the ActionScript code to JavaScript (or TypeScript in my case). But at least you don’t have to reinvent the wheel, with designing the game’s logic, as the previous programmer has already done that for you. ๐Ÿ˜

Rebuilding The Game Into HTML5

After you’ve exported all the assets, next begins the process of transferring graphics to your new HTML5 project. Raster graphics such as bitmaps, PNGs, and JPEGs can simply be copied over if exported in their native formats. However, for vector graphics, you’ll need to export them as rasters, so they can be loaded onto the HTML5 canvas. Adobe Animate can do this conversion for you.

You can package up all the extracted graphics into one or more spritesheets using TexturePacker. And if you’re using an HTML5 canvas engine like Phaser, it has built-in support for the TexturePacker spritesheets.

If there were animations – hopefully simple ones – you’ll need to extract each frame as a separate raster graphic, then rebuild the animation for use with canvas. Again, Phaser, if you’re using it, can rebuild the animations.

As a super bonus โญ… If you’re using Phaser, you can use Phaser Editor to rebuild the layouts exactly as they were (or as close to it as possible) in the original Flash. I’ve demonstrated this before, and you can use the Editor along with the newly extracted graphics to convert your Flash stage to a Phaser scene.

Export to HTML5

I previously mentioned that the decompiler can export to HTML5. If your Flash is simple enough, I suspect this can convert your Flash game without incident. I say suspect, because, unfortunately, when I tried it, it didn’t work out too well for me.

When I tried it, it produced two files: one HTML file, and once JavaScript file. However, when I ran it, it didn’t behave as intended. The stage content was transitioning from one frame to the next, but it was leaving behind the previous frame’s content. Furthermore, the game logic wasn’t running as expected. Here’s a screenshot of the result:

The text from the previous frames wasn’t removed, and they’re jumbled behind the current frame’s text.

So, let’s have a look inside the HTML and JavaScript files:

What the…! ๐Ÿ˜ต

Good luck trying to edit that! Even with a code formatter like this one, you’ll still be hardpressed with fixing the game to make it work. As I’ve said before, best to rebuild the codebase from scratch, converting the ActionScript code to JavaScript/TypeScript.

Closing

Even if you don’t have the original FLA and assets, there may be a way to still convert the Flash game to HTML5 with a tool like Sothing SWF Decompiler. Overall, I’ve not had much trouble using this tool, and I would recommended giving the trial a try if you’re working to convert your Flash content.

And if you can’t (or don’t want to ) be bothered with the conversion process, reach out to me. I could take a look at your SWF. Or even if you have all the original code and assets, and are looking for a programmer to convert it for you, contact me directly at
cartrell @ gameplaycoder dot com, or you can use this contact form.

And if you’d like to get on my e-mailing list, you can sign up using the form below. There, you’ll get first access to projects that I’m working one as I make noteworthy process. You’ll see the games I work on come to life as I continually work on them.

Thanks for reading! Talk to you next time,

– C. out.

Creating A Multiplayer Poker Game For HTML5 Using Phaser, Part 3

Continuing the series of building a multiplayer poker game, some progress has been made on the game. Development is coming along great using Phaser Editor v3!

A Bit More Technical Setup

I’m using several technologies, as mentioned in the first article of this series, and as I’m moving forward, I’m continuing to make adjustments to my development environment.

Since the game will perform as both a single-player and multiplayer game, I’m working on the single-player aspect first.

The game will be split into two primary projects: one for the client-side, and the other for the server-side.

Both will use common logic for running the game, and to avoid having to duplicate code across both projects. I made a secondary project, which is acts as a “common” repo for sharing code that will be used by both projects.

Since the common folder is outside of the client project root folder, I made come adjustments to VSCode to allow it to “see” this external folder and add it to the workspace.

The common folder is in the same folder as the client project (and server project). In order for Webpack to add the common files and folders to the build process, I made some adjustments to the webpack.config.js file. The alias inside of the resolve also makes the import statements look cleaner in VSCode.

module: {
  ...
  rules: [
    ...
    {
      include: [
        ...
        path.resolve(__dirname, '../common/src'),
      ],
      ...
    }
  ]
};
...
resolve: {
  ...
  alias: {
    common: path.resolve(__dirname, '../common/'),
  }
};

Learning Poker

I’m learning the rules of poker as I build this game, and the journey has been quite interesting. ๐Ÿ™‚

The order in which the players take their turns was fairly straightforward. Play starts with player left of the dealer, small blind (SB). The player left of the SB is the big blind (BB). Play goes clockwise around the poker table.

The object of poker is to win all the money in the pot. You do this by having the best poker hand at the end of the game. Your hand must be built from any combination of two cards that you’ll eventually be dealt (the “hole” cards), plus the five community cards that will eventually be dealt. As players make their turns, they can place bets by adding money to the pot. The player who wins the game (by having the best poker hand) at the end of the game wins all the money in the pot.

The game is split up into rounds and each round doesn’t end until every player has contributed an equal amount of money to the pot.

Note: I’ll be using 1/2 no-limit (NL) rules.

To start the game off, the SB posts a forced bet bet of 1bb, and the BB posts another forced bet of 2bb, twice the SB’s.

After both blinds make their bets, each player is dealt two face-down cards. (You can see your own cards, of course ๐Ÿ˜‰)

Image taken from Batman The Animated Series, Episode: “Almost Got ‘Im”.

When it’s the next player’s turn, if they wish to stay in the game, they must “call” by matching the BB’s bet of 2bb.

When play returns the the SB, they need only post 1bb, since they posted the initial 1bb star started the game. After this, all players still in the game (who haven’t quit, or folded) have posted an equal amount of 2bb.

After all players have placed equal bets the betting round comes to a close, and the first three of five community cards, the flop, are dealt, face-up in the center of the table.

The round begins again with the player nearest the left of the dealer. This would be the SB if They haven’t folded. Each players has the following moves:

  • Check: Pass to the next player without making a bet.
  • Bet: Increase the current bet by posting additional money into the pot. If a player does this, all other players must either match this bet, fold, or re-raise. More on re-raise later.
  • Fold: Forfeit their place in the current game. Their hand is surrendered face-down. Note that they can return to play the next game.
  • Call: If a previous raise has been made, the player can call by matching the previous bet.
  • All-In: If a player does not have enough money to match the current bet, and they wish to stay in the game, they must go “all in”, betting all their remaining chips. Note that if the player does not win this game, they will lose all their money and be out of the game!

Once the flop round is complete, the fourth community card is dealt, called the turn. Betting begins again with the player left of the dealer. And the round ends once all players have posted equal amounts to the pot.

Note: It is possible to no players to make any bets during a betting round by simple calling each time. But that would make for a slow and boring game, IMO. Maybe that’s the rookie talkin’, haha! ๐Ÿ˜†

Once the turn round is complete, the fifth and final community card is dealt, called the river.

(Image owned by Activision.)

Couldn’t resist.

Ahem! Anyway, betting begins again with the player left of the dealer. And the round ends once all players have posted equal amounts to the pot.

After this round ends, the showdown begins!

During the showdown, all players still in the game reveal their hands, and the player with the best hand wins the pot. If you’re curious, you can learn more about the poker hands here.

Re-Raising

Back to the concept of re-raising. This is when a player raises the bet, then another player raises again after them. Depending on the type of poker being played, the rules for determining the minimum (and maximum) amounts you can raise will vary. Since I’m coding a game using the rules by No-Limit, the maximum you can bet is all your available chips. However, the minimum you can bet can be a little trick to figure out, because it’s simply not just “double what the big blinds bet”.

I’m still working on this part, but I think I’ve got it (if not close ๐Ÿ˜…). Of course, if you’re an expert on calculating the minimum amount for re-raising in No-Limit 1/2 poker, please comment and correct any of my assertions. That would be greatly appreciated. ๐Ÿ‘๐Ÿพ

When re-raising against previous raise, the minimum amount must be at least the amount raised by the previous player. Take this example below.

Pot size is 6bb.
Player 1 bets 4bb.
Player 2 raises to 10bb.
What would be the minimum raise for Player 3?

First, let’s have a look at the wording used. Player 2 raised to 10bb. However, Player 2 actually increased the bet amount by 10 – 4 = 6bb. So, the minimum Player 3 will need to raise by is 6bb.

This would be a total raise size of:
10 (previous player’s total raise to) + 6 (minimum raise by) = 16bb.

Back To The Game Dev

As I close this article, here’s a screen shot of the current progress. I’m currently working on the raise (and re-raise!) implementation, as well as a few other functions, such as folding and going all-out.

After that, I’ll move on to the showdown functions and determine the winner among the various conditions.

Thatโ€™s all for now. Iโ€™ll continue to keep you updated as I make progress.

Finally, you can sign up using the form below to receive updates to playable builds (or at least interactable builds) as I make noteworthy progress.

Talk to you later,

– C. out.

Creating Buttons Using The User Components In Phaser Editor v3

Hey guys.

As I’m working on the Poker game, I realize that I’ll need to add some buttons to it. While v3 of Phaser does not have a native button in it like v2 does. I decided to add one. And since I’m using Arian’s Phaser Editor v3, which recently got User Components added to it, why not use them to create the buttons? Let’s go for it!

You can check out a demo here.

What Is A User Component?

User Components allow you to add custom properties to existing game objects and further extend their functionality. For example, if you have characters in a game, you can add a “Character” component to add the usual stats to character instances that you add to the scene, such as health, speed, name, etc.

When you build a User Component, you add properties to it, using some primitive data types, such as string, number, or boolean. You can also use expressions that can be evaluated as they are entered into the editor. They will run within the scene on which the game object they are added to lives.

This article will not go in depth on User Components. For more information, see the help pages. You can also look at Arian’s recent article for additional inspiration.

Building A Button Component

First, let me say where I got inspiration from regarding designing the User Component itself. It was from v1 of the Phaser Editor. Since it supported Phaser v2, which has native support for buttons, v1 took advantage of that. I decided to use its UI as a starting point:

Phaser Editor v1's button UI.

As you can see, with Phaser Editor v1, you have several properties. Let’s go over them, and see how we would add them as properties for our User Component.

There are four frames that determine the button’s appearance based on its state. They are overFrame, outFrame, downFrame, and upFrame (which I will call normFrame, short for “normal frame”). Since these specify the frames of images that the button will use, they can be assigned strings in the User Components Editor.

Next, have a look at callback, and callbackContext. Since these two refer to functions or references to objects, they would be assigned the “Expression” type.

There are a few more properties we’ll add to our button component:

  • Disabled Frame: We’ll use this to display our button when it is disabled. While Phaser doesn’t natively support a disabled state, I decided to add that one myself. Like the other frames, this property will be a string.
  • Enabled: Since we can disabled the button, you can use this property to specify if the button will be enabled by default. This property can be assigned a boolean type in the User Components Editor. We’ll assign it a default value of true.

Note: When you are creating component properties, you can also assign them default properties.

  • Pressed Sound Key: Sometimes, you may want a button to produce a sound as additional feedback that a button was pressed. This can be a string.
  • Down Sound Key: You may instead want to define a sound that plays when the button is first down.

For this article, let’s name the button component…. waaaaait for it…….. ButtonComponent. ๐Ÿ˜‹

After setting up the properties, my component in the editor inspector looks like this:

Setting Up The Game Object

The type of Phaser game object that will use this component will be a Phaser.GameObjects.Image. The image is an interactive object that can respond to pointer events (mouse for desktops and laptops, and ya fangah for mobile/touch devices), such as over, out, up, and down states.

The gist of it works like this:

  • In the constructor of your button component, you’ll make the game object interactive using Phaser.GameObjects.GameObject.setInteractive. In the config object, you can optionally set the useHandCursor property to true. Note that this only applies to mouse cursors.
  • Add the down, over, and out input events to the game object. Also add their respective event handler methods to the ButtonComponent class. (There are a few caveats to setting these up; these will be addressed later in this article.)
  • To handle “pressed” events, you’d listen to the up property. This is where the callback and callback context properties come in. (There are a few caveats to setting these up; these will be addressed later in this article.)
  • In their respective event handlers, you’d set the down, over, or up image frames using the corresponding frame from the User Component properties defined earlier.

Note: The event handlers (as well as the other code you’d add) would go into the code sections within ButtonComponent the User Components compiler allows you to add code.

You can add enabled getter/setter to determine if the button is enabled or not. This is where the Disabled Frame property comes in. You set the frame of the image to this frame if the value of the disabled frame if the button is disabled.

  • You could try setting the initial enabled/disabled state using the Enabled component property, but there is a problem to this… as you may have guessed, we’ll get to that later. ๐Ÿ™‚

Caveats

Now, we finally get to those few things to be aware of when creating this button component. (:

First, when you press down on a button, it’s state changes to the Down Frame image. However if you hold the pointer down while moving over another button, you can also interact with that button an the same time. Normally, you should not be able to do this, as you should only be able to interact with one button at a time if it is pressed. Also, if the button is pressed, then the pointer is moved out of the button, then released, the button will not receive the up handler, not clearing the down status.

To handle this, I borrowed a concept from Microsoft known as capturing the mouse. The idea is when a button is pressed, that button “captures” the mouse, meaning, while the mouse button is down, that button accepts all mouse input, even if it moves over other buttons.

I took that concept and adapted it to this button component. When a button is first pressed, it will “capture” the pointer. A reference to that button can be saved in a static property; we’ll call it capturedButton.

Let’s See Some Damn Code Already! >:D

Only the down, over, and out event handlers were added to the game object. However, the up event handler was not added to the game object. Instead, the up handler is added to the scene that the game object is on. This is done, so that we can emulate the captured button component receiving events, even if the pointer has moved out of the component’s game object.

Also, this handler is only added inside the game object’s event handler – and remember to add it to the game object’s scene:

// "this" is the ButtonComponent instance

// add down, over, and out input event handlers to the game object
this.gameObject.on(Phaser.Input.Events.GAMEOBJECT_POINTER_DOWN,
  this.onInputDown, this);
this.gameObject.on(Phaser.Input.Events.GAMEOBJECT_POINTER_OVER,
  this.onInputOver, this);
this.gameObject.on(Phaser.Input.Events.GAMEOBJECT_POINTER_OUT,
  this.onInputOut, this);
...
onInputDown() {
  // capture the button component
  ButtonComponent.capturedButton = this;

  // update the down state flag
  this._isDown = false;

  // add a one-time up input handler to the scene
  this.gameObject.scene.input.once(Phaser.Input.Events.POINTER_UP,
    this.onScenePointerUp, this);

  this.updateButtonImage();
}
...
onScenePointerUp() {
  const captured = ButtonComponent.capturedButton;

  // clear the captured button component
  ButtonComponent.capturedButton = null;

  // if a button is captured, only handle up events from that button
  if (captured !== this) {
    return;
  }
  
  // clear the previously captured button's down state flag
  this._isDown = false;
  
  if (this._isOver) {
    this.updateButtonImage();
    
    // a button "press" only counts if the pointer was released while it
    // was also over that same button
    if (this.callback) {
      this.callback.call(this.context, this);
    }
  }
  
  // if an over-non-captured-button is set while the captured button is
  // being released, handle input for that button as if the pointer just moved
  // over it
  const nonCaptured = ButtonComponent.overNonCapturedButton;
  if (nonCaptured) {
    ButtonComponent.overNonCapturedButton = null;
    nonCaptured.onInputOver();
  }
}
...
onInputOver() {
  const captured = ButtonComponent.capturedButton;
  if (captured) {
    if (captured === this) {
      this._isOver = true;
      this.updateButtonImage();
    } else {

      ButtonComponent.overNonCapturedButton = this;
    }
  } else if (this.gameObject.scene.input.activePointer.primaryDown) {
    ButtonComponent.overNonCapturedButton = this;
    this.gameObject.scene.input.once(Phaser.Input.Events.POINTER_UP,
      this.onScenePointerUp, this);
  } else {
    this._isOver = true;
    this.updateButtonImage();
  }
}
...
onInputOut() {
  const captured = ButtonComponent.capturedButton;
  if (captured) {
    if (captured === this) {
      this._isOver = false;
      this.updateButtonImage();
    } else {
      // clear the non-captured button
      ButtonComponent.overNonCapturedButton = null;
    }
  } else {
    // this button 
    this._isOver = false;
    this.updateButtonImage();
  }
}

Ok, quite a bit going on here. Well, you asked for some damn code, and you got it. ๐Ÿคจ

First the down, over, and out event handlers are added to the game object.

In the down event handler, onInputDown, the current button component is “captured”, and an up input event handler is added to the scene, instead of the component. The comments should give you the gist of what’s going on. However, I do want to point out something:
ButtonComponent.overNonCapturedButton.

This static property is used when a button is captured, and the pointer moves over a different button. While we still want to ignore processing for that “over-non-captured” button, we want to set a reference to it.

Reason is, if the pointer is released (up input event) while over this button, after releasing the captured button, we want to immediately update the over state of the non-captured-button. You can see this happening in the last code block of the onScenePointerUp function.

Next, let’s have a look at enabling and disabling the button.

get enabled() {
  return (this._enabled);
}

set enabled(value) {
  this._enabled = value;
  this.gameObject.input.enabled = this._enabled;
}

Here, I assigned an ‘enabled’ getter and setter to the ButtonComponent class.

Normally, if the button is disabled, you disable the input property of the game object and update the game object display frame. to display the disabled image. But what if the button was captured while it was disabled? Or what if an over-non-captured button is set while the captured button is disabled?

And if you enable the button, the input property is also re-enabled, and the game object will display the “normal” (up) display frame. But what if the pointer is over the button at the moment it because enabled?

These questions can be answered in the updateAfterDisable, updateAfterEnabled, and updateCapturedStatesAfterOff functions.

Let’s make the following adjustments to the above code:

set enabled(value) {
  this._enabled = value;
  this.gameObject.input.enabled = this._enabled;
    
  if (this._enabled) {
    this.updateAfterEnabled();
  } else {
    this.updateAfterDisable();
  }
}

updateAfterDisable() {
  this._isDown = false;
  this._isOver = false;
  this.updateCapturedStatesAfterOff();
  this.updateButtonImage();
}

updateAfterEnabled() {
  const input = this.gameObject.scene.input;
  const gameObjects = input.hitTestPointer(input.activePointer);
  this._isOver = gameObjects.indexOf(this.gameObject) > -1;
  this.updateButtonImage();
}

updateCapturedStatesAfterOff(): void {
  if (ButtonComponent.capturedButton === this) {
    ButtonComponent.capturedButton = null;

    const nonCaptured = ButtonComponent.overNonCapturedButton;
    if (nonCaptured) {
      ButtonComponent.overNonCapturedButton = null;
      nonCaptured.onInputOver();
    }
  } else if (ButtonComponent.overNonCapturedButton === this) {
    ButtonComponent.overNonCapturedButton = null;
  }
}

One final piece of code I want to highlight is actually updating the gameObject’s display image to represent the button’s state.

Sometimes, you don’t want to have over, down, or disabled display. You only want a single image (the “normal” / up) frame. I designed the component so that you only have to specify the Normal Frame of a button component, and it’ll use that for all it’s image states.

Let’s have a look at how this is achieved:

updateButtonImage() {
  const buttonImage = this.getGameObject();
  if (!buttonImage) {
    return;
  }

  let frame;

  if (!this._enabled) {
    // button is disabled. try the disabled frame first, and if it's
    // not available, try the normal frame
    frame = this.resolveFrame([this.disabledFrame, this.normFrame]);
  } else if (this._isDown) {
    // button is down. keep moving
    if (this._isOver) {
      // button is over AND down. try the down frame first, then try over,
      // finally, normal
      frame = this.resolveFrame([this.downFrame, this.overFrame,
        this.normFrame]);
    } else {
      // this would happen if the button is captured, but the pointer has
      // moved out of the game object image
      frame = this.normFrame;
    }
  } else if (this._isOver) {
    // button is over but not down
    frame = this.resolveFrame([this.overFrame, this.normFrame]);
  } else {
    // last case
    frame = this.normFrame;
  }

  buttonImage.setFrame(frame);
}

doesFrameExist() {
  const buttonImage = this.getGameObject();
  return (frame in buttonImage.texture.frames);
}

resolveFrame(framesOrder) {
  // frames are resolved in the order they are specified in the array.
  // the first frame that exists in the texture will be used.
  let index = 0;
  for (; index < framesOrder.length - 1; index += 1) {
    const frame = framesOrder[index];
    if (this.doesFrameExist(frame)) {
      return (frame);
    }
  }

  return (framesOrder[index]);
}

Bonus: Checkboxes and Radio Buttons

You likely noticed from the demo, that there are also checkboxes and radio buttons.

To create these types of buttons, I first tried to extend the BaseButton class and create a CheckboxComponent component. However, if you create a component that extends another component, it doesn’t carry over all the component properties from the base component class. So, I ended up using composition, adding the ButtonComponent as a member object of the CheckBox component.

Inside the Checkbox constructor, you could instantiate your button component like:

this.buttonComponent = new ButtonComponent(this.gameObject);

A normal button has four states: normal, over, down, and disabled. But a checkbox has eight states, those four, times an “on” (check) and “off” (unchecked). My Checkbox component properties ended up looking like this:

Whoa! Dem’s a lotta prop-tehs! ๐Ÿค 

I won’t go into details about the check box, but the ButtonComponent does handle most of the work. Many of the functions just get passed from the Checkbox component to the Button component.

A key difference is toggling the checkbox’s “on” state each time it’s pressed…

this.isOn = !this.isOn;

Updating the game object’s image based on the state is handled a little a differently. Something like this:

...
const component = this.buttonComponent;
if (this._isOn) {
  component.normFrame = this.normOnFrame;
  component.overFrame = this.overOnFrame;
  component.downFrame = this.downOnFrame;
  component.disabledFrame = this.disabledOnFrame;
} else {
  component.normFrame = this.normOffFrame;
  component.overFrame = this.overOffFrame;
  component.downFrame = this.downOffFrame;
  component.disabledFrame = this.disabledOffFrame;
}
...

We’re basically just setting up the button component’s properties depending on if the checkbox is on or off.

Setting Up A Radio Button

As for a radio button, once press it on, you can’t press it off, unless you press another radio button in the same “group”. That will turn that radio button on while turning this one off.

Implementing a group was a bit tricky, because I didn’t want to have to actually code anything additional outside of the inner workings of the Checkbox component every time I wanted to create checkbox objects. So, on the component properties, the “Group Name” (string) is a data property that gets added as a a data property of the Scene that the checkbox game object image is added to.

And of course, don’t forget to check the “Is Radio Button” box in the Checkbox component properties, if you want your checkbox to behave like a radio button. ๐Ÿ˜‰

In the constructor, the Checkbox component will attempt to fetch an object (that would include an array of CheckboxComponent objects. If the array doesn’t exist, it creates it, and assigns the group to the scene’s data property. Then it assigns itself to the group.

Note: This “group” is not necessarily Phaser’s Group object. You might prefer to make a separate class for this to keep code organized, especially if your group will provide additional behind-the-scenes functionality.

Setting that up might look something like this:

// this.groupName is the "Group Name" component property

if (this.groupName) {
  const existingGroup = this.gameObject.scene.data.get(this.groupName);
  
  if (existingGroup) {
    this._group = existingGroup;
  } else {
    this._group = [];
    this.gameObject.scene.data.set(this.groupName, this._group);
  }

  this._group.push(this);
}

Note: If you use this method, if you use multiple groups, make sure each group name is unique.

Handling Press Actions For Checkboxes And Radio Buttons

Since there is an internal ButtonComponent handling all the input events, we need to have the “pressed” event forwarded onto the Checkbox component so it can properly respond, which includes invoking the callback provided in the Checkbox component properties.

You can set that up using something like:

this.buttonComponent.callback = this.callback;
this.buttonComponent.context = this;
...
callback() {
  // when the button is pressed this function is called
  if (this.isRadioButton) {
    this.handleRadioPressed();
  } else {
    this.handleCheckPressed();
  }
}

handleCheckPressed() {
  // toggle the on state and be done with it
  this.isOn = !this.isOn;
  this.dispatchCallback();
}

handleRadioPressed() {
  if (this.isOn) {
    // if the radio button is already on, skip everything else
    return;
  }

  this.isOn = true;

  // turn off all other buttons in the group EXCEPT this one
  this._group.forEach((checkbox) => {
    if (checkbox !== this) {
      checkbox.isOn = false;
    }
  });

  this.dispatchCallback();
}

dispatchCallback() {
  if (this.chkCallback) {
    this.chkCallback.call(this.context, this);
  }
}

Wrapping Up

To add the component to a game object image, turning it into a button, drop an image onto your scene, add the ButtonComponent to it, and set up the properties. Be sure your callback and context are properly referenced in your code.

There is another aspect of buttons: visibility, and playing sounds when the button is pressed or is down. Making a button visible is handled similarly to enabling and disabling a button. I’ll leave that to you as an exercise. ๐Ÿ™‚

Again, if you want to have a look at the buttons demo, it’s here.

That’s pretty much it for building a button component in Phaser Editor using the User Component! At least, this is how I decided to design one, as I’m sure there are other ways to do it.

Finally, sign up using the form below to receive updates to playable builds (of the Poker game I’m currently working on). You’ll get e-mails to builds you can interact with to some degree as I make noteworthy progress.

Talk to you later,

– C. out.

Creating A Multiplayer Poker Game For HTML5 Using Phaser, Part 2

Continuing the series of building a multiplayer poker game, I’ve decided to make a big turn in how the game will be built.

I’ve decided to give Arian’s latest version, Phaser Editor v3, a try.

Why? All my previous projects were deep in v1 or v2. However, I haven’t gotten very far into this Poker project, so it was easy to switch it from v2 to v3 sooner rather than later. Plus, after comparing its functionality with that of previous versions, it made sense to at least give it a try. And so far, it’s working out well!

Now, the biggest attraction, at least for me, was the fact that prefabs were back, which we haven’t seen since v1. Using factories in v2, while they took a bit of work to get them the way that I wanted, allowed me to learn a lot about how custom factories work in Phaser.

At the time of this article, v3 doesn’t yet supply an animations editor, or texture atlas editor. But that’s ok!

For animations, you can use a tool called Animator. You can learn more about animations in v3 here. I haven’t needed to use animations for my Poker game (at least not so far), so I can’t vouch for this tool. However, it is an option.

For texture atlases, you can use Texture Packer, which I’ve enjoyed using quite a bit over the years. To learn more about atlas editor usage in v3, as well as other options, check here.

Since this version now works in your browser (which also significantly reduces its download size), you start it up using your command prompt. So I made a simple batch file which starts the editor with the -desktop option since I work with a local server. My projects workspace is also in a location different than the default workspace, so I use the -ws option. For a full list of options, see this page.

As I’m learning the rules for Poker, the interactive tutorial on this page has been very helpful. Also, playing this game has also been useful. (No, I haven’t been screwing around, getting sucked into playing! Nope. Not me.)

I got a good chuckle from this scene from The Avengers.

That’s all for now. I’ll continue to keep you updated as I make progress.

Finally, sign up using the form below to receive updates to playable builds (or at least interactable builds) as I make noteworthy progress.

Talk to you later,

– C. out.

Progress Update: Converting The Flash Game Blasteroids To HTML5 Using Phaser, Part 5

Hey,

With every new piece of functionality to HTML5, I get a little more excited really excited about the progressโ€ฆ especially when the more playable updates (like this one), come along! ๐Ÿ˜„

In this part 5 of the series of converting the Flash game, Blasteroids, to HTML5 using Phaser and Phaser Editor, you can also collide with asteroids. You can now also fire your missiles to blow them up!

Check out this short demo video of the current progress of the game.

By the way, if you’d like to gain access to these work-in-progress updates, if you’d like to play around with these updates instead of just watch them, you can sign up on the mailing list below. You’ll also be notified every time new content is posted to the site.

As you’re probably aware by now, Adobe is discontinuing Flash by end of this year. If you have Flash games, they will no longer work afterwards, as browsers, such as Google Chrome, will completely block Flash content.

So, if you want to preserve your Flash, you’ll have to re-build it in another platform, and if it’s to remain as a web-based game (meaning you’re NOT converting it from web to mobile), then HTML5 (Canvas/WebGL) is likely your best bet.

I previously announced that I was taking on the challenge to convert a Flash game I made for a previous client to HTML5. This will be presented in a series of articles, including this one.

The current list of articles is here:

  • Part 1 – Setting up the player
  • Part 2 – Displaying objects, keyboard input, and object wrapping collisions
  • Part 3 – Missiles, animations, and HUD
  • Part 4 – Adding text, health, and icons to HUD (this article)
  • Part 5 – Collision With Missiles, Asteroids, and Player Ship (this article)

Let’s get started. The updates covered in this article are:

  1. Adding missile explosions
  2. Adding collision checking

Adding Explosion Animations

We’ll be adding the explosion for the player missile. In the demo video above, you’ll also see a larger explosion when an asteroid is destroyed. We’ll only go over adding the missile explosion, since adding both use the same steps.

Every missile that is fired will eventually be removed from the game by one of two methods. One: it collides with another game object; or two: it travels its full distance and goes away. Either will result in the missile exploding.

Setting Up The Explosion Animation

First, we export all the frames in this animation as individual PNG bitmaps, then recreate them as an animation in Phaser Editor. Part 3 of this series went over how to do that, if you’d like to see how that’s done.

In the original ActionScript 3 code, when explosion game objects are created, they are done so using as class constructors defined in a variable. To accomplish this in Phaser, we return to our EntityFactory class. In Phaser Editor, we can create a new Scene, remove the Scene Key, change the Super Class to Engine.Entities.EntityFactory, and change the name of the create method to _create.

When you want create an instance of this missile explosion, you’d use the Entity constructor and pass it the name of the class name of the explosion scene. This article assumes it’s named “MissileExplosionScene”.

To create the missile explosion animation, you could start with something like this:

let missileExplosion = new Entity(missile.scene, missile.x, missile.y, MissileExplosionScene);

Let’s assume you have created the explosion animation from earlier, with an animation key named, "missile-explosion". Phaser Editor will automatically create the code for you, looking something like this:

class MissileExplosionScene extends Engine.Entities.EntityFactory {
    _create() {
        var missileExplosionSprite = this.add.sprite(0.0, 0.0, "texture", "MissileExplosionTexture");
        missileExplosionSprite.anims.play("missile-explosion");
    }

    /* START-USER-CODE */
  ...
}

Directly under the START-USER-CODE comment, the following code is added:

constructor(scene, x, y) {
  super(scene, x, y);
  this._create();
}
Cleaning Up The Missiles And Explosions

As the player fires missiles and explosions, we want to remove them when we’re done with them. Leave them hanging around (even if they’re no longer visible on the scene), and they’ll continue to use up memory resources.

The missile is simple to remove. When it collides with something (which we’ll cover later in this article), or if it travels its full distance, we want to remove it from the scene. Then, we create the explosion animation in the same location the missile was, when we removed it.

Removing a missile is simple. You can use Phaser’s destroy method.

Now that the missile is removed, the explosion animation can be created and added to the scene. The animation should be removed once it’s finished playing. We can tell when this happens by using attaching an event listener to the animation. The animation is attached to the explosion sprite, but first, we need to gain access to the sprite object itself.

When the Entity constructor is called, with its displayFactoryClass parameter as MissileExplosionScene, it will attach its display object to this Entity. We can get the sprite object with code like this:

let sprite = missileExplosion.getAt(0);
let anims = sprite.anims;

Note: When the missileExplosion object is created, recall it calls the EntityFactory.DisplayMixin to move all the display objects from the scene onto this Entity display object container. Because there was only one sprite added to the scene, it will be placed at index 0. Hence, the getAt(0) function call above to retrieve that sprite.

Once we have the anims reference we can listen for the completion of the animation with this code:

anims.on(Phaser.Animations.Events.SPRITE_ANIMATION_COMPLETE, onSpriteAnimationComplete, this);

When the explosion animation is complete, Phaser will automatically call the onSpriteAnimationComplete method. In that function, we can finally remove the missile explosion using the destroy method.

onSpriteAnimationComplete() {
  missileExplosion.destroy();
}

That’s it for the explosion animation. Creating the explosion for the asteroid is done the same way, except a different explosion animation is used.

Adding Collision Checking

When we first started creating game objects, we created the Matter physics bodies on them for collision detection. Now, we’re going to actually perform the collision detections.

Since the Phaser’s Matter physics system is being used, and all the bodies are sensors, we can use the Phaser.Physics.Matter.MatterPhysics.overlap method to determine if:

  1. A missile collides with an asteroid; or
  2. An asteroid collides with the player

The matter physics body for each game object was created using this code:

var rect = rectContact.getBounds();
this.scene.matter.add.rectangle(
  rectangle.centerX,
  rectangle.centerY,
  rectangle.width,
  rectangle.height,
  {
    isSensor: true
  });

In this code the rectangle method returns that physics body. We can to assign that to a property of the game object, for example:

missileExplosion.body = this.scene.matter.add.rectangle(...);

Let’s assume we have a similar body assigned to an asteroid game object, with an instance game object named asteroid. To check for collision, check something like this:

missileExplosion.scene.matter.overlay(missileExplosion.body, asteroid.body);

The overlap method returns true if the two bodies overlap with each other. From there, you can take the necessary action (in our case, damaging/destroying the asteroid, and exploding the missile).

Note: Since we’re not using the Matter physics system in its traditional matter (Phaser automatically moves the bodies and sprites around in a rigid-body-simulated world, we need to update the positions of the bodies ourselves. Each time a sprite of a game object’s moves, we must move the body attached to it ourselves. Assuming both your sprite and body have origin points in the center, you can simply update the position of the body to match that of the sprite.

That’s it for this article! Now we’re starting to see more playable aspects of this conversion process come together, and there is much more to come! I hope you continue to stay tuned as I make more progress. ๐Ÿ™‚

Thanks, and talk to you later.

– C. out.

Progress Update: Converting The Flash Game Blasteroids To HTML5 Using Phaser, Part 4

Hey,

Part 4 of the Flash-to-HTML5 game series is here! Added score, level, and lives text to HUD, health bars, and power up icons.

As you’re probably aware by now, Adobe is discontinuing Flash by end of this year. If you have Flash games, they will no longer work afterwards, as browsers, such as Google Chrome, will completely block Flash content.

So, if you want to preserve your Flash, you’ll have to re-build it in another platform, and if it’s to remain as a web-based game (meaning you’re NOT converting it from web to mobile), then HTML5 (Canvas/WebGL) is likely your best bet.

I previously announced that I was taking on the challenge to convert a Flash game I made for a previous client to HTML5. This will be presented in a series of articles, including this one.

The current list of articles is here:

  • Part 1 – Setting up the player
  • Part 2 – Displaying objects, keyboard input, and object wrapping collisions
  • Part 3 – Missiles, animations, and HUD
  • Part 4 – Adding text, health, and icons to HUD (this article)

Let’s get started! The updates covered in this article are:

  1. Adding text to the HUD
  2. Adding power-up icons to the HUD
  3. Adding player health bar to the HUD

Here’s a quick video of what’s done so far. This demonstrates functionality for text, health bars, and icons:

Adding Text To The HUD

First, let’s add text that shows the player’s score, level and score.

Adobe Animate uses fonts installed on the system, and can embed those fonts directly into the Flash SWF file when the project is compiled. This allows players to view the fonts, even if they don’t have the fonts installed on their system.

However, you can’t embed a font into an HTML5 game. While Phaser does allow you to use fonts that are available to the browser, you’ll either need to use CSS or a third-party font loading library, because Phaser does not handle this for you.

An alternative is to go “old-school” and put all the characters of the font into a sprite-sheet and using that to draw text onto the scene. This is the route we’ll choose, because this is supported by Phaser, it renders faster, and we don’t need to mess around with CSS, or come up with silly workarounds just to make sure our font is pre-loaded. ๐Ÿ™„

Phaser uses a BitmapText object to support this. BitmapText objects use two resources: a texture that has all the characters in it; and a data file (in XML or JSON) that describes how to find all the fonts in the texture.

There are a few third-party tools that you can use to create your resources:

Note: While Littera runs in the browser, it is a Flash app. Depending on which when you are reading this article, Flash may have already been disabled/no longer available in your browser. As far as I know, there is no non-Flash equivalent of this app. So, because of this, and because I’m on Windows 10, I’ll be using Bitmap Font Generator.

The only characters Blasteroids needs are the numbers 0-9, so in your font tool, you only need those.

This is Bitmap Font Generator, with only the numbers selected.

When creating your texture and data file, you’ll get two files: a texture image and data file. For the data file, select XML format if possible.

Note: You may need to rename the extension of your data file to .XML before adding to your Phaser project. For example, Bitmap Font Generator uses a .FNT extension.

After you have your two files, you can go to Phaser Editor, and press Add Object, then select BitmapText. Note that when you position and size your text, it won’t line up at the exact same location as it did in Adobe Animate, so you’ll have to match it manually as best you can. You can add this font for all three text objects (lives, level, and score).

Notice in the image above that the text is yellow. While Littera allows you to color the font before exporting the texture, Bitmap Font Generator does not. You’ll end up with a white font by default. You’ll need to re-color the font in a bitmap editor before importing into Phaser Editor.

Adding Health Bars To The HUD

Next, we’ll add the player’s health bars.

It’s composed of 14 bar units, so we’ll need to export the individual bar graphic.

Also, if you recall the first video in this article, you’ll see how the health goes up and down. This is done using an image mask. A mask can be used to hide part or all of an image. The mask only shows the parts of the image where both, the mask and the image intersect.

When the player’s health is full, we don’t want to show mask. This makes it so the mask wont intersect the health bars, thus showing all of them. As the player’s health decreases, we show more of the mask. The lower the player’s health, the bigger the the size of the mask, this intersecting with more health bars, ultimately, hiding more of them.

We can create a mask that is rectangular in shape and will overlap all 14 health bars.

This white box is not the actual mask, but illustrate how the mask would be placed over the health bars.

We can adjust the size of this mask by changing its scaleX property. At full health, scaleX would be 1.0 (showing 100% of the health bars). Say the player has only 25% health. The scaleX of the mask would be set to 0.25.

To create the actual mask, we need two objects. First, we can create a rectangle that assumes the size and position of the white box in Phaser using a Graphics object. Second, in order to make this rectangle into a mask, we can create a GeometryMask object, then attach the Graphics rectangle to it.

This code snipped can accomplish that:

var rectangle = new Phaser.GameObjects.Graphics(gameScene);
rectangle.x = whiteMaskBox.x;
rectangle.y = whiteMaskBox.y;
rectangle.fillRect(0, 0, whiteMaskBox.width, whiteMaskBox.height);
var mask = new Phaser.Display.Masks.GeometryMask(gameScene, rectangle);

To modify the size of the mask (which in turns, affects how many health bars are visible), something like this can be used:

var ratio = player.health / player.maxHealth;
mask.geometryMask.scaleX = ratio;

The geometryMask property of the mask refers to the rectangle Graphics object created and assigned to it.

Changing Health Bar Colors

One more functionality for health bars we need to convert from Flash to HTML5 is changing the health bar colors.

The starting color for the health bars is blue, and the ending color is red. In Adobe Animate, the color change is done by creating a Color Filter and adjusting the hue starting from (0, blue) to (150, red).

My first idea was to use the tint property of a Phaser Image and apply that as needed. However, setting the tint didn’t re-create the same blue-to-red appearance as demonstrated in the above video.

And since there’s currently no equivalent “ColorMatrixFilter” in Phaser 3, we’ll have to get creative again. ๐Ÿ˜

In Adobe Animate, we can create a timeline animation where the health bars change from blue to red using our desired color filter settings. I decided to make the transition from blue to red a duration of 16 frames, which produced a decent resolution.

The result of exporting the 16-frame animation.

You can then change the texture of each health bar unit using the Phaser.GameObjects.Image.setTexture method.

Adding The Weapons Retainer Icon To The HUD

The final functionality is adding the icons to the HUD.

For the dual-icons, these are very simple, consisting of exporting the icon images, then creating images from them, so I won’t go into detail on those.

However, there is one icon that animates as it appears and disappears, the “weapons retainer icon”.

(Normally, when your ship is destroyed in Blasteroids, you’ll lose all your power-up items – as with most action/shooter games from back in the day. However, if you have this weapons retainer, it will allow you to keep your other power-up items once per usage.)

This icon uses color filters, like the health bars, so we’ll need to export it as individual frames as well. However, this time, it was originally done in Flash using code via a third-party library called the Greensock Animation Platform (GSAP).

When the icon first appears, it starts at twice its size, and is completely white, then quickly scales down to its original size, and the white fades away, revealing the original icon appearance.

Note: While Phaser has its own built-in tweening support, I decided to switch from Greensock’s AS3 version of their tweening library (which has already been discontinued) to their JS version. For the most part, you can copy Greensock’s tweening code over from AS3 to JS with little modifications for basic tweening operations.

Consider the following code for making the weapons retainer icon appear.

var timeline:TimelineLite = new TimelineLite(o_tlVars);

var ctVars:ColorTransformVars = new ColorTransformVars();
ctVars.brightness = 2;

var vars = new TweenLiteVars();
vars.colorTransform = ctVars;
vars.scaleX = 2.0;
vars.scaleY = 2.0;
timeline.append(TweenLite.from(icon, 0.25, vars));
timeline.play();

Note: The classes of TimelineLite, ColorTransformVars TweenLite, and TweenLiteVars all come from Greensock’s library.

A couple things happening here. First, the icon starts completely white (brightness set to 2), and twice its original size (scales set to 2.0).

To make the icon completely white, a color transformation is applied, with the brightness gradually decreasing. As mentioned before, there are no color transformation effects in Phaser, but this tween animation is simple enough to recreate as a sprite animation in Adobe Animate.

From the timeline code above, the tween animation has a duration of 0.25 seconds (Greensock uses seconds for its time durations, instead of milliseconds). We need to figure out how many frames 0.25 seconds so we can create a timeline animation on the stage with that many frames. We can use the following formula:

This gives us 7.5 frames. However, we can only use whole numbers for frames. So, let’s go ahead and round that up to eight frames (or you could use seven if you want ๐Ÿ™‚ ).

When re-creating the animation in Phaser Editor, specifying the duration, you can use this equation to convert frames to milliseconds. The short of it is:

milliseconds = frames / 30 * 1000

Full details of the equation are here.

That’s it for this article! With every update, I’m really excited about the progress made and what I’m learning about Phaser, the editor, and the conversion process in general. As I continue to make more noteworthy progress, I’ll keep you updated!

Thanks, and talk to you later.

– C. out.

Progress Update: Converting The Flash Game Blasteroids To HTML5 Using Phaser, Part 3

Hey,

Welcome to part 3 of this series of converting the Blasteroids Flash game to HTML5!

As you’re probably aware by now, Adobe is discontinuing Flash by end of this year. If you have Flash games, they will no longer work afterwards, as browsers, such as Google Chrome, will completely block Flash content.

But, Flash is not the only Adobe technology being discontinued. Announced on May 30, of 2019, Adobe is also discontinuing Adobe AIR by end 2020. If you’re interested, you can read more details here.

So, if you want to preserve your Flash, you’ll have to re-build it in another platform, and if it’s to remain as a web-based game (meaning you’re NOT converting it from web to mobile), then HTML5 (Canvas/WebGL) is likely your best bet.

I previously announced that I was challenging myself by creating this side project to convert a previous Flash game I made for a previous client to HTML5.

The current list of articles is here:

The current list of articles is here:

  • Part 1 – Setting up the player
  • Part 2 – Displaying objects, keyboard input, and object wrapping collisions
  • Part 3 – Missiles and HUD (this article)

With further ado, let’s dive right in. The progress covered in this article are:

  1. Adding a player missile
  2. Adding HUD details

Here’s a quick video of what’s done so far:

1. Adding A Player Missile

Well, you won’t be able to survive for long if you can’t even fire weapons to defend yourself, right? (: So let’s add a missile projectile to the game.

Blasteroids contains over 20 missiles, but at this time, we’re only adding this one (think of it as an MVP). The remaining missiles are added in similar fashion.

A little background on how the player’s weapons system is designed.

When I was first building Blasteroids, I got inspiration from Gunstar Heroes, a run and gun game on the Sega Genesis. That game featured a “weapons combination” mechanic. There were four weapons, and you could hold any combination of one or two of them at once. If you had two, they would combine to form a stronger weapon.

You can see a few seconds of several weapon combos being demoed here.

Well, in Blasteroids, I did something similar. I took a series of weapons, and gave them various 2-weapon combinations, hence having so many missile objects.

With that, let’s convert the player’s default missile.

Setting Up The Missile Animation

In the Flash version, most missiles were made of a two-keyframe animation.

First thing’s first. You need to extract both vector graphics, the red and the yellow lasers, and save them as PNGs. I eventually added them to the game’s texture atlas, which you can easily set up in Phaser Editor.

Next, you can create a Phaser animation using those two graphics inside the Editor.

Remember: I want the HTML5 version of Blasteroids to maintain the look and feel of its original Flash counterpart as much as possible. This includes animation speeds and how long each of animation frame is shown.

In a previous article, I added code to make the game appear to run at 30 FPS (frames per second), as the browser runs at 60 FPS, and you can’t change that. So at 60, the game runs too fast.

With that in mind, let’s have another look at the original animation frames in Flash. From the image below, that animation is composed of six frames: the first three showing the red laser graphic, and the remaining three showing the yellow laser graphic:

Each frame in that animation is shown for one frame of execution. And each of the two laser images lasts for three frames. But Phaser doesn’t measure duration in frames; it uses milliseconds. So we need a way to convert 3 frames (running at 30 FPS) to milliseconds. This formula is used:

Frames-To-Milliseconds Equation

Both “frames” units cancel each other out, as well as both “second” units. The only unit left is ms (milliseconds), which is what we want.

Now we can do the math:
3 / 30 x 1000 => 3000 / 30 => 100

So, each animation frame in Phaser Editor will be 100 ms in duration.

A duration of 100 ms is set for both, red and yellow graphic animation frames.
Setting Up The Missile Object

Now that the missile animation is ready, we can setup the game object that will be displayed when the missile is fired in-game.

First, create a new Scene in the Editor, add a Sprite. Make sure to add a Sprite, not an Image, because Phaser sprites support animation, while images do not. Be sure it is positioned at (0, 0) on the scene, and assign it the red laser graphic.

Next, select the image, go to the Animations section, and assign it the missile animation you just created. Just like how the player ship object was set up, assign the Super Class as EntityFactory.

We’ll be revisiting the EntityFactory class, because we need to replace the add factory for Phaser Sprite objects similar to what we did with Image objects in the last article.

We’ll need to update the EntityFactor constructor also:

EntityFactor constructor
constructor(scene, x, y) {
  super(scene, x, y);
  this._add = this.add;
  this.add = {
    image: this.make_image,
    sprite: this._make_sprite
  };

  this.add.image = this.add.image.bind(this);
  this.add.sprite = this.add.sprite.bind(this);  
}

The highlighted lines are the new line added. As you can see, the first one references a new function make_sprite, which is written below. The second one maps this.add to the base Phaser Container object.

EntityFactory.make_sprite
make_sprite(x, y, texture, frame) {
  var spr = new Phaser.GameObjects.Sprite(this.scene, x, y, texture, frame);
  this.scene.sys.updateList.add(spr);
  this._add(spr);
  return(spr);
}

Note the highlighted line. Unlike make_image, we want to add the sprite to Phaser’s “update list”. Objects that are added to this list will be updated every frame of Phaser execution. The sprite uses animation, and animations need to be updated every frame, so they can, well, animate ๐Ÿ™‚

Finally, to create an instance of the missile (when the player “fires” a missile), you’d use the Entity constructor, passing the class of the missile factory scene display you created earlier.

Note: You may have noticed there is no green collision box like there was with the player scene. Since this missile is a rectangle itself, you can simply add a physics body with the same bounds as the missile graphic itself. See EntityFactory.make_rectContact for this. Of course, you can still add a green collision box if you want. (:

2. Adding HUD Details

The HUD as it appears in Adobe Animate.

We’ll begin creating the HUD (Heads Up Display) in this article. But for now, we’re not going to add any functionality to it. We’ll just be adding all the static objects (those that don’t change), and merging them to form the back panel bitmap of the HUD.

Elements like the text, power up icons, and health bars will be created in a later article.

In this image, I’ve temporarily hidden all the non-static objects, then converted the image to a bitmap to be imported into Phaser Editor.

The HUD is another scene, but it is not a game object to be setup like the player or missile. Because the HUD will be shown on screen along with the rest of the game, you can see the HUD is placed at the bottom of the scene view (The original Flash Blasteroids game used a screen size of 820 x 460, so we also use that in the HTML5 version.) The HUD objects placed at the bottom, because you can’t set the position of a scene; it’s always offset at (0, 0) (at least, I don’t know of any way to reposition a scene, if someone knows how, please let me know! ๐Ÿ™ƒ)

I want to keep the HUD code separate from the other game logic, so the HUD will be an additional scene added to the game scene at run-time.

At the same time, I prefer not to add game logic code to the JavaScript scene files created by Phaser Editor. So, I’ll be using object composition, by creating a GameHud class, and from within, creating the GameHudScene.

GameHud constructor
class GameHud {
  constructor(gameScene) {
    this.scene = gameScene.scene.add("gameHud", GameHudScene, true);
  }
}

This code creates the game HUD scene as a new Scene object and adds it to Phaser’s scene manager.

From your main game scene, you can create an instance of the GameHud class with some code that looks like this:

Game constructor
class Game {
  constructor(scene) {
    this.gameHud = new GameHud(this);
  }
}

We’re passing the game scene as the argument for the GameHud instance, so that it can in turn create the GameHudScene, and add it to the scene manager.

That’s it for this article. Next, we’ll add more to the game HUD, including text that shows the lives, current level, and score, the health bars, and game icons. Stick around for more!

– C. out.

Progress Update: Converting The Flash Game Blasteroids To HTML5 Using Phaser, Part 2

Hey,

Time for a progress update!

As you’re probably aware by now, Adobe is discontinuing its Flash player web browser plug-in by the end of this year. If you have Flash games, they will no longer work afterwards, as browsers, such as Google Chrome, will completely block Flash content.

Also, Flash is not the only Adobe technology being discontinued. Announced on May 30, of 2019, Adobe is also discontinuing Adobe AIR by end 2020. I found this a bit surprising, because AIR – when used along with FlashDevelop – made it easy to take a single code base and target both major mobile giants, Android and iOS, without the aid of their native development tools (Android Studio for Android, and Xcode + Mac OS for iOS). If you’re interested, you can read more details here.

So, if you want to preserve your Flash games, you’ll have to re-build them on another platform, and if they’re to remain as a web-based game (meaning you’re NOT converting from web to mobile), then HTML5 (Canvas/WebGL) is likely your best bet.

I previously announced that I was challenging myself to convert a previous Flash game I made for a previous client to HTML5.

The current list of articles is here:

After many hours of studying Phaser 3, working with Phaser Editor, reconfiguring graphical assets, and re-writing ActionScript 3 code as JavaScript, there is finally a moving spaceship on the canvas!

Check this out

It’s not much, but there’s a lot that went into just this, coming from a conversion standpoint. ๐Ÿ™‚

Converting Code

First thing’s first: I wanted to get minimal functionality, while upholding this rule: The HTML5 version of Blasteroids must maintain the mechanics and look & feel of its Flash counterpart as closely as possible.

Sure, I could just make a brand new Blasteroids game from scratch, throwing out the former AS3 code base, and only copying the assets (graphics and audio), but the mechanics and look & feel would also be different.

So, I needed to convert a large portion of the AS3 codebase over, even for this simple functionality. For the most part, the game-logic portions translate from AS3 to JS relatively easy, albeit laborious. However, I focused on the following five areas:

  1. Setting up the scene/stage in Phaser Editor
  2. Displaying game objects
  3. Handling keyboard input
  4. Collision detection
  5. Game execution speed

So let’s have a look at these one at a time.

1. Setting Up The Scene/Stage In Phaser Editor

First, let’s have a look at the primary game view in the Flash editor:

And the Phaser “equivalent” looks like this:

The square and rectangular nodes here are green instead of blue, but it’s pretty much the same. Also, the HUD at the bottom is missing all the details. This is intentional; I’m only making a “MVP” at this point.

I’ll start off by re-creating most of this in Phaser Editor.

You can see a HUD (the blue bar at the bottom), two squares, one in the middle, another in the upper-left, and a space background that occupies most of the scene.

The functionality and visual elements of the HUD are not needed for this demo, so for now, I just made a blue rectangle at the bottom. The square in the middle acts as a placeholder for the player’s start location. The square in the upper-left acts as a container for all the in-game objects (player ships, missiles, asteroids, items, explosions and enemy ships).

Note: Rather than hard-code the locations of things like the in-game view and player start location, I’d rather just have those set visually, then write code that takes the locations and/or size of the rectangles, then finally removes the rectangles. The rectangles themselves only serve as temporary visual aides for the editors.

Player’s Start Location

The player’s ship will always appear in this location. All that is needed is to store the location of this node, then remove it.

Something like this works nicely:

initPlayerStartPoint
function initPlayerStartPoint() {
  var node = this.scene.children.getByName("playerStartPh");
  var point = new Phaser.Geom.Point(node.x, node.y);
  node.destroy();
  return(point);
}
Game Objects Container

This container node serves as the z-order index of where to place the in-game object container. The in-game objects are things like the player ship, asteroids, missiles, and power-up items. Every type a new object appears on the screen, it will be placed inside this container.

This node is not the container itself, but is placed at within order on the Phaser scene, to make sure all in-game objects are aligned where they are supposed to. For example, in-game objects should not appear in front of the HUD, but behind it.

The code for creating the container looks something like this:

initEntitiesContainer
initEntitiesContainer() {
  var node = this.scene.children.getByName("entitiesContainerNode");
  var container = new Phaser.GameObjects.Container(this.scene, node.x, node.y);
  this.scene.sys.displayList.addAt(container, this.scene.sys.displayList.getIndex(node));
  node.destroy();
  return(container);
}

It’s worth noting that we want our container to have the same positing in the z-order as its placeholder. The highlighted line does this.

In-Game Area

This is another node where the location is saved like the player start location. In addition, we want the size of this area also.

If you’re familiar with classic Asteroids mechanics, the player’s, the asteroids, and the ship missiles wrap to the opposite side side of screen when they go off screen, while others are removed from the game when they go off screen. This area defines the bounds of the “game world”, and when an object goes outside that area, one of the two aforementioned actions will occur.

The game area can be set from the placeholder node with this:

initArea
function initArea() {
  var node = this.scene.children.getByName("viewAreaPh");
  var rect = node.getBounds();
  node.destroy();
  return(rect);
}

Note: When defining these nodes in Phaser Editor, you’ll need to obtain them in code somehow. An object will need to either be assigned a name or specified as a property of the scene, or assigning it “game object” name. As you can see in the code, I decided to give the game objects a name, then use the getByName method to get the node by its name.

2. Displaying Game Objects

Once you have a basic game area setup, you can begin adding game objects. We’ll be adding only the player game object for now.

From part 1 of this series, to set up the player’s ship, I used a scene as a Phaser game container object, and created a factory so that container could be created within code.

Since I also want to preserve the original class structure from the AS3 codebase, I needed a way to assign the visual ship container to the game object class (called Entity). In Flash, using its IDE, you can export it as an ActionScript class so you could create the display object from code.

You could then use new Player() to create a display object.

In the player ship scene, the Super Class is EntityFactory. It was Phaser.GameObjects.Container in the previous article, but in your code, EntityFactory will extend the Container. We’ll need to add some custom code, and creating EntityFactory allows us to do that.

The challenge is with how images are created in a Scene vs in a Container. In a scene, you have something like this:
this.add.image(x, y, texture, frame);

But, this won’t work in a container, because it doesn’t have the add (Phaser.GameObjects.GameObjectFactory) property like a scene does. Instead, it has an add method which accepts a GameObject to add to it.

So, in order to make use of the add (from the factory) in a container, while continuing to use Phaser Editor to use scenes as makeshift containers, a little creativity needed to be worked in order to use scenes in the editor as game object containers. ๐Ÿ˜

In the EntityFactory constructor, the code could look like:

EntityFactory constructor
constructor(scene, x, y) {
  super(scene, x, y);
  this._add = this.add;
  this.add = {
    image: this.make_image,
  };

  this.add.image = this.add.image.bind(this);
}
EntityFactory.make_image
make_image(x, y, texture, frame) {
  var img = new Phaser.GameObjects.Image(this.scene, x, y, texture, frame);
  this._add(img);
  return(img);
}

What’s going on here? First, we want to replace the container’s add method with our own custom property that contains an image property which points to a make_image method.

When the Phaser Editor generates this.add.image calls, instead of the scene’s add.image factory method being called, our make_image function will be called instead, and we’ll go ahead and create the image from within that method, as well as use the container’s original add method to add it to the container.

Have a look at this line from the constructor:

this.add.image = this.add.image.bind(this);

Since our make_image is coming from within the this.add object, the scope will be bound to this.add, so this will reference that object, and not the container itself. The bind method creates a new method, where the this context points the value sent to bind, and we want that to be the container object.

Now that we can create a display object using our custom class from the Editor, the final piece here is to attach that display object to our Entity game object class. All our in-game objects will extend this class. The Entity class itself extends Phaser.GameObjects.Container. So we’ll start off with something like:

Entity constructor
class Entity extends Phaser.GameObjects.Container {
  constructor(scene, x = 0, y = 0, displayFactoryClass = null) {
    super(scene, x, y);
    this.initDisplay(displayFactoryClass);
  }

  ...

  initDisplay(displayFactoryClass) {
    if (typeof displayFactoryClass === 'function') {
      EntityFactory.DisplayMixin(this.scene, this, displayFactoryClass);
    }
  }
}

The constructor takes the usual scene, x, and y parameters. But there’s this displayFactoryClass parameter? That would reference a custom class that extends the EntityFactory class. This would be the scene class that we’re using to build the player display.

Since the Entity class (from Flash) has all the child images already built into the container (when we exported it as AS3 code), we want to re-create that here in Phaser. This is where the EntityFactory.DisplayMixin method comes in, which is called from inside the initDisplay method.

EntityFactory.DisplayMixin
static DisplayMixin(scene, targetEntity, sourceEntityFactoryClass) {
  var sourceEntityFactory = new sourceEntityFactoryClass(scene, 0, 0);
  var display = sourceEntityFactory.list.shift();
  while (display) {
    targetEntity.add(display);
    display = sourceEntityFactory.list.shift();
  }

  sourceEntityFactory.destroy();
}

What this method does is:

  1. Creates a temporary display object using the specified entity factory class
  2. Remove the first (bottom-most) each child display object from the factory object
  3. Add that display object to the in-game target entity
  4. Repeat steps 2 and 3 until all child objects have been removed from the factory object and added to the target entity
  5. Destroy the temporary display object

To retain the correct z-ordering of the child objects, the bottom-most child display is always removed from the factory object. When that child is added to the target entity, it will be the top-most at the time it was added.

The Player class is what create its display, as well as handle all its other in-game logic. It looks something like this:

Player class
Player = class extends Entity {
  constructor(scene, x, y) {
    super(scene, x, y, PlayerEntity);
  }
};

As you can see in its constructor, the PlayerEntity display factory class is passed to its parent Entity‘s constructor. This will create the player display and add all its visual objects to thus Player container.

Finally, to add this player ship to our view so we can see it, add it to the entities container we created in the previous step. Then use this code:

var player = new Player(scene, x, y);
entitiesContainer.add(player);

3. Handling Keyboard Input

The next functionality to be re-written is handling keyboard input.

In Flash, handling keyboard input is done by adding a KeyboardEvent.KEY_DOWN event listener to the stage (or another object that accepts keyboard input). When the event is fired, the event data will contain the key code of the key that was pressed.

Then in your game logic, if you wanted to check, for example, if the up arrow was pressed, you’d write this AS3 code:

function setupKeydownHandler():void {
  stage.addEventListener(KeyboardEvent.KEY_DOWN, onKeyDown);
}

...

function onKeyDown(event:KeyboardEvent):void {
  var keyCode:uint = event.keyCode;
  if (keyCode == 38) {
    //do whatever (38 is the key code for the up arrow)
  }
}

Phaser has its own keydown event handler for capturing keyboard input. You could write something like:

function setupKeydownHandler() {
  this.scene.input.keyboard.on('keydown', this.onKeyDown, this);
}

...

function onKeyDown(domKeyboardEvent) {
  var keyCode = this._getKeyCode(domKeyboardEvent.code);
  if (keyCode === "ArrowUp") {
    //do whatever (ArrowUp is the key code for the up arrow)
  }
}

Note: If you’d like to learn more about KeyboardEvent of the Web API that browsers use, check this page.
You can also see the supported key codes, like “ArrowUp”, on this page.

There’s also a corresponding keyup event that you can respond to when the player releases a key. It’s setup is similar to keydown. You’d like to have the player stop their ship from moving when they release the key, right? Riiiiiiiight?? ๐Ÿ˜ผ

When moving the player ship around, you can check (in the keyboard handler), when the appropriate arrow button is pressed, then increment the x and y properties of the player ship accordingly.

4. Collision Detection

In Flash, you were more or less responsible for handling collisions yourself, as there was no out-of-the-box physics/collision system. And unless you used a third-party library like Box2D or Nape you’ll have to use built-in rudimentary functions like DisplayObject.hetTestObject.

But for my purposes in this game, hitTestObject was sufficient enough, though it has its flaws, particularly when it comes to collision detection on rotated AABBs.

Phaser currently uses three different physics systems: Arcade, Matter, and Impact. Arcade, AFAIK, is the most commonly used one, and it’s perfect for AABBs (But don’t quote me on that. You know what. Go ahead ‘n quote me on that if you want. I don’t care. ๐Ÿ™ƒ)

Matter is a bodies-based physics system. Since our game involves lots of rotating objects in it, we’ll “upgrade” our collision system by using Matter instead of Arcade. Matter is also designed to use elements like gravity, friction, mass, density, restitution (“bounciness”). However, we won’t need any of those in this game. We’ll be using Matter for its ability to rotate AABBs and accurate collision detections.

When creating the Phaser Game object, we can setup the Matter physics system like this:

var game = new Phaser.Game({
  ...
  physics: {
    default: "matter",
    matter: {
      debug: true,
      gravity: {
        y: 0
      }
    }
  }
  ...
});

We don’t want any gravity, and we want to see the bodies during development (debug is set to true for this).

In the Flash editor, we don’t want the entire player ship (including exhaust flames) to collide with other things. So, I defined a set of “contact” AABB nodes which were responsible for collisions. You can see this image:

All the green AABBs are the contacts.

In Phaser, we’ll only need one contact, and you can see it defined here:

This contact will be created as a Matter physics body in our code. There are several ways you could handle this, and you’ll need to revisit the EntityFactory class, the PlayerEntity scene, and the Entity class. You could follow this strategy:

  1. Create a factory class called ContactRectEntityFactory with the factory name rectContact.
  2. Create a display object class for the factory that extends Phaser.GameObjects.Image.
    When you register rectContact with Phaser.GameObjects.GameObjectCreator.register be sure not to add the display object to the display or update lists.
  3. In Phaser Editor, add a rectangular image to the PlayerEntity scene and assign it the rectContact factory.
    Phaser Editor will generate code in the format of:
    var node = this.add.rectContact(x, y, texture, frame);
  4. In EntityFactory constructor, add this to the this.add object:
    rectContact: this.make_rectContact
  5. Of course, you’ll need to create a new make_rectContact method for the EntityFactory class:
EntityFactory.make_rectContact
make_rectContact(x, y, texture, frame) {
  var img = new ContactRectEntityFactory(this.scene, x, y, texture, frame);
  this._add(img);
  return(img);
}
  1. Finally, in the Entity class you want to create a Matter physics body for every display object that’s an instance of the ContactRectEntityFactory class.

You can obtain the bounds of a rect entity by calling the Phaser.GameObjects.getBounds() on that contact object.
Then you can use that rectangle to create the physics body and add it to the physics world.

var rect = rectContact.getBounds();
this.scene.matter.add.rectangle(
  rectangle.centerX,
  rectangle.centerY,
  rectangle.width,
  rectangle.height,
  {
    isSensor: true
  });

Since we won’t be using any collision response functionality of Matter physics, all the bodies will be sensors. Bodies that are sensors won’t generate any response (bounce or blocked) by other bodies when they intersect with them.

Note: Some final notes about the physics bodies.
Normally, you’d attach your physics body the the Phaser display image itself. However, our display objects are Containers, and according to the Phaser docs, there are some caveats when using physics bodies with Containers. Taken from the Containers page:

Containers can be given a physics body for either Arcade Physics, Impact Physics or Matter Physics. However, if Container children are enabled for physics you may get unexpected results, such as offset bodies, if the Container itself, or any of its ancestors, is positioned anywhere other than at 0 x 0. Container children with physics do not factor in the Container due to the excessive extra calculations needed. Please structure your game to work around this.

Because of this, I decided NOT to add physics bodies at all to containers or any of its children, but just as separate objects added to the physics world. So within the Entity class, I’m also keeping reference of which bodies “belong” to it.

Normally, the physics body will automatically move along with the display image and rotate how it rotates. Since they are not coupled, you’ll need to update the position and rotation of the physics bodies so they stay in sync with the display object.

The final function regarding collision detection in this article is the ability to wrap a display object when it reaches one end of the view area to the other side.

Phaser Matter physics does support built-in wrapping using code adopted from matter-wrap. However, I’m using manual wrapping instead because:

  1. Already wrote the original logic in AS3 ๐Ÿ™‚
  2. Using the built-in wrapping, there’s no way to determine when a display object would wrap. When objects would go past an edge of the view area, Blasteroids needs to wrap some display objects while removing others.

5. Game Execution Speed

Whew! The final section of this long article! Kudos to you if you made it this far. ๐Ÿ’ช๐Ÿพ

When I first started testing player movement, I noticed that the player ship was moving a bit too fast. The browsers (using Chrome 80 and Firefox 73 at the time of this writing) run at 60 FPS, and this is a bit too fast, as the Flash SWF was designed to run at 30 FPS.

In Flash, you’d add an event listener to the ENTER_FRAME event, and that function would be called based on the number of FPS the SWF was set to run at. So an FPS of 30 would cause your enterFrame method to be run approximately 30 times each second.

Phaser uses the Phaser.update() method which is called the number of frames, acting as Phaser’s version of enterFrame.

There’s no way to change the FPS. So the update method would be called approximately 60 times each second or whatever FPS the browser is set to. I decided to use timing to simulate a 30 FPS environment. Start off with the following code in your Phaser game Scene:

this.fps = 30;
this.msPerFrame = 1000 / this.fps;
this.delta = 0;

Then for each call to update you can write something like this in your game scene:

function update() {
  ...
  this.delta += this.game.loop.delta;
  if (this.delta < this.msPerFrame) {
    //too soon to update game objects
    return;
  }

  this.delta -= this.msPerFrame;

  //update all game objects here
}

That’s pretty much it for this ultra-long article! I’m really excited about the progress I’ve made and what I’m learning about Phaser, the editor, and the conversion process in general. As I continue to make more noteworthy progress, I’ll keep you updated.

Thanks, and talk to you later.
– C. out.

Progress Update: Converting The Flash Game Blasteroids To HTML5 Using Phaser

Hey there,

As you’re probably aware by now, Adobe is discontinuing the Flash web browser plug-in by end of 2020. If you have Flash games, they will no longer work afterwards, as browsers, such as Google Chrome, will completely block Flash content.

If your game is to be preserved, you’ll have to re-build it for another platform, and if it’s to stay as a web-based game, then HTML5 (Canvas/WebGL) is likely your best bet.

In the last article, I was challenging myself to convert a previous Flash game called Blasteroids that I made for a previous client to HTML5.

Digging up the original source code, I jumped in. But first thing’s first. I’ve also been learning Phaser 3, and the latest version of Phaser Editor, (awesome tool by the way; I highly recommend it for Phaser game development) which supports Phaser 3.

Most of the time spent on the project so far has been figuring out how to convert resources over. Sure, I could just “make” a new Blasteroids game, but the challenge is for the Phaser version to maintain the play and feel as closely as possible to the original Flash game.

So I started with both editors, Phaser Editor, and Flash CS. I’m examining how the scene is set up in Flash CS and replicating it as closely as possible. Images and locations are super-easy to move over. However, the way that the code is assigned to the images and their underlying “game objects” will change, simply due to how Phaser interacts with the scene, and how Phaser Editor sets up images for you on the scene.

For example, in Flash, many game objects are actually a composition of several images, and not just one image. Flash uses a DisplayObjectContainer class to accomplish this, and images on the scene are based on the ‘Sprite’ class, which extends DisplayObjectContainer.

In Phaser 3, the closest matching class is Container class, which contains other images. However, there may be some potential caveats to using Containers, as noted below from the container’s help page:

It’s important to understand the impact of using Containers. They add additional processing overhead into every one of their children. The deeper you nest them, the more the cost escalates. This is especially true for input events. You also loose the ability to set the display depth of Container children in the same flexible manner as those not within them. In short, don’t use them for the sake of it. You pay a small cost every time you create one, try to structure your game around avoiding that where possible.

I’ll need to test this as I move forward and see what impact it might have. Fortunately, Blaseroids doesn’t use input events on any game objects using containers.

Another challenge is that, as of this writing, Phaser Editor does not use the Container class when creating game objects in the scene.

Adding The Player Game Object To The Scene

In the Flash version, the main player’s ship is composed of three visible images (the ship body, and two exhaust flame images). You can place this on Flash’s stage (similar to Phaser 3’s scene).

All three images are contained in a single sprite.

As I mentioned, Phaser 3 uses containers, but is there a way to do something like this in Phaser Editor? Not officially, but there is a workaround, which I’ll explain in two steps.

Step 1: Create The Player “Scene”

First, we need to recreate the player’s ship which is composed of the three images. The workaround is to create the player object as a scene. When you create a scene, you can add multiple images to it. The player scene would look like this:

The same three images, ship body, and two flames.

Phaser Editor automatically generates the code that will setup and position them for you. Also, there are some properties you’ll need to adjust, so that it technically won’t be a scene anymore.

  1. Name the scene PlayerEntity.scene
  2. Uncheck the Only Generate Methods box if it’s checked
  3. Clear out the Scene Key
  4. Change the Super Class to Phaser.GameObjects.Container
  5. Change the Create Method to _create
  6. Change the Methods Context Type to OBJECT

This gives us a container game object that contains all the ship images.

In Phaser Editor, you can’t add one scene to another (the other being whatever you;re using as your main scene to show to the player). But, you can add an image to the scene using the Add Object button located at the top of the editor.

You’d then select the ship body and add it where ever you’d like it placed.

Note: You don’t need to add the flame images, just the ship body. The ship image we’re adding here is just a visual placeholder for the container game object we created earlier.

Step 2: Create The Player Factory

In Phaser, when you create game objects, you use a “factory” which allows you to quickly create many types of game objects, and have them added to your scene. Phaser has many built-in factories, for example, ‘bitmapText’, ‘group’, ‘image’ and ‘sprite’, and you can create your own. If you wanted to create a sprite and add it to your scene, you could write something like:

this.add.sprite(x, y, texture);
The this keyword references the scene that the sprite is being added to.

This would create a sprite image with the given texture, add it to the scene, and locate it at the specified x and y position.

We want to have our player container game object added to the scene, and we’ll use the player ship we added to the scene earlier. But as is, this will create just an image, and we want our container instead. Also, instead of Phaser Editor writing this for us:

this.add.sprite(x, y, texture);

it’d be nice to have it write this instead:

this.add.player(x, y, texture, frame);

Note: Although we ultimately won’t use the texture and frame here, these are created, are we can see the image in the editor.

Note the player part of the code. That is a custom factory, and Phaser allows you to create your own factories. And what’s awesome about Phaser Editorโ€ฆ it supports custom factories YES! ๐Ÿ‘๐Ÿพ

If you’d like more details on how Phaser Editor uses factories, have a look here.

When you create your player factory, the code might look something like this:

Phaser.GameObjects.GameObjectFactory.register("player", function (x, y) {
    var container = new PlayerEntity(this.scene, x, y);
    this.scene.sys.displayList.add(container);
    return container;
});

You want to run this code before you load your main scene, preferably, at your earliest convenience. The PlayerEntity class will come from the player scene you created earlier.

The player string registers your factory with Phaser, so you’ll then be able to write the this.add.player... code shown earlier. It would then create that PlayerEntity object, which in turn creates the three images: our player ship, and the two exhaust flames, places them inside a container, and adds that container to the scene.

When ran in your web browser, the final output will look something like this:

I added the space background to my main scene as well.

That’s it for now! I’m really excited about the progress I’ve made so far, but there’s still lots of ActionScript 3 code and images to convert over. As I make more noteworthy progress, I’ll keep you updated.

Thanks, and talk to you later.

– C. out.