
Hey,
Time for a progress update!
As you’re probably aware by now, Adobe is discontinuing its Flash player web browser plug-in by the end of this year. If you have Flash games, they will no longer work afterwards, as browsers, such as Google Chrome, will completely block Flash content.
Also, Flash is not the only Adobe technology being discontinued. Announced on May 30, of 2019, Adobe is also discontinuing Adobe AIR by end 2020. I found this a bit surprising, because AIR – when used along with FlashDevelop – made it easy to take a single code base and target both major mobile giants, Android and iOS, without the aid of their native development tools (Android Studio for Android, and Xcode + Mac OS for iOS). If you’re interested, you can read more details here.
So, if you want to preserve your Flash games, you’ll have to re-build them on another platform, and if they’re to remain as a web-based game (meaning you’re NOT converting from web to mobile), then HTML5 (Canvas/WebGL) is likely your best bet.
I previously announced that I was challenging myself to convert a previous Flash game I made for a previous client to HTML5.
The current list of articles is here:
- Part 1 – Setting up the player
- Part 2 (This article)
After many hours of studying Phaser 3, working with Phaser Editor, reconfiguring graphical assets, and re-writing ActionScript 3 code as JavaScript, there is finally a moving spaceship on the canvas!
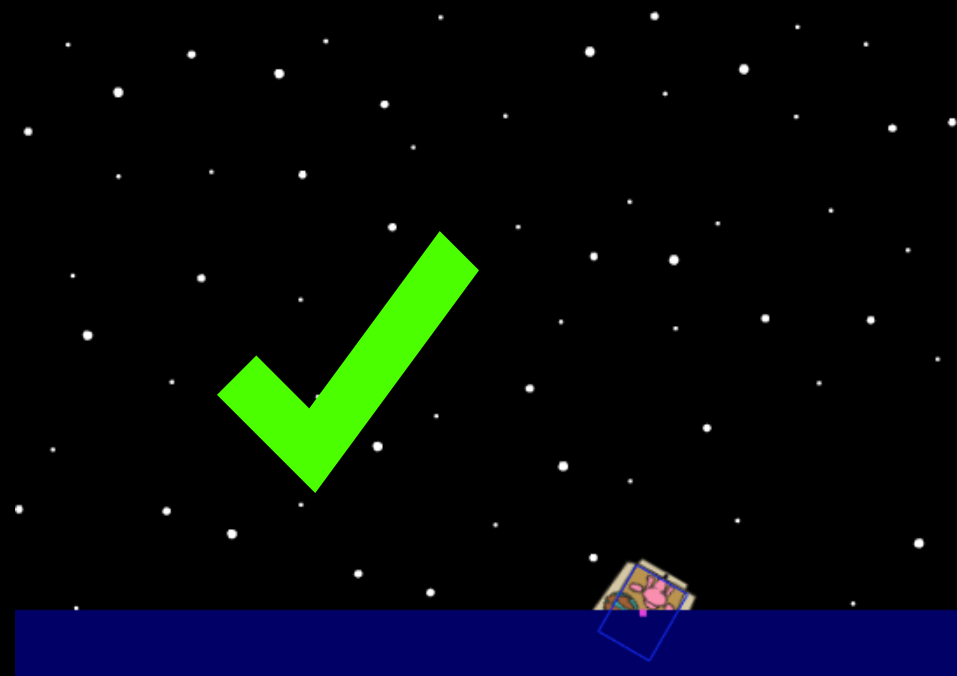
Check this out
It’s not much, but there’s a lot that went into just this, coming from a conversion standpoint. 🙂
Converting Code
First thing’s first: I wanted to get minimal functionality, while upholding this rule: The HTML5 version of Blasteroids must maintain the mechanics and look & feel of its Flash counterpart as closely as possible.
Sure, I could just make a brand new Blasteroids game from scratch, throwing out the former AS3 code base, and only copying the assets (graphics and audio), but the mechanics and look & feel would also be different.
So, I needed to convert a large portion of the AS3 codebase over, even for this simple functionality. For the most part, the game-logic portions translate from AS3 to JS relatively easy, albeit laborious. However, I focused on the following five areas:
- Setting up the scene/stage in Phaser Editor
- Displaying game objects
- Handling keyboard input
- Collision detection
- Game execution speed
So let’s have a look at these one at a time.
1. Setting Up The Scene/Stage In Phaser Editor
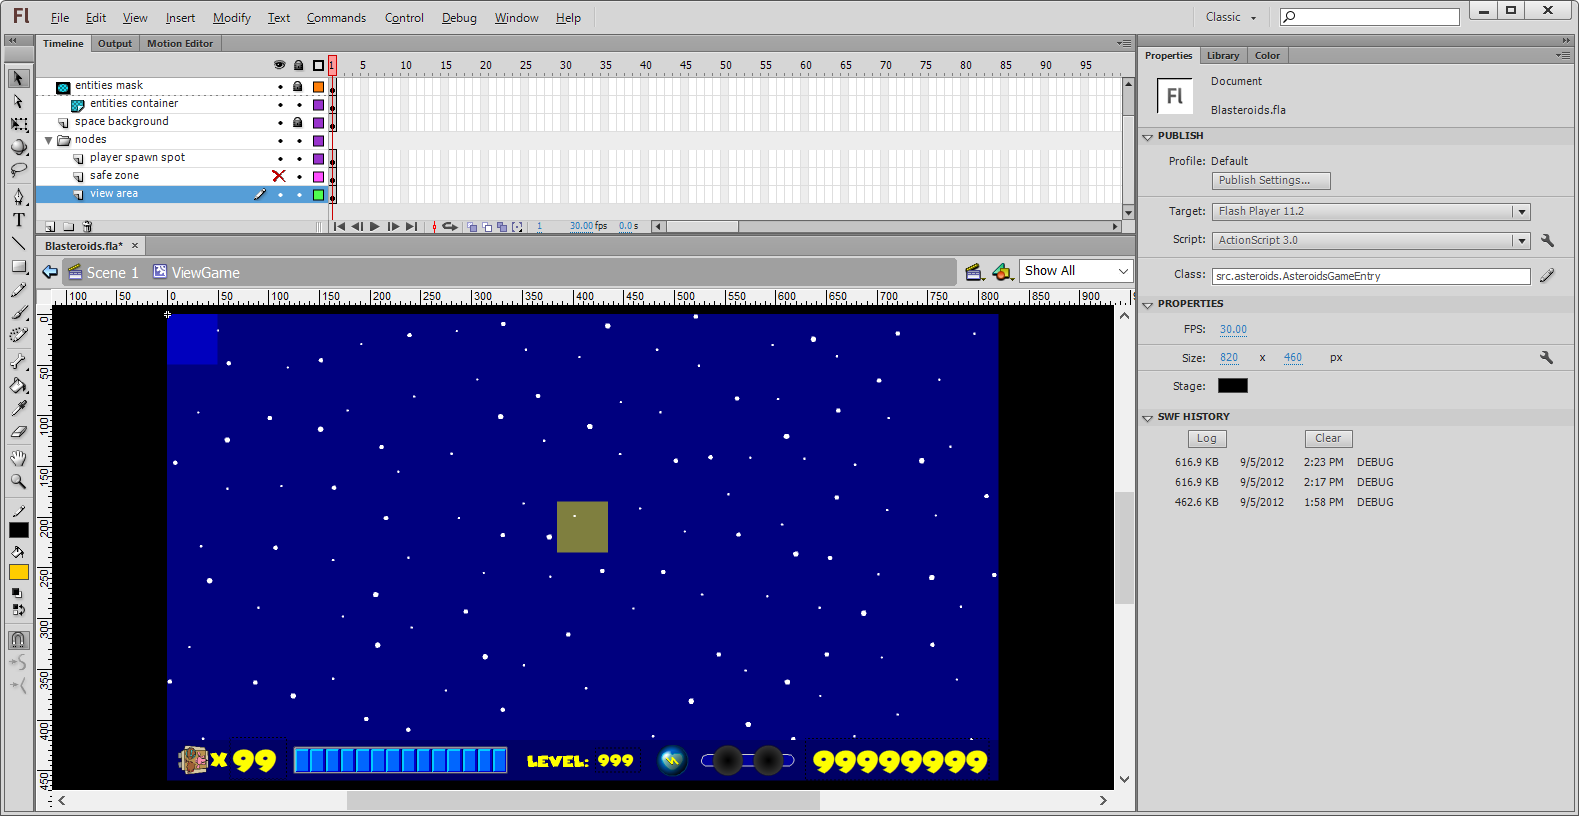
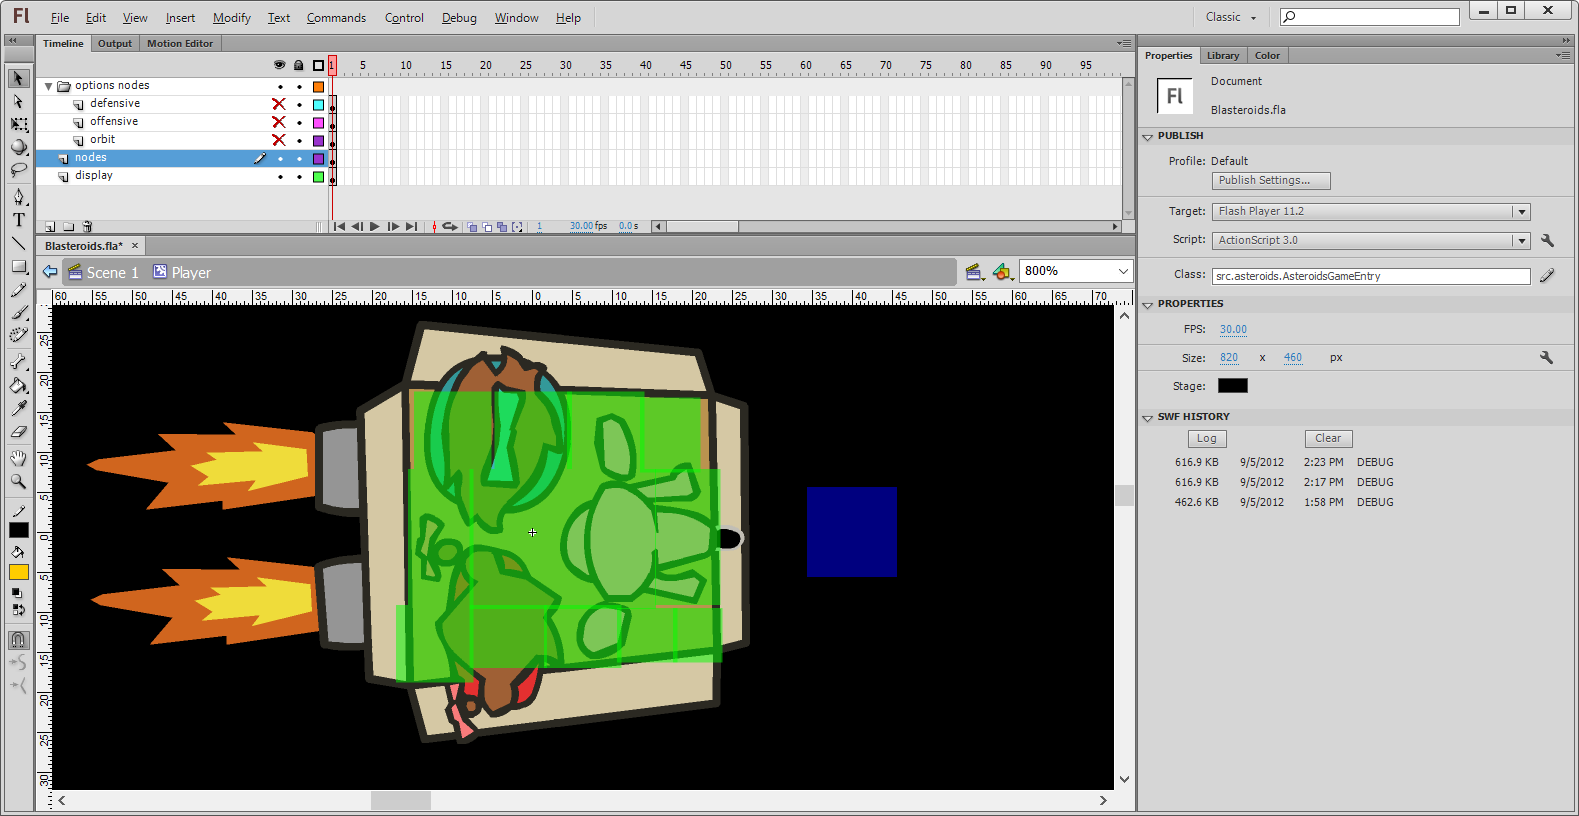
First, let’s have a look at the primary game view in the Flash editor:
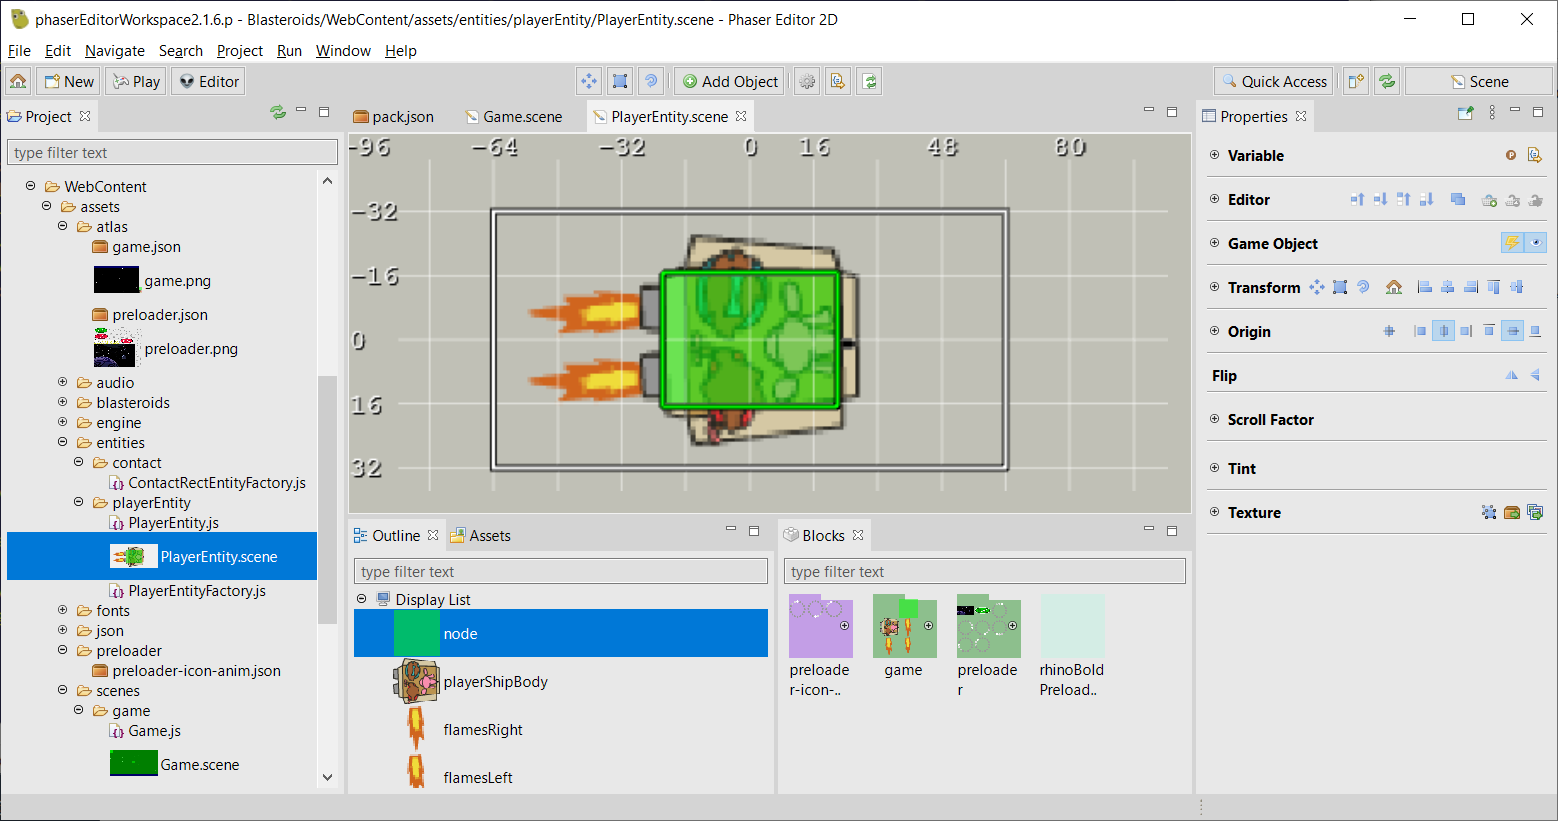
And the Phaser “equivalent” looks like this:
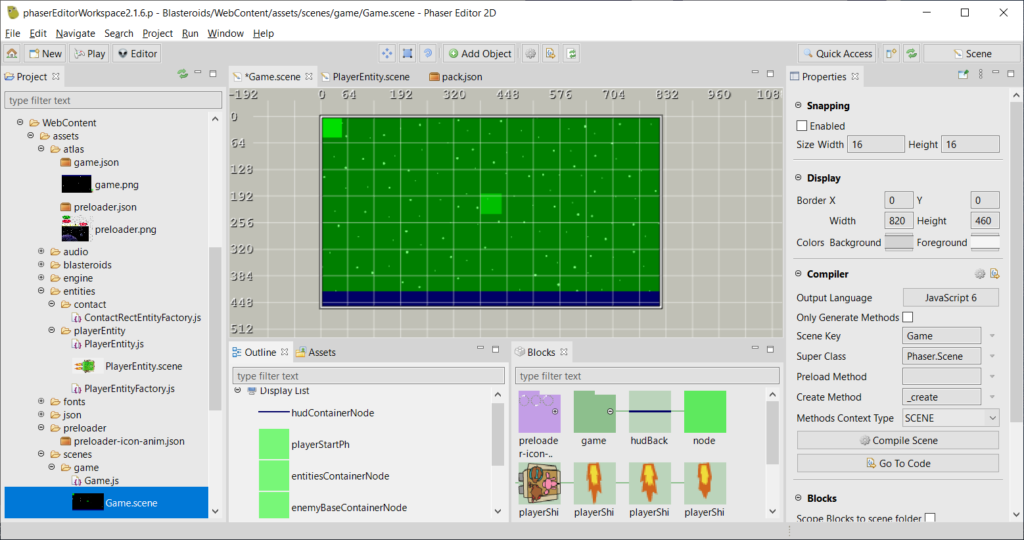
I’ll start off by re-creating most of this in Phaser Editor.
You can see a HUD (the blue bar at the bottom), two squares, one in the middle, another in the upper-left, and a space background that occupies most of the scene.
The functionality and visual elements of the HUD are not needed for this demo, so for now, I just made a blue rectangle at the bottom. The square in the middle acts as a placeholder for the player’s start location. The square in the upper-left acts as a container for all the in-game objects (player ships, missiles, asteroids, items, explosions and enemy ships).
Note: Rather than hard-code the locations of things like the in-game view and player start location, I’d rather just have those set visually, then write code that takes the locations and/or size of the rectangles, then finally removes the rectangles. The rectangles themselves only serve as temporary visual aides for the editors.
Player’s Start Location
The player’s ship will always appear in this location. All that is needed is to store the location of this node, then remove it.
Something like this works nicely:
initPlayerStartPoint
function initPlayerStartPoint() {
  var node = this.scene.children.getByName("playerStartPh");
  var point = new Phaser.Geom.Point(node.x, node.y);
  node.destroy();
  return(point);
}
Game Objects Container
This container node serves as the z-order index of where to place the in-game object container. The in-game objects are things like the player ship, asteroids, missiles, and power-up items. Every type a new object appears on the screen, it will be placed inside this container.
This node is not the container itself, but is placed at within order on the Phaser scene, to make sure all in-game objects are aligned where they are supposed to. For example, in-game objects should not appear in front of the HUD, but behind it.
The code for creating the container looks something like this:
initEntitiesContainer
initEntitiesContainer() {
  var node = this.scene.children.getByName("entitiesContainerNode");
  var container = new Phaser.GameObjects.Container(this.scene, node.x, node.y);
  this.scene.sys.displayList.addAt(container, this.scene.sys.displayList.getIndex(node));
  node.destroy();
  return(container);
}
It’s worth noting that we want our container to have the same positing in the z-order as its placeholder. The highlighted line does this.
In-Game Area
This is another node where the location is saved like the player start location. In addition, we want the size of this area also.
If you’re familiar with classic Asteroids mechanics, the player’s, the asteroids, and the ship missiles wrap to the opposite side side of screen when they go off screen, while others are removed from the game when they go off screen. This area defines the bounds of the “game world”, and when an object goes outside that area, one of the two aforementioned actions will occur.
The game area can be set from the placeholder node with this:
initArea
function initArea() {
  var node = this.scene.children.getByName("viewAreaPh");
  var rect = node.getBounds();
  node.destroy();
  return(rect);
}
Note: When defining these nodes in Phaser Editor, you’ll need to obtain them in code somehow. An object will need to either be assigned a name or specified as a property of the scene, or assigning it “game object” name. As you can see in the code, I decided to give the game objects a name, then use the getByName method to get the node by its name.
2. Displaying Game Objects
Once you have a basic game area setup, you can begin adding game objects. We’ll be adding only the player game object for now.
From part 1 of this series, to set up the player’s ship, I used a scene as a Phaser game container object, and created a factory so that container could be created within code.
Since I also want to preserve the original class structure from the AS3 codebase, I needed a way to assign the visual ship container to the game object class (called Entity). In Flash, using its IDE, you can export it as an ActionScript class so you could create the display object from code.
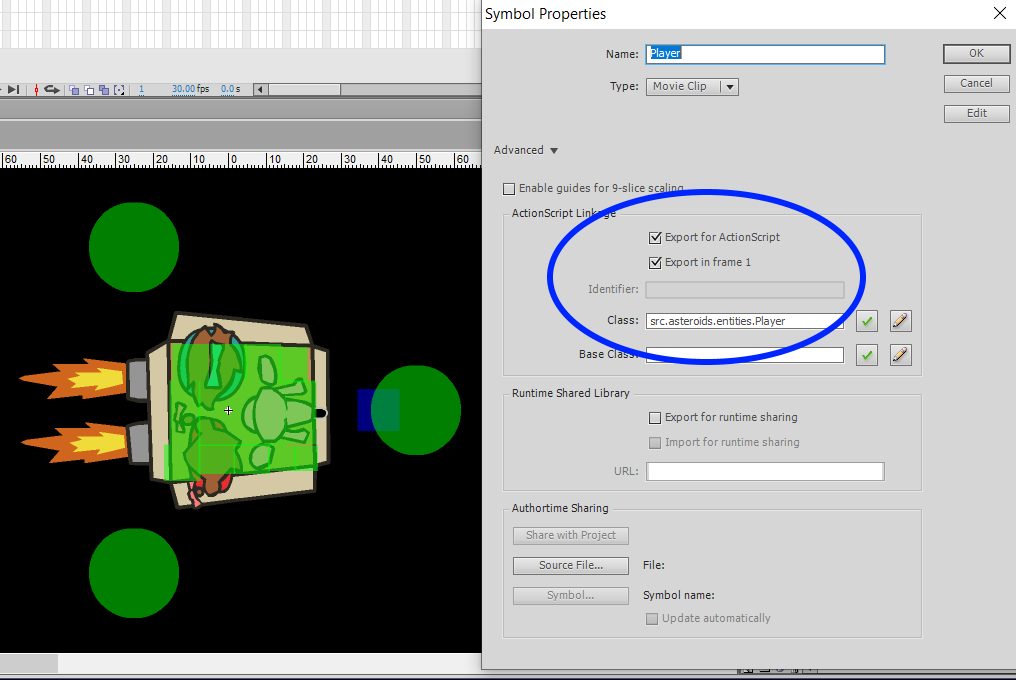
new Player() to create a display object.In the player ship scene, the Super Class is EntityFactory. It was Phaser.GameObjects.Container in the previous article, but in your code, EntityFactory will extend the Container. We’ll need to add some custom code, and creating EntityFactory allows us to do that.
The challenge is with how images are created in a Scene vs in a Container. In a scene, you have something like this:this.add.image(x, y, texture, frame);
But, this won’t work in a container, because it doesn’t have the add (Phaser.GameObjects.GameObjectFactory) property like a scene does. Instead, it has an add method which accepts a GameObject to add to it.
So, in order to make use of the add (from the factory) in a container, while continuing to use Phaser Editor to use scenes as makeshift containers, a little creativity needed to be worked in order to use scenes in the editor as game object containers. 😏
In the EntityFactory constructor, the code could look like:
EntityFactory constructor
constructor(scene, x, y) {
  super(scene, x, y);
  this._add = this.add;
  this.add = {
    image: this.make_image,
  };

  this.add.image = this.add.image.bind(this);
}
EntityFactory.make_image
make_image(x, y, texture, frame) {
  var img = new Phaser.GameObjects.Image(this.scene, x, y, texture, frame);
  this._add(img);
  return(img);
}
What’s going on here? First, we want to replace the container’s add method with our own custom property that contains an image property which points to a make_image method.
When the Phaser Editor generates this.add.image calls, instead of the scene’s add.image factory method being called, our make_image function will be called instead, and we’ll go ahead and create the image from within that method, as well as use the container’s original add method to add it to the container.
Have a look at this line from the constructor:this.add.image = this.add.image.bind(this);
Since our make_image is coming from within the this.add object, the scope will be bound to this.add, so this will reference that object, and not the container itself. The bind method creates a new method, where the this context points the value sent to bind, and we want that to be the container object.
Now that we can create a display object using our custom class from the Editor, the final piece here is to attach that display object to our Entity game object class. All our in-game objects will extend this class. The Entity class itself extends Phaser.GameObjects.Container. So we’ll start off with something like:
Entity constructor
class Entity extends Phaser.GameObjects.Container {
  constructor(scene, x = 0, y = 0, displayFactoryClass = null) {
    super(scene, x, y);
    this.initDisplay(displayFactoryClass);
  }

  ...

  initDisplay(displayFactoryClass) {
    if (typeof displayFactoryClass === 'function') {
      EntityFactory.DisplayMixin(this.scene, this, displayFactoryClass);
    }
  }
}
The constructor takes the usual scene, x, and y parameters. But there’s this displayFactoryClass parameter? That would reference a custom class that extends the EntityFactory class. This would be the scene class that we’re using to build the player display.
Since the Entity class (from Flash) has all the child images already built into the container (when we exported it as AS3 code), we want to re-create that here in Phaser. This is where the EntityFactory.DisplayMixin method comes in, which is called from inside the initDisplay method.
EntityFactory.DisplayMixin
static DisplayMixin(scene, targetEntity, sourceEntityFactoryClass) {
  var sourceEntityFactory = new sourceEntityFactoryClass(scene, 0, 0);
  var display = sourceEntityFactory.list.shift();
  while (display) {
    targetEntity.add(display);
    display = sourceEntityFactory.list.shift();
  }

  sourceEntityFactory.destroy();
}
What this method does is:
- Creates a temporary display object using the specified entity factory class
- Remove the first (bottom-most) each child display object from the factory object
- Add that display object to the in-game target entity
- Repeat steps 2 and 3 until all child objects have been removed from the factory object and added to the target entity
- Destroy the temporary display object
To retain the correct z-ordering of the child objects, the bottom-most child display is always removed from the factory object. When that child is added to the target entity, it will be the top-most at the time it was added.
The Player class is what create its display, as well as handle all its other in-game logic. It looks something like this:
Player class
Player = class extends Entity {
  constructor(scene, x, y) {
    super(scene, x, y, PlayerEntity);
  }
};
As you can see in its constructor, the PlayerEntity display factory class is passed to its parent Entity‘s constructor. This will create the player display and add all its visual objects to thus Player container.
Finally, to add this player ship to our view so we can see it, add it to the entities container we created in the previous step. Then use this code:
var player = new Player(scene, x, y);
entitiesContainer.add(player);
3. Handling Keyboard Input
The next functionality to be re-written is handling keyboard input.
In Flash, handling keyboard input is done by adding a KeyboardEvent.KEY_DOWN event listener to the stage (or another object that accepts keyboard input). When the event is fired, the event data will contain the key code of the key that was pressed.
Then in your game logic, if you wanted to check, for example, if the up arrow was pressed, you’d write this AS3 code:
function setupKeydownHandler():void {
  stage.addEventListener(KeyboardEvent.KEY_DOWN, onKeyDown);
}

...

function onKeyDown(event:KeyboardEvent):void {
  var keyCode:uint = event.keyCode;
  if (keyCode == 38) {
    //do whatever (38 is the key code for the up arrow)
  }
}
Phaser has its own keydown event handler for capturing keyboard input. You could write something like:
function setupKeydownHandler() {
  this.scene.input.keyboard.on('keydown', this.onKeyDown, this);
}

...

function onKeyDown(domKeyboardEvent) {
  var keyCode = this._getKeyCode(domKeyboardEvent.code);
  if (keyCode === "ArrowUp") {
    //do whatever (ArrowUp is the key code for the up arrow)
  }
}
Note: If you’d like to learn more about KeyboardEvent of the Web API that browsers use, check this page.
You can also see the supported key codes, like “ArrowUp”, on this page.
There’s also a corresponding keyup event that you can respond to when the player releases a key. It’s setup is similar to keydown. You’d like to have the player stop their ship from moving when they release the key, right? Riiiiiiiight?? 😼
When moving the player ship around, you can check (in the keyboard handler), when the appropriate arrow button is pressed, then increment the x and y properties of the player ship accordingly.
4. Collision Detection
In Flash, you were more or less responsible for handling collisions yourself, as there was no out-of-the-box physics/collision system. And unless you used a third-party library like Box2D or Nape you’ll have to use built-in rudimentary functions like DisplayObject.hetTestObject.
But for my purposes in this game, hitTestObject was sufficient enough, though it has its flaws, particularly when it comes to collision detection on rotated AABBs.
Phaser currently uses three different physics systems: Arcade, Matter, and Impact. Arcade, AFAIK, is the most commonly used one, and it’s perfect for AABBs (But don’t quote me on that. You know what. Go ahead ‘n quote me on that if you want. I don’t care. 🙃)
Matter is a bodies-based physics system. Since our game involves lots of rotating objects in it, we’ll “upgrade” our collision system by using Matter instead of Arcade. Matter is also designed to use elements like gravity, friction, mass, density, restitution (“bounciness”). However, we won’t need any of those in this game. We’ll be using Matter for its ability to rotate AABBs and accurate collision detections.
When creating the Phaser Game object, we can setup the Matter physics system like this:
var game = new Phaser.Game({
  ...
  physics: {
    default: "matter",
    matter: {
      debug: true,
      gravity: {
        y: 0
      }
    }
  }
  ...
});
We don’t want any gravity, and we want to see the bodies during development (debug is set to true for this).
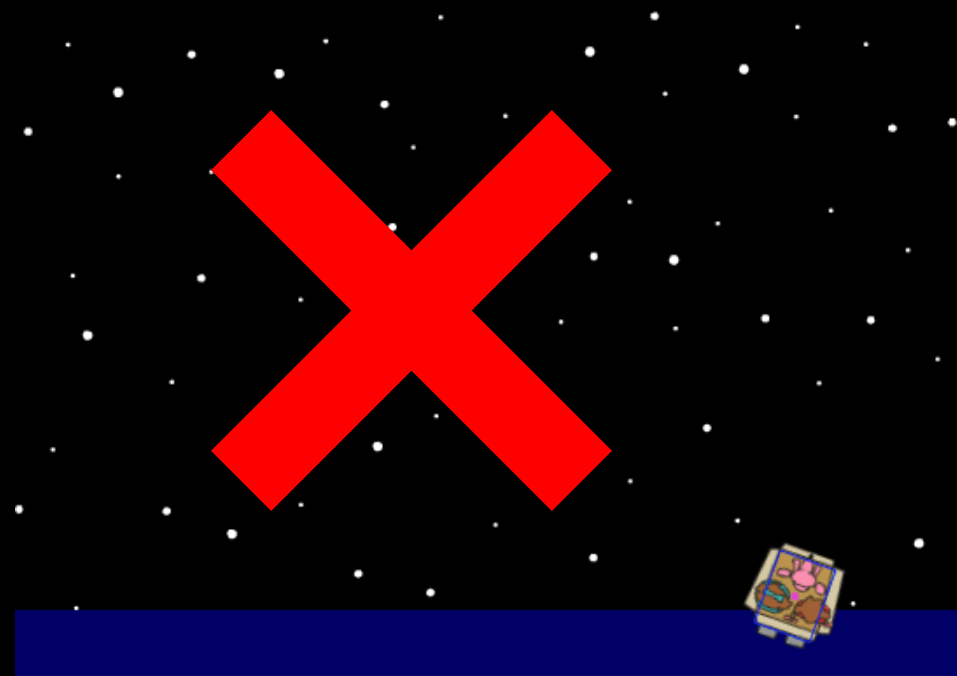
In the Flash editor, we don’t want the entire player ship (including exhaust flames) to collide with other things. So, I defined a set of “contact” AABB nodes which were responsible for collisions. You can see this image:
In Phaser, we’ll only need one contact, and you can see it defined here:
This contact will be created as a Matter physics body in our code. There are several ways you could handle this, and you’ll need to revisit the EntityFactory class, the PlayerEntity scene, and the Entity class. You could follow this strategy:
- Create a factory class called
ContactRectEntityFactorywith the factory namerectContact. - Create a display object class for the factory that extends
Phaser.GameObjects.Image.
When you registerrectContactwithPhaser.GameObjects.GameObjectCreator.registerbe sure not to add the display object to the display or update lists. - In Phaser Editor, add a rectangular image to the
PlayerEntityscene and assign it therectContactfactory.
Phaser Editor will generate code in the format of:
var node = this.add.rectContact(x, y, texture, frame); - In
EntityFactoryconstructor, add this to thethis.addobject:
rectContact: this.make_rectContact - Of course, you’ll need to create a new
make_rectContactmethod for theEntityFactoryclass:
EntityFactory.make_rectContact
make_rectContact(x, y, texture, frame) {
  var img = new ContactRectEntityFactory(this.scene, x, y, texture, frame);
  this._add(img);
  return(img);
}
- Finally, in the
Entityclass you want to create a Matter physics body for every display object that’s an instance of theContactRectEntityFactoryclass.
You can obtain the bounds of a rect entity by calling the Phaser.GameObjects.getBounds() on that contact object.
Then you can use that rectangle to create the physics body and add it to the physics world.
var rect = rectContact.getBounds();
this.scene.matter.add.rectangle(
  rectangle.centerX,
  rectangle.centerY,
  rectangle.width,
  rectangle.height,
  {
    isSensor: true
  });
Since we won’t be using any collision response functionality of Matter physics, all the bodies will be sensors. Bodies that are sensors won’t generate any response (bounce or blocked) by other bodies when they intersect with them.
Note: Some final notes about the physics bodies.
Normally, you’d attach your physics body the the Phaser display image itself. However, our display objects are Containers, and according to the Phaser docs, there are some caveats when using physics bodies with Containers. Taken from the Containers page:Containers can be given a physics body for either Arcade Physics, Impact Physics or Matter Physics. However, if Container children are enabled for physics you may get unexpected results, such as offset bodies, if the Container itself, or any of its ancestors, is positioned anywhere other than at 0 x 0. Container children with physics do not factor in the Container due to the excessive extra calculations needed. Please structure your game to work around this.
Because of this, I decided NOT to add physics bodies at all to containers or any of its children, but just as separate objects added to the physics world. So within the Entity class, I’m also keeping reference of which bodies “belong” to it.
Normally, the physics body will automatically move along with the display image and rotate how it rotates. Since they are not coupled, you’ll need to update the position and rotation of the physics bodies so they stay in sync with the display object.
The final function regarding collision detection in this article is the ability to wrap a display object when it reaches one end of the view area to the other side.
Phaser Matter physics does support built-in wrapping using code adopted from matter-wrap. However, I’m using manual wrapping instead because:
- Already wrote the original logic in AS3 🙂
- Using the built-in wrapping, there’s no way to determine when a display object would wrap. When objects would go past an edge of the view area, Blasteroids needs to wrap some display objects while removing others.
5. Game Execution Speed
Whew! The final section of this long article! Kudos to you if you made it this far. 💪🏾
When I first started testing player movement, I noticed that the player ship was moving a bit too fast. The browsers (using Chrome 80 and Firefox 73 at the time of this writing) run at 60 FPS, and this is a bit too fast, as the Flash SWF was designed to run at 30 FPS.
In Flash, you’d add an event listener to the ENTER_FRAME event, and that function would be called based on the number of FPS the SWF was set to run at. So an FPS of 30 would cause your enterFrame method to be run approximately 30 times each second.
Phaser uses the Phaser.update() method which is called the number of frames, acting as Phaser’s version of enterFrame.
There’s no way to change the FPS. So the update method would be called approximately 60 times each second or whatever FPS the browser is set to. I decided to use timing to simulate a 30 FPS environment. Start off with the following code in your Phaser game Scene:
this.fps = 30;
this.msPerFrame = 1000 / this.fps;
this.delta = 0;
Then for each call to update you can write something like this in your game scene:
function update() {
  ...
  this.delta += this.game.loop.delta;
  if (this.delta < this.msPerFrame) {
    //too soon to update game objects
    return;
  }

  this.delta -= this.msPerFrame;

  //update all game objects here
}
That’s pretty much it for this ultra-long article! I’m really excited about the progress I’ve made and what I’m learning about Phaser, the editor, and the conversion process in general. As I continue to make more noteworthy progress, I’ll keep you updated.
Thanks, and talk to you later.
– C. out.
Where are you writing all this code?
It’s currently not anywhere public (GitHub, etc) if that’s what you’re really asking.