In this article, the series of converting the Flash game Blasteroids to HTML5 continues. The conversion process is almost complete! This is super-exciting! 🙂
Have a look at this demo video to see all the action.
The target technology I’m using for process is Phaser, and the primary tools I’m using for development are Visual Studio Code and the amazing Phaser Editor tool. Adobe Animate (formerly Adobe Flash Professional, CC, CSx) is also used, as I reference the original source code and assets many times throughout this process.
As you may be aware, Adobe is discontinuing Flash by end of this year. If you have Flash games, they will no longer work afterwards, as browsers, such as Google Chrome, will completely block Flash content.
So, if you want to preserve your Flash, you’ll have to re-build it in another platform, and if it’s to remain as a web-based game (meaning you’re NOT converting it from web to mobile), then HTML5 (Canvas/WebGL) is likely your best bet.
I previously announced that I was taking on the challenge to convert a Flash game I made for a previous client to HTML5. I will continue to post progress updates on the game until the conversion has been completed (and it’s almost there!).
This article won’t focus on technical aspects of development. There’s not much new material to convert over using methods that haven’t already been covered in previous articles. I’m currently play-testing, cleaning up some AS3-to-JS code that ended up becoming obsolete, and addressing glitches, and a few other functions of the game’s engine.
At this point, all of the items, asteroids, enemy ships, missiles, and sound effects have been converted over.
Enter the Option
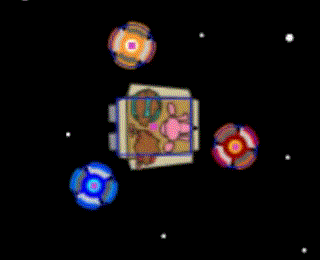
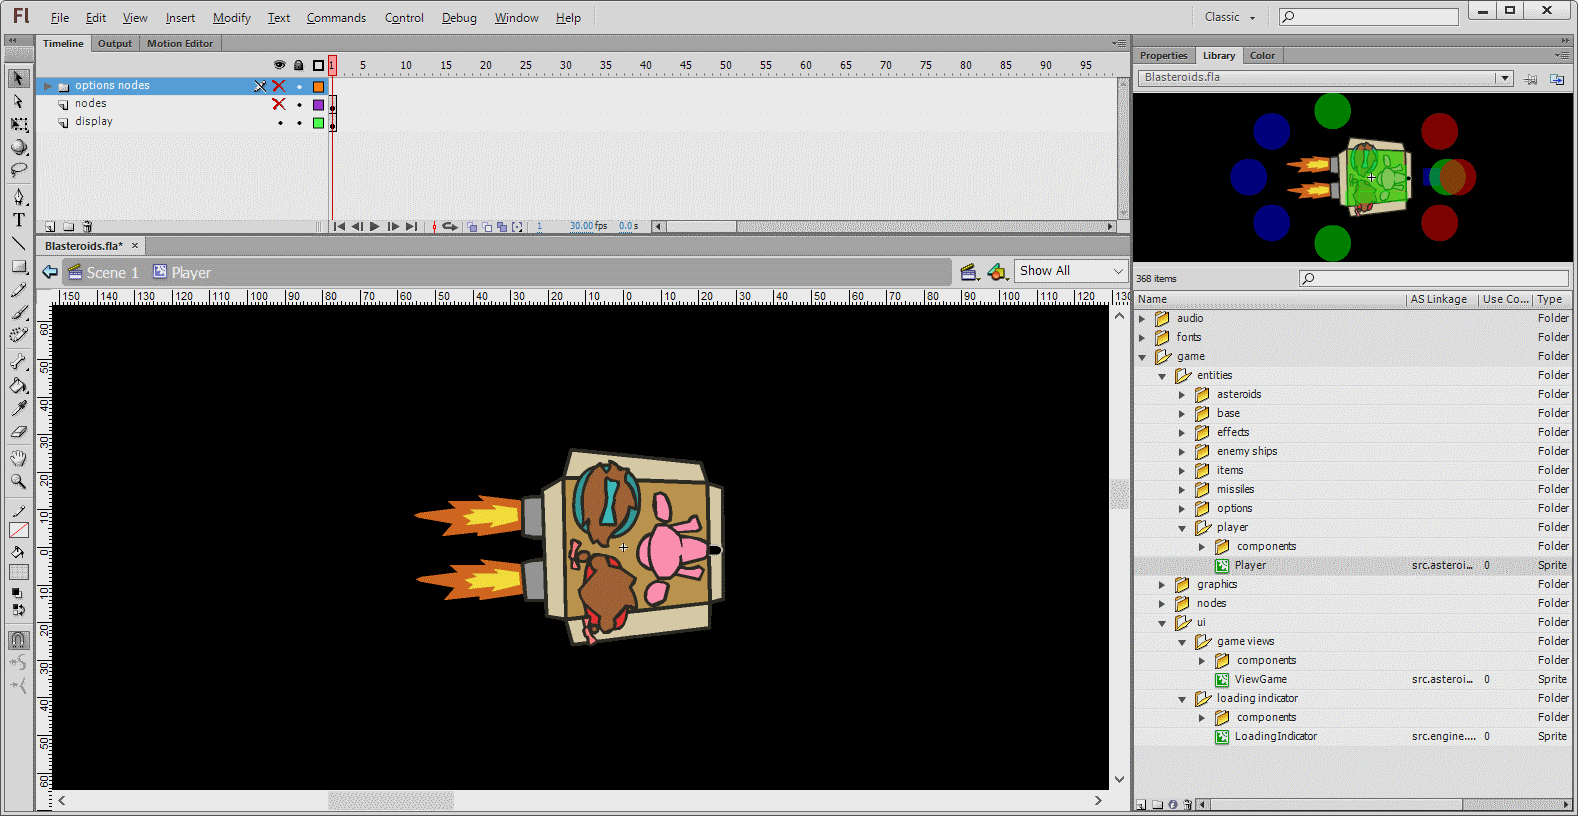
When I originally coded the original Flash game back in 2012, I got some inspiration from the Gradius scrolling space shooter games, Blasteroids also has the Option in it! You can collect the option power-up to add an Option to your ship.
In Blasteroids, an Option is a small vessel that orbits your ship or follows it, and fires when you fire. It is invulnerable to most attacks. You can collect up to three Options max.
Here we have the regular Option (blue), a Long Range Option (yellow), and a Power Option (red).
There are currently five types of Options, and the type you collect depends on what weapons you have. Four of the five have specialized weapons that can only be obtained if you collect an Option while you have a double-weapon equipped. In other words, if both weapon slots contain the same weapon, you will create a specialized Option with a unique weapon. All other weapon combs create the regular Option.
If your ship is destroyed, any Options you have will drift off into space! When your next ship respawns, you can recollect them before they are destroyed or drift off the screen (they do not wrap around to the other side). Also, while an Option is drifting, it is vulnerable to everything.
Boss Monster!
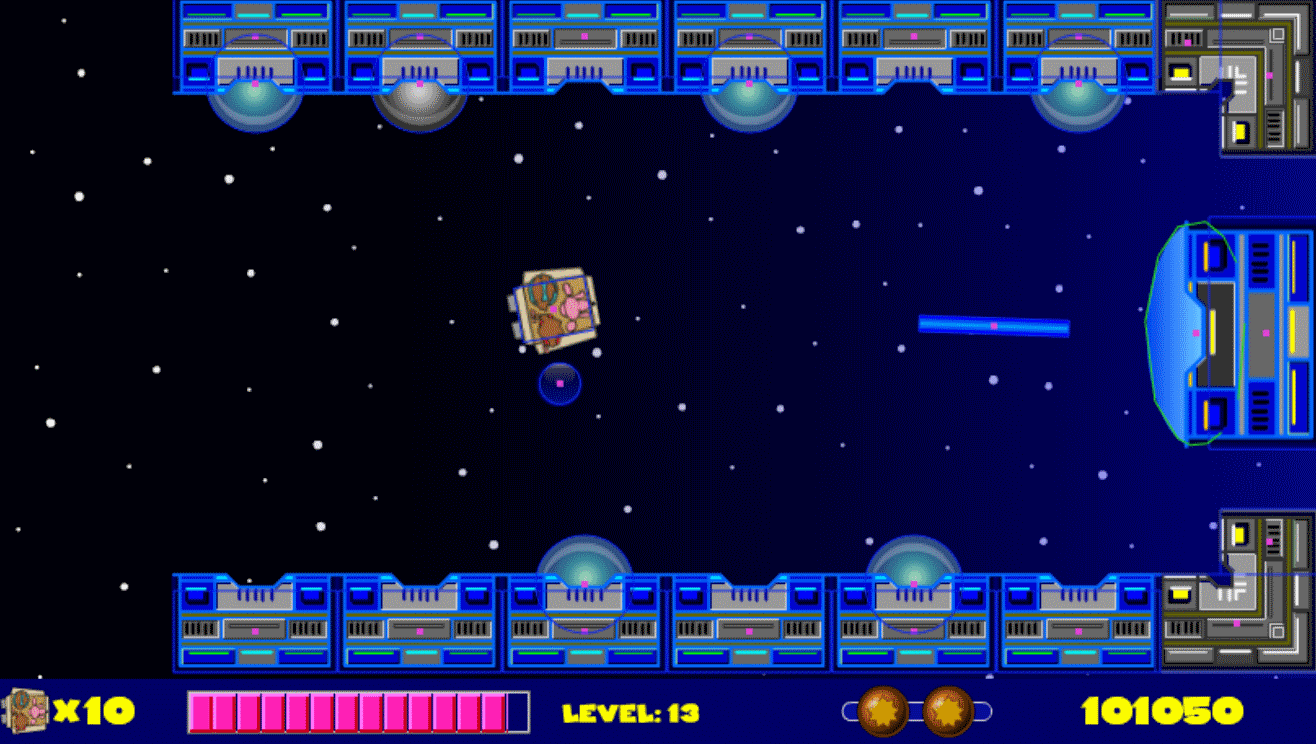
There is also an “enemy base”, which is the game’s boss monster. After completing several stages, an alarm will sound, lights will flash, and the boss will appear! A little mellow-dramatic, eh? 🎭
Here’s the blue enemy base, defended by six Mini-Cells.
It’s a Core Cell that looks like it stepped out of the work of Metroid. It will eventually charge its primary weapon and fire it at you. It can only be damaged while it’s charging.
The Core Cell is also defended by several other Mini-Cells that behave in a similar way. They fire two types of missiles at you: their normal blue missile orbs, and a “Rainbow” Orb. You can actually destroy this missile, and if you do, it will drop an item. If your ship is being power-crapped by all these Cells, you may want to take advantage of destroying Rainbow Orbs, because they have a 100% drop rate!
That’s it for this article!
Subscribe below to my list to get updates, including work-in-progress game updates (plus the ability to play them in your PC browser) that are not available in these articles!
Stay In The Loop
Sign up to receive updates when new content comes out, such as blog articles and free games.
Thank you!
You have successfully joined our subscriber list.
Finally, if you’d rather skip all the learning and have me take a look at your Flash game instead, reach out to me one of these ways:
In this article, the series of converting the Flash game Blasteroids to HTML5 continues. This update introduces sound effects to the game.
The target technology I’m using for process is Phaser, and the primary tools I’m using for development are Visual Studio Code and the amazing Phaser Editor. The latter provides an integrated environment for HTML5 game development, similar to what Adobe Animate did for Flash.
Note: Having access to the original FLA, source code and assets is crucial if you want to convert you Flash game to HTML5. Although Adobe Animate is not the target tool in the process, it’s still important to have.
However, Adobe Animate can be the target tool in some projects, depending on how the original Flash game was built. When converting Flash games to HTML5, there is no one-size-fits-all method, and you will need to inspect the original project to see which approach to take.
Finally, it’s worth noting that not all features in the Flash game may convert over to HTML5. An example includes use of advanced color filter effects. You might be able to use shaders for color effects, but building shaders may be more trouble than they’re worth.
FYI: As most of the updates now involved processes already discussed in previous articles, I won’t go into details on those updates. But, more items, and weapons were added.
This article will focus on adding sound; which is one of the easier aspects to convert over.
Check out this short demo video of the current progress of the game:
As you’re probably aware by now, Adobe is discontinuing Flash by end of this year. If you have Flash games, they will no longer work afterwards, as browsers, such as Google Chrome, will completely block Flash content.
So, if you want to preserve your Flash, you’ll have to re-build it in another platform, and if it’s to remain as a web-based game (meaning you’re NOT converting it from web to mobile), then HTML5 (Canvas/WebGL) is likely your best bet.
I previously announced that I was taking on the challenge to convert a Flash game I made for a previous client to HTML5. I will continue to post progress updates on the game until the conversion has been completed.
Phaser uses either the Web Audio API for playing audio, or the HTML <audio> tag as an alternative option.
When you setup Phaser by creating a Phaser.Game object, you can specify an optional AudioConfig object. By default, Phaser will attempt to use the Web Audio API, and fall back to the HTML audio if the former is not available.
The type of audio files and their encoding are important, because not all browsers can play all audio formats. For each sound effect, you can specify multiple formats, for example MP3 and OGG. You can check this table to see the current formats that are supported for various browsers.
In Phaser, you can preload sounds similar to the other assets, in the preload function of a Scene:
In the above example, the sound effect is given the key someSoundKey, and two audio formats are assigned to it. And you don’t have to worry about all the files being loaded! The loader will determine which file to load based on the browser, and load just that ONE file.
You can also load audio by placing them inside JSON file (or JSON-formatted object):
Phaser Editor makes it really easy to add sounds to your project. For this project, we’ll be creating a JSON pack file, and adding the sounds to that. Then we’ll preload it in the preload function of the Scene.
Retrieving Your Original Sounds
But before we can load our sounds, we must first get the original sound files themselves.
Note: As I mentioned before, it’s always best to have the original source files and assets if you’re attempting to convert a Flash game to HTML5.
If you already have the original audio files stored on disk, you can press here to skip to the next section. If you only have the FLA file, and it has the sounds embedded inside it, continue reading below.
Before you can import those sounds into your Phaser game, you’ll need to extract them from the FLA file.
In previous versions of Flash Professional, you used to be able to extract sounds by placing them on the stage’s timeline, exporting them as a movie, then selecting an audio format. However, with Adobe Animate, that option has been removed, and there is no built-in or straightforward way of extracting sounds. Dammit. 😠
But there is hope! ⭐😮
It can be done by using Flash JavaScript (JSFL) code. With JSFL, you can create custom functionality for Adobe Animate that is not exposed in Animate itself. JSFL has an extensive API to help streamline the authoring process. For example, you can write scripts to automate repetitive tasks or add custom tools to the Tools panel.
We’ll be using a script that will allow us to extract sounds from an FLA library, and save them to disk.
There is a JSFL script that was created by João César, and his script is in this repo here.
Currently the script is unable to export MP3 sounds, only WAV. So I forked his repo, made some changes, and submitted a push request (result pending at the time of this article). You can find my update here.
You’ll need to download the Export Library Sounds.jsfl script.
After you’ve downloaded the script, you can export the audio library items from the FLA file to your disk by, following these steps:
Open the FLA file in Adobe Animate.
From the library, select the audio items you want to export. If the audio items are in a folder, you can select the folder instead.
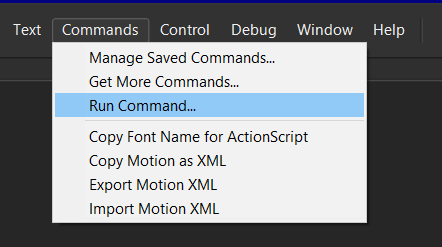
From Animate’s main menu, select Commands, then Run Command....
Select the Export Library Sounds.jsfl script you download. This will run the script.
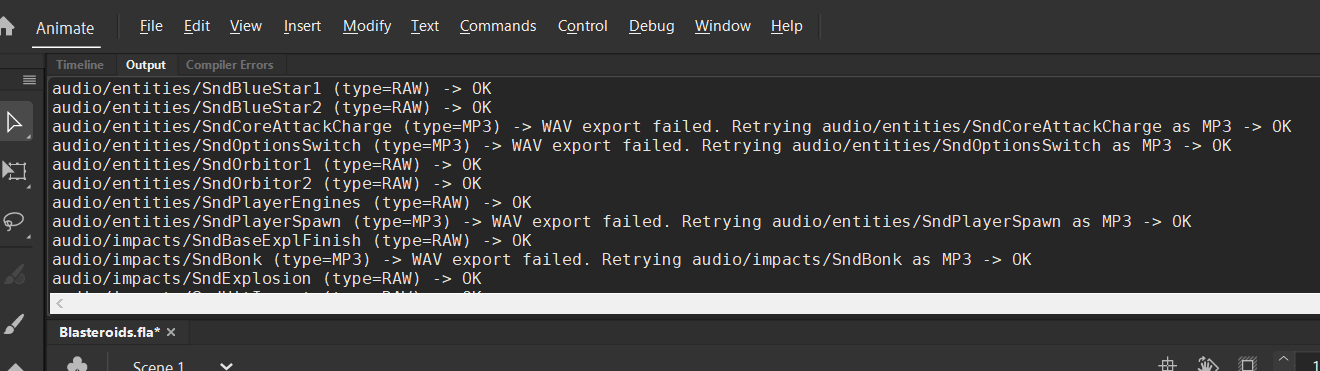
A window will open, prompting you to select an output directory (folder) on your disk were the script should export the selected audio.
Once you select a folder, press Select Folder, and the script will attempt to export all the audio items you selected. You should then be able to see all your audio files in the folder you selected. You can check the Output tab in Adobe Animate if you’d like to check the status of each audio item tried.
Adding Your Sounds To Phaser Editor
At this point, you should have the audio files on your disk. Now, we can import them into Phaser Editor.
First, place the audio files inside a folder stored under the WebContent folder in the Phaser Editor project.
You can add the file to the main JSON pack file, if you’ve only a few of them. However, because Blasteroids has lots of audio files, I prefer to make a separate JSON pack file just for the sounds. So, we’ll do that!
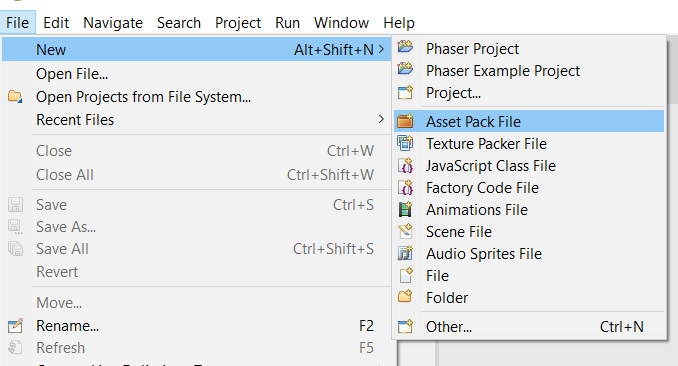
From Phaser Editor (using version 2.1.6) main menu, select New, then Asset Pack File. Then create a pack JSON file. You can name it whatever you want. (Alternatively, you can press the New button, then select Asset Pack File from the pop-up window.)
The pack will will automatically open.
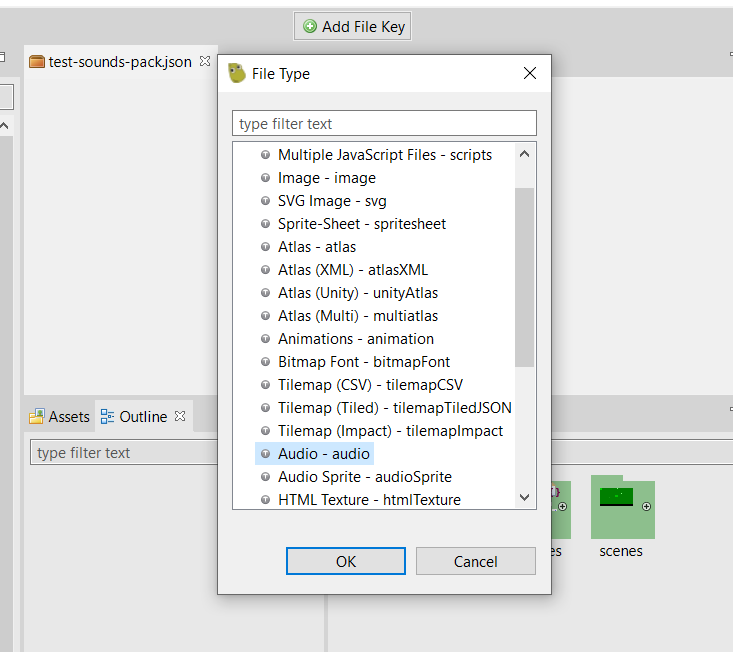
Press the Add File Key button, select Audio – audio from the list, then press OK.
A pop-up window should open listing all the sounds Phaser Editor found in your project. You can select the ones you want to add to this JSON pack file. In my case, I added all of them.
Loading And Playing Sounds
Now that you have a nice little JSON pack, you can preload this pack so all your sounds are are available for play.
In the code for your Phaser Scene, add a preload function if one is not already there, then add a line of code like this:
I decided to use "gameSounds" as the key for this asset pack, but you can use whatever makes sense to you. Just remember it must be unique; no other assets should use the same key name.
If you just need to play a sound only once (then forget about it), you can use code like this: this.scene.sound.play("key-of-the-sound"); Each sound inside the assets pack has a unique key.
If you’ll want to play a sound multiple times, and/or if you’ll need an event that fires once a sound finishes playing, you can create a Phaser Sound object. Use code like this to do so: var sound = this.scene.sound.add("key-of-the-sound"); You can then play the returned sound object by writing: sound.play();
In Flash, if you wanted to be notified when a sound finished playing, you’d attach a Event.SOUND_COMPLETE handler to its SoundChannel.
Your code might look something like this.
var sound:Sound;
...
var soundChannel:SoundChannel = sound.play();
soundChannel.addEventListener(Event.SOUND_COMPLETE, onSoundComplete);
In Phaser, we can do something similar with the sound object. You can write something like this:
var sound = this.scene.sound.add("key-of-the-sound");
sound.on("complete", onSoundComplete);
sound.play();
...
function onSoundComplete() {
  //code runs here when sound finishes playing
}
Note: You can learn more about Phaser’s SoundManager here. Depending on if you’re using Web Audio or HTML5 audio, each has its respective sound manager class: ◾ WebAudioSoundManager ◾ HTML5AudioSoundManager
That’s it for this article! Playing sounds is one of the more relatively easier tasks when converting a game from Flash to HTML5.
Finally, if you’d rather skip all the learning and have me take a look at your Flash game instead, reach out to me one of these ways:
In this article, the series of converting the Flash game Blasteroids to HTML5 continues. The target technology I’m using throughout this process is Phaser, and the primary tools I’m using for development are Visual Studio Code and the amazing Phaser Editor. The latter is an amazing tool, as it aims to provide an integrated environment for HTML5 game development, similar to what Adobe Animate did for Flash.
Adding the first power up item is presented in this article. Most of what’s presented in this article has been covered in previous articles. Nonetheless, they are important aspects of the conversion process as they will be used repeatedly throughout.
Check out this short demo video of the current progress of the game.
As you’re probably aware by now, Adobe is discontinuing Flash by end of this year. If you have Flash games, they will no longer work afterwards, as browsers, such as Google Chrome, will completely block Flash content.
So, if you want to preserve your Flash, you’ll have to re-build it in another platform, and if it’s to remain as a web-based game (meaning you’re NOT converting it from web to mobile), then HTML5 (Canvas/WebGL) is likely your best bet.
I previously announced that I was taking on the challenge to convert a Flash game I made for a previous client to HTML5. I will continue to post progress updates on the game until the conversion has been completed.
Part 5 – Collision With Missiles, Asteroids, and Player Ship
Part 6 – First Power-Up Item (this article)
Let’s get started. The updates covered in this article are:
Adding the power-up item graphic
Adding a new collision shape
Player Collects An Item
1. Adding The Power-Up Item Graphic
The power-up item we’re adding is one of the simplest ones in the game: a health booster. When you collect this item, it restores a little health to your ship. Unlike traditional Asteroids game, Blasteroids is not one-hit-kill, meaning, one hit from asteroids, enemy ships, or enemy fire won’t kill you (unless the hit took out all your health).
Setting Up The Item AnimatioN
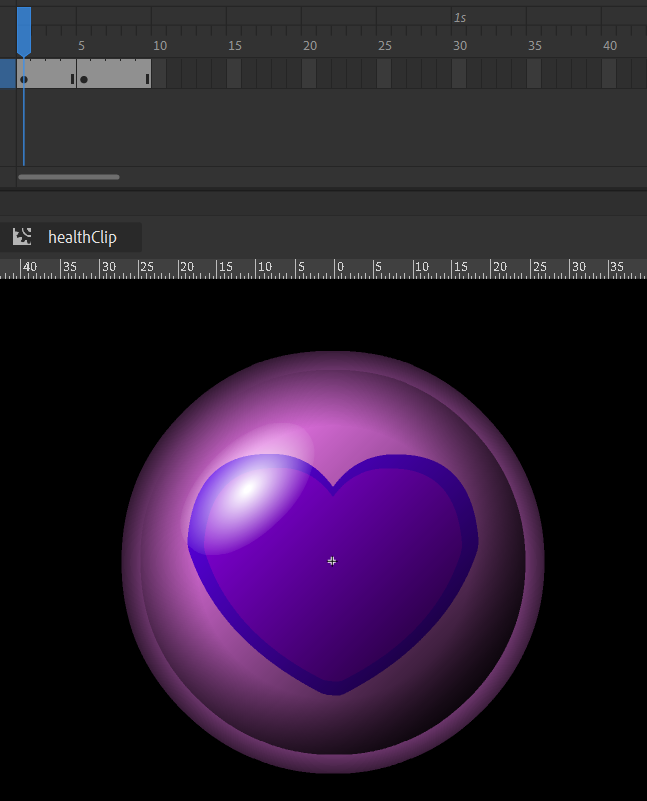
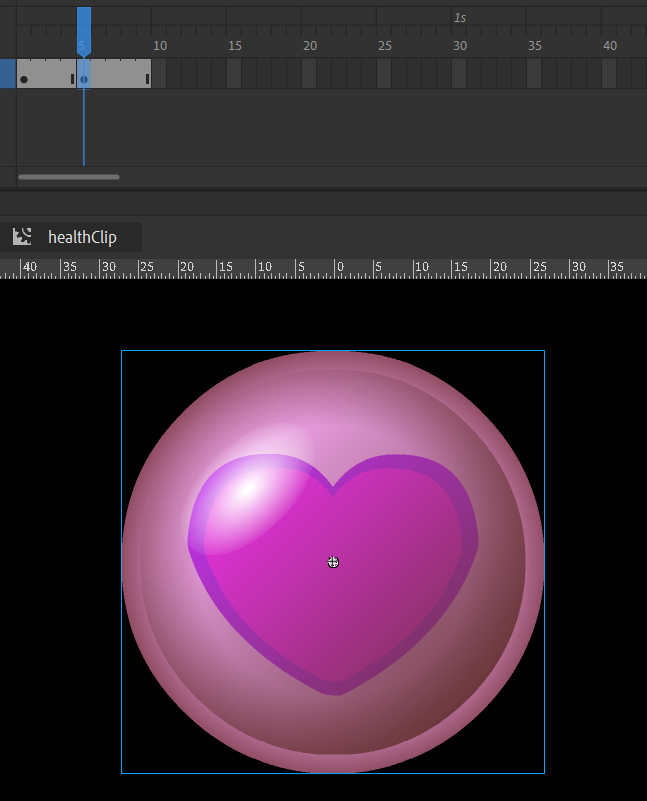
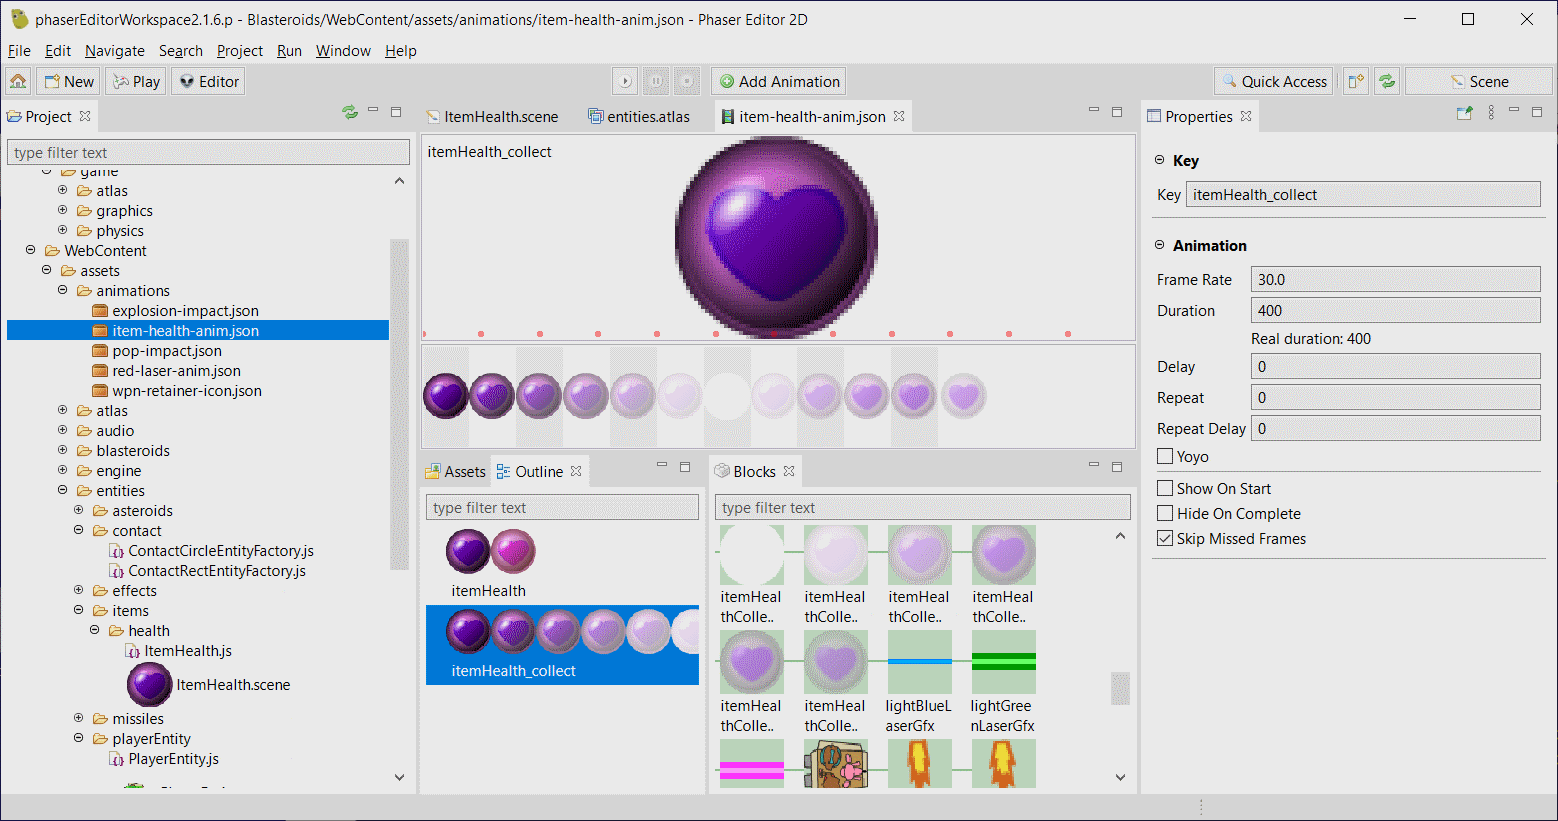
In the original Flash game, power-up items are displayed with two animation states, normal, and highlighted, as you can see from the video demo at the beginning of this article.
In Adobe Animate, the animation timeline sets up the two states like this:
We’ll need to extract both states as bitmap images, as we’ve done previous animations. You can see this animation is nine frames in length. However, we don’t need to extract all nine, because there are only two animation states. So, we can export the graphics only on frames one and five.
Note: Adobe Animate presents a new dialog for exporting images. It presets some new functions you may find useful, but all we need here is to ensure that “Clip to Stage” is unchecked so they we extract only the complete image, without any white space or truncation. And of course, you can still use the legacy dialog if you prefer.
Once those two images are extracted, you can import them into Phaser Editor. You’ll then set up an animation for the item. It’s just like how the animation for the player’s ship missile was setup back in Part 3 of this article series.
Setting Up The Item Collection Animation
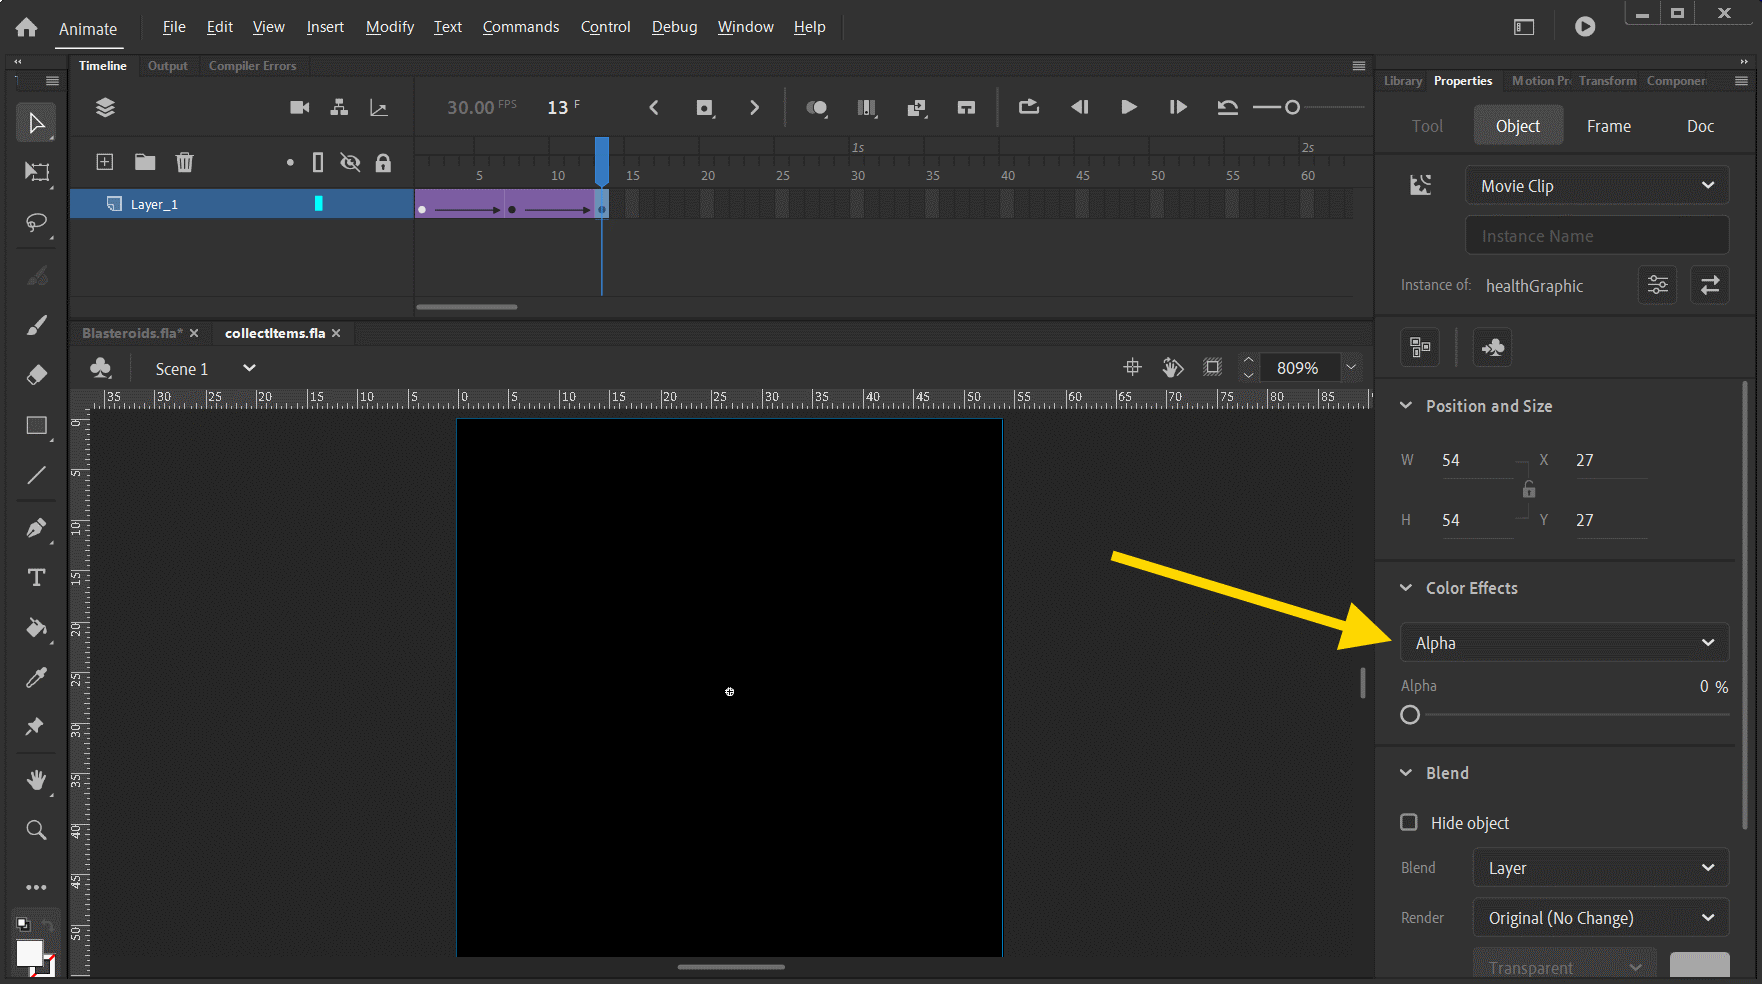
When the player collects an item, it’s removed from the scene. And while we could simply make the item disappear, we can add a little polish to that. 😏
If you need to, have another look at the demo video. When an item is collected, it plays a quick animation before being removed.
The original Flash did this using Greensock (GSAP) tweening ActionScript 3 code, like the following:
...
blendMode = BlendMode.LAYER;

var tlVars:Object = {
  onComplete: onTimelineCollectDone
};

var timeLine:TimelineLite = new TimelineLite(tlVars);

var ctVars:ColorTransformVars = new ColorTransformVars();
ctVars.brightness = 2;

var vars:TweenLiteVars = new TweenLiteVars();
vars.colorTransform = ctVars;
timeLine.append(new TweenLite(this, 0.25, vars));

vars = new TweenLiteVars();
vars.addProp("alpha", 0);
timeLine.append(new TweenLite(this, 0.25, vars));

timeLine.play();
...
This animation can be done using an animation of three keyframes.
The first one is the original image with no effects applied.
The second keyframe will set the brightness to full white. As you can see from the above code, it sets the brightness to 2. The equivalent of this in Adobe Animate is to set the Brightness property to 100%.
The final keyframe sets the alpha property to 0%.
Now that the keyframes are in place, we can set up the duration from one keyframe to the next.
In the code above, each tween runs for 0.25 seconds (Greensock measures durations using seconds instead of milliseconds). We already know how to convert seconds to frames with this formula: frames = seconds x frames-per-second
Note:frames-per-second is set to 30, the running speed of the game.
So the number of frames is 0.25 x 30 = 7.5 frames. You can round to either 7 or 8 frames.
Finally, you’d create Classic Tweens between the keyframes to create finalize the animation.
Once that’s done, then the animation can be exported as a series of bitmaps to be imported into Phaser Editor as made into an animation. You can add this animation as a separate one in the same JSON file that you created the first item animation as shown here:
2. Adding A New Collision Shape
Now that the idle and collect animations have been created, we can set up the item game object for collisions, so the player can pick it up.
If you want, you can assign the existing square node to this item, similar to how the player game object was setup here.
But, we’re not gonna do dat. 😎
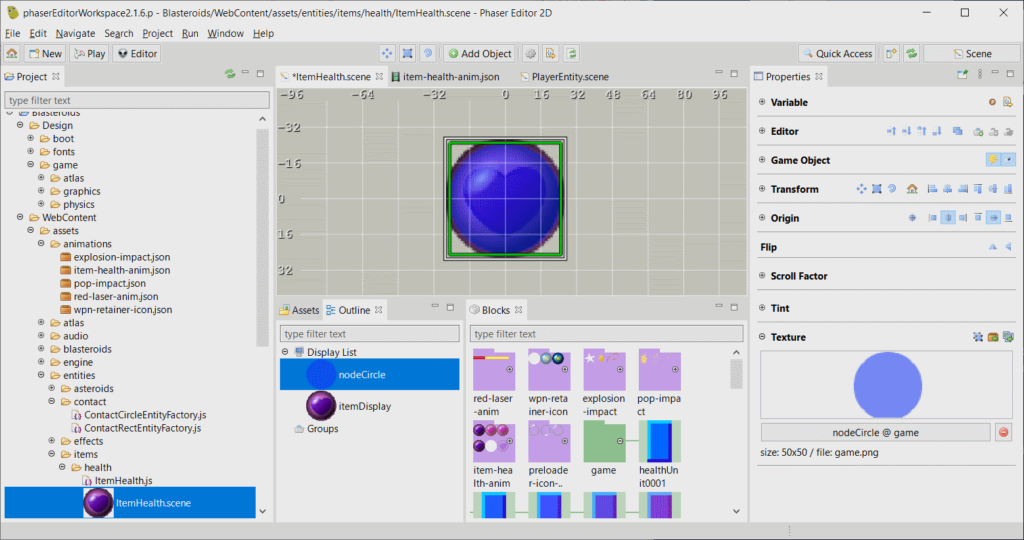
Since the icon image is circular, we’re gonna set up a new circle shape!
Just like we previously created a ContactRectEntityFactory factory file, the steps are very similar to the rectangular contact factory we made.
Create a factory class called ContactCircleEntityFactory with the factory name circleContact.
Create a display object class for the factory that extends Phaser.GameObjects.Image. When you register circleContact with Phaser.GameObjects.GameObjectCreator.register, be sure not to add the display object to the display or update lists.
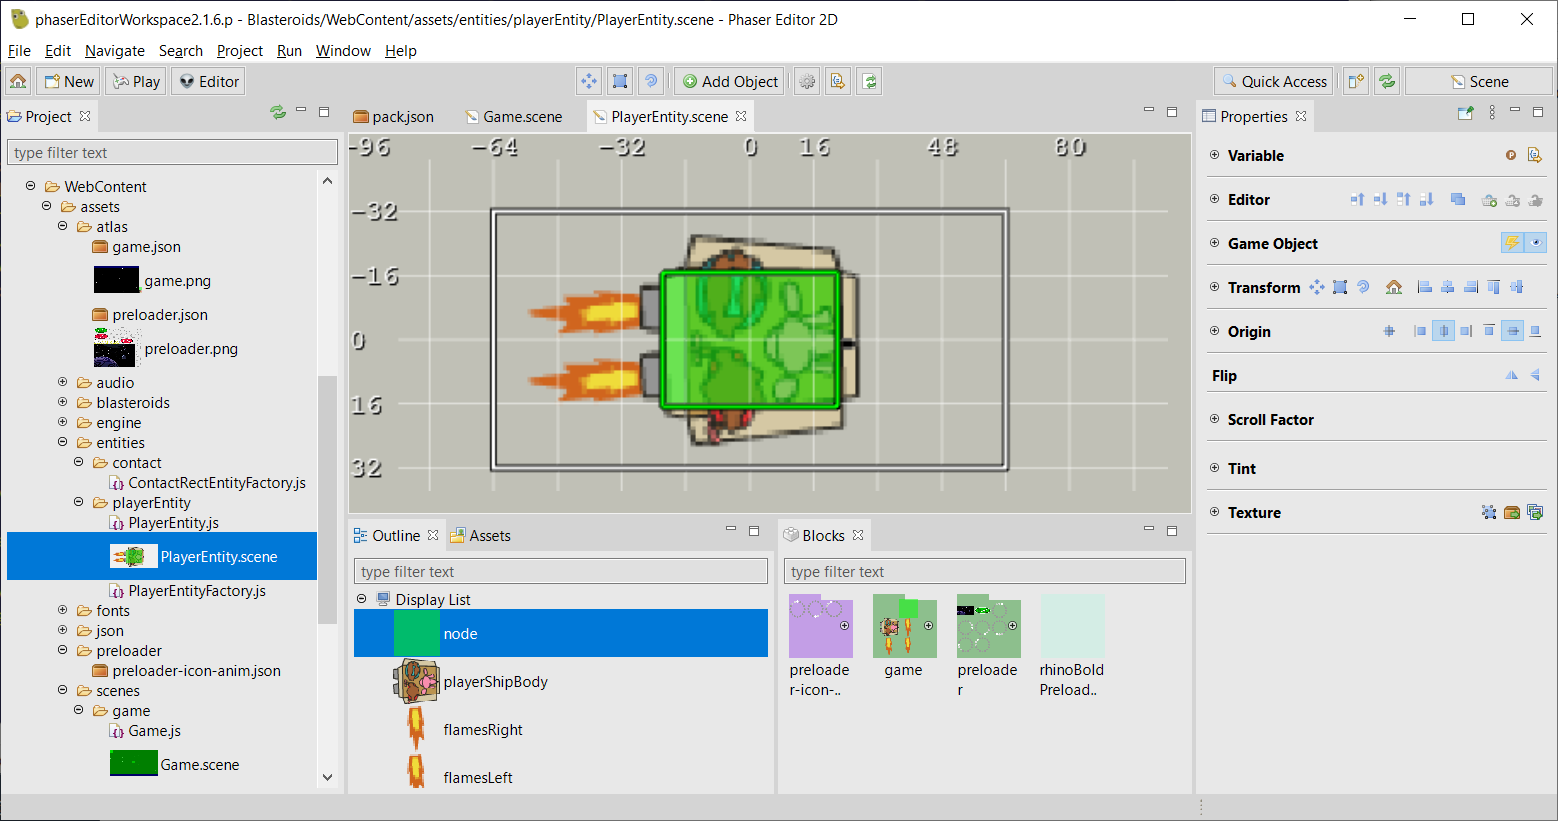
Just like the player object, create a new Scene in Phaser Editor. Name it HealthItemEntity. This will be the factory display item.
In Phaser Editor, add the image that will visually represent the health item. Set its Var Name to itemDisplay, and check the Name box in the Game Object section. Then add a circular image to the HealthItemEntity scene and assign it the circleContact factory. You’ll need to create a circle graphic in your graphics tool of choice. This image acts as a temporary placeholder that will determine the size (radius) of the actual circular physics body. Phaser Editor will generate code in the format of: var node = this.add.circleContact(x, y, texture, frame);
A blueish “nodeCircle” image has been placed onto the scene of this item.
In EntityFactory constructor, add this to the this.add object: circleContact: this._make_circleContact; After the edit (this includes edits from previous articles), the add object should look like this:
Create a new make_circleContact method for the EntityFactory class:
EntityFactory.make_circleContact
make_circleContact(x, y, texture, frame) {
  var img = new ContactCircleEntityFactory(this.scene, x, y, texture, frame);
  this._add(img);
  return(img);
}
In the Entity class, create a Matter physics body for every display object that’s an instance of the ContactCircleEntityFactory class.
You can obtain the bounds of a circle entity by calling the Phaser.GameObjects.getBounds() method on that contact object. Assuming you created the circular image from step 3, once you have the bounds, you can divide the width (or height) of the bounds by two to obtain the radius of the circle. You’ll need the radius when creating the circle physics body. Consider the following code for creating the body:
createCircleBody
function createCircleBody(circleEntity) {
  var bounds = circleEntity.getBounds();
  return(
    this.scene.matter.add.circle(
      bounds.centerX,
      bounds.centerY,
      bounds.width / 2,
      {
        isSensor: true
      }
    ));
}
Similar to this.scene.matter.add.rectangle, which creates a rectangular body, this time, this.scene.matter.add.circle is used to create a circular body. The highlighted line 7 specifies the radius of the circle, which is required when creating a circular body.
Now, when you create your item entity, it will have a circular physics body attached to it.
4. Player Collects An Item
From here, we can collision-check when the player touches an item. While each item has a different effect, we’ll only cover the health item here.
Since all Matter physics bodies are sensors (they don’t respond with colliding with other bodies), we can use something like this: this.scene.matter.overlap(playerEntity, itemEntity); The function will return true if the player ship and the item are touching.
Once the player has touched the item, you should immediately remove it, so that the player can’t collect it again!
But, we don’t want to do that right away, because we wouldn’t be able to see the “item collection” animation we set up earlier.
Since collision is not handled automatically in Blasteroids by Phaser (it’s using polling by checking collisions each frame), you can add a new property to Entity. This property can be used to determine if the entity will be checked for collisions. Let’s call it Entity.canCollide, and by default (in your Entity constructor), you can set this property to true.
So when an item has been picked up, you can set this property to false.
Ok, say you store all your game entities in an array. Let’s call it gameEntities. Then, your main polling loop might look something like this:
for (var index1 = 0; index1 < this.gameEntitities.length - 1; index1++) {
  var entity1 = this.gameEntitities[index1];
  if (!entity1.canCollide) {
    continue;
  }

  for (var index2 = index1 + 1; index2 < this.gameEntitities.length; index2++) {
    var entity2 = this.gameEntitities[index2];
    if (!entity2.canCollide) {
      continue;
    }

    if (this.scene.matter.overlap(entity1, entity2)) {
      this.handleCollision(entity1, entity2) || this.handleCollision(entity2, entity1);
    }
  }
}
handleCollision
function handleCollision(entity1, entity2) {
  if (entity1 instanceof Player) {
    if (entity2 instanceof Item) {
      entity2.canCollide = false;

      //(if health item
      //add health to player, and update health text on hud
      //otherwise, handle whatever item was just collected)

      //play collection animation
      const ITEM_DISPLAY_NAME = "itemDisplay";
      var itemDisplay = entity2.getByName(ITEM_DISPLAY_NAME);

      const DATA_ANIM_ITEM_KEY = "collectAnimKey";
      var animKey = itemDisplay.getData(DATA_ANIM_ITEM_KEY);
      entity2.anims.play(animKey);

      itemDisplay.on(Phaser.Animations.Events.SPRITE_ANIMATION_COMPLETE,
        this.onItemCollectionAnimationComplete, entity2);

      return(true);
    }
  }

  return(false);
}
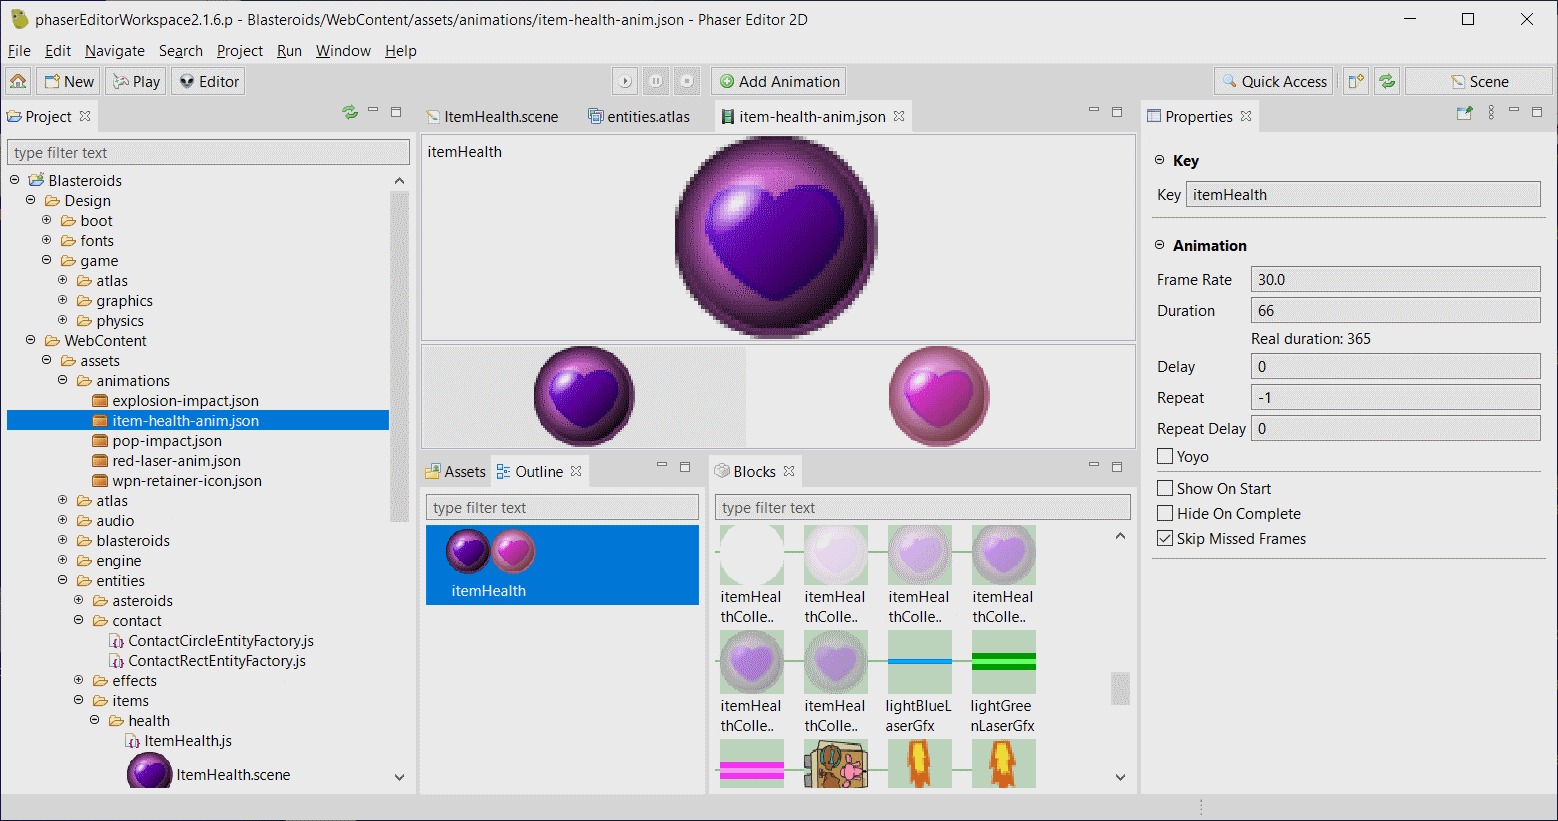
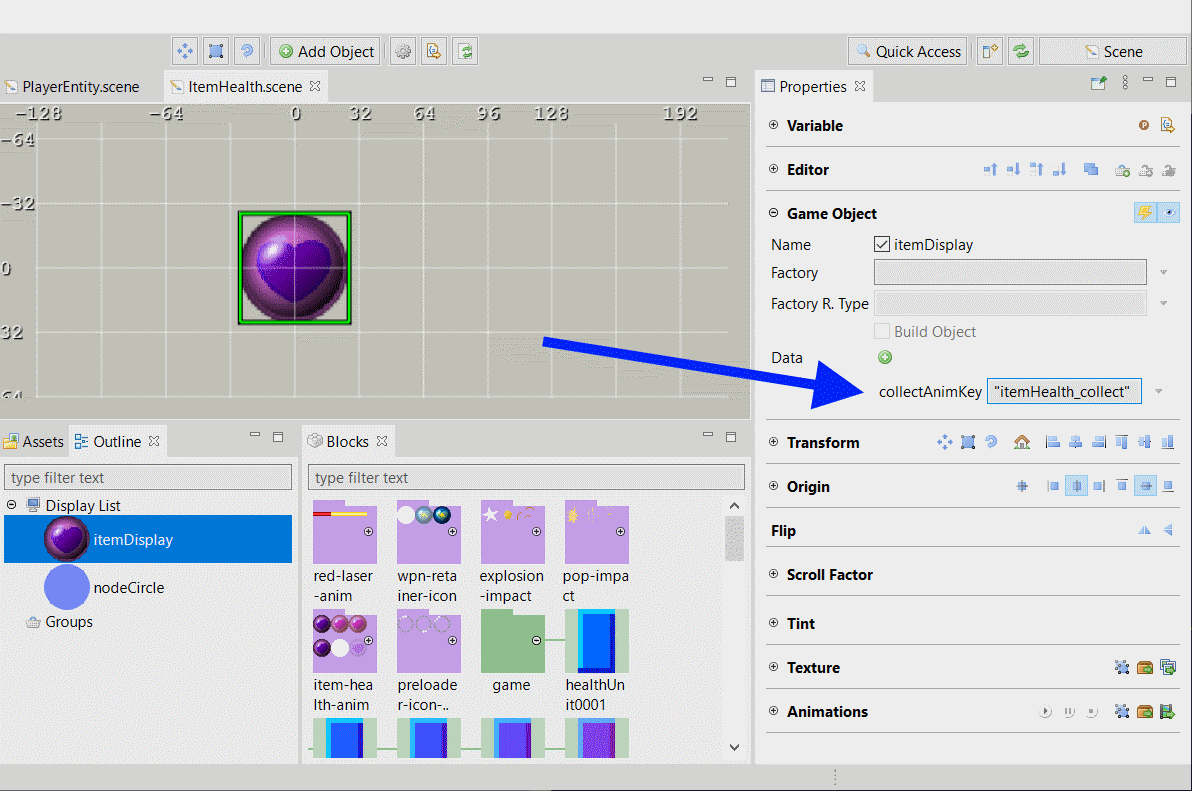
To get the name of the animation key for the collect animation, you could store it as a data property in the item entity scene.
In this image, the name of date key is collectAnimKey and its value is the same value that you used as the key of the collection animation when you set it up. Also, you’ll notice that we get the item display, because the base GameObject class has the Data Manager as a property. In Phaser Editor, when you assign a data property to an object in a scene, Phaser Editor generates code similar to this: itemDisplay.setData("collectAnimKey", "itemHealth_collect");
When we’re creating an entity from our entity factory EntityFactory.DisplayMixin method, it copies the display object onto our Entity class. And in the case of our health item, we named that display object “itemDisplay”. We can get a reference to this display object with getByName. Then, we can get a data property from the underlying Data Manager using the getData method.
Note: Every item will be named “itemDisplay”. However, the name of the key of the animation key must be unique for each item to avoid animation naming conflicts within Phaser.
Also, since the item was not immediately removed when collected, because it’s playing the collection animation, you can remove the item once the animation has completed playing. This can be done using the Phaser.Animations.Events.SPRITE_ANIMATION_COMPLETE event handler. When this event is dispatched, you can finally destroy the item entity.
FYI: The Player entity class was defined back here.
The Item class has not been defined yet, but it would be similar to Player.
Item class
Item = class extends Entity {
  constructor(scene, x, y, itemEntityFactory) {
    super(scene, x, y, itemEntityFactory);
  }
}
The itemEntityFactory would be a reference to the scene that was created for the item. In this case, this would be HealthItemEntity.
That’s it for this article! Now we’ve converted an item to help the player out. Because believe you, once we get this game going with all the other threats coming at you, you’re gonna need all the help you can get. 💪🏾
Stick around as I continue making progress, converting this Flash browser game to HTML5 browser game!
With every new piece of functionality to HTML5, I get a little more excited really excited about the progress… especially when the more playable updates (like this one), come along! 😄
In this part 5 of the series of converting the Flash game, Blasteroids, to HTML5 using Phaser and Phaser Editor, you can also collide with asteroids. You can now also fire your missiles to blow them up!
Check out this short demo video of the current progress of the game.
By the way, if you’d like to gain access to these work-in-progress updates, if you’d like to play around with these updates instead of just watch them, you can sign up on the mailing list below. You’ll also be notified every time new content is posted to the site.
As you’re probably aware by now, Adobe is discontinuing Flash by end of this year. If you have Flash games, they will no longer work afterwards, as browsers, such as Google Chrome, will completely block Flash content.
So, if you want to preserve your Flash, you’ll have to re-build it in another platform, and if it’s to remain as a web-based game (meaning you’re NOT converting it from web to mobile), then HTML5 (Canvas/WebGL) is likely your best bet.
I previously announced that I was taking on the challenge to convert a Flash game I made for a previous client to HTML5. This will be presented in a series of articles, including this one.
Part 4 – Adding text, health, and icons to HUD (this article)
Part 5 – Collision With Missiles, Asteroids, and Player Ship (this article)
Let’s get started. The updates covered in this article are:
Adding missile explosions
Adding collision checking
Adding Explosion Animations
We’ll be adding the explosion for the player missile. In the demo video above, you’ll also see a larger explosion when an asteroid is destroyed. We’ll only go over adding the missile explosion, since adding both use the same steps.
Every missile that is fired will eventually be removed from the game by one of two methods. One: it collides with another game object; or two: it travels its full distance and goes away. Either will result in the missile exploding.
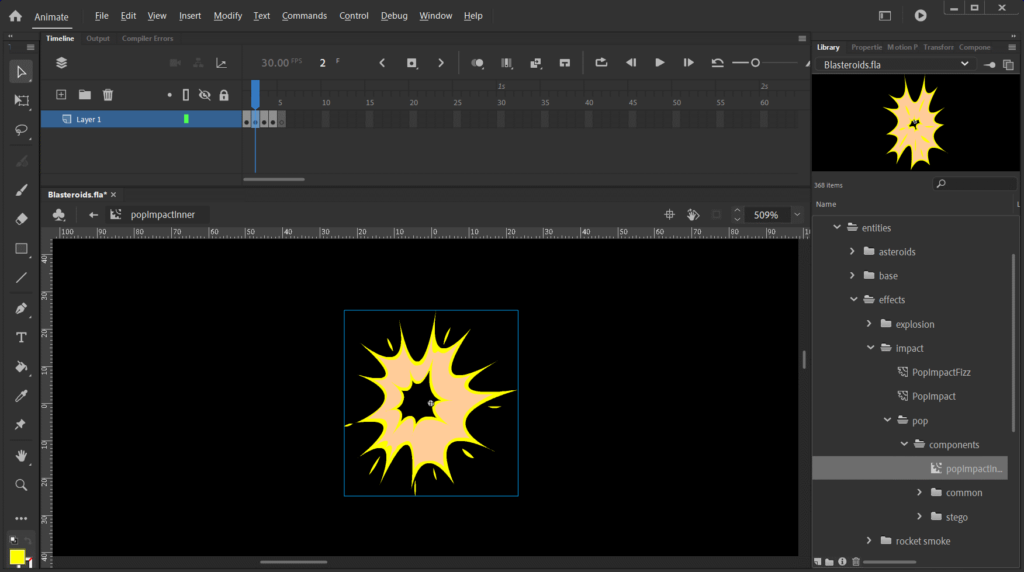
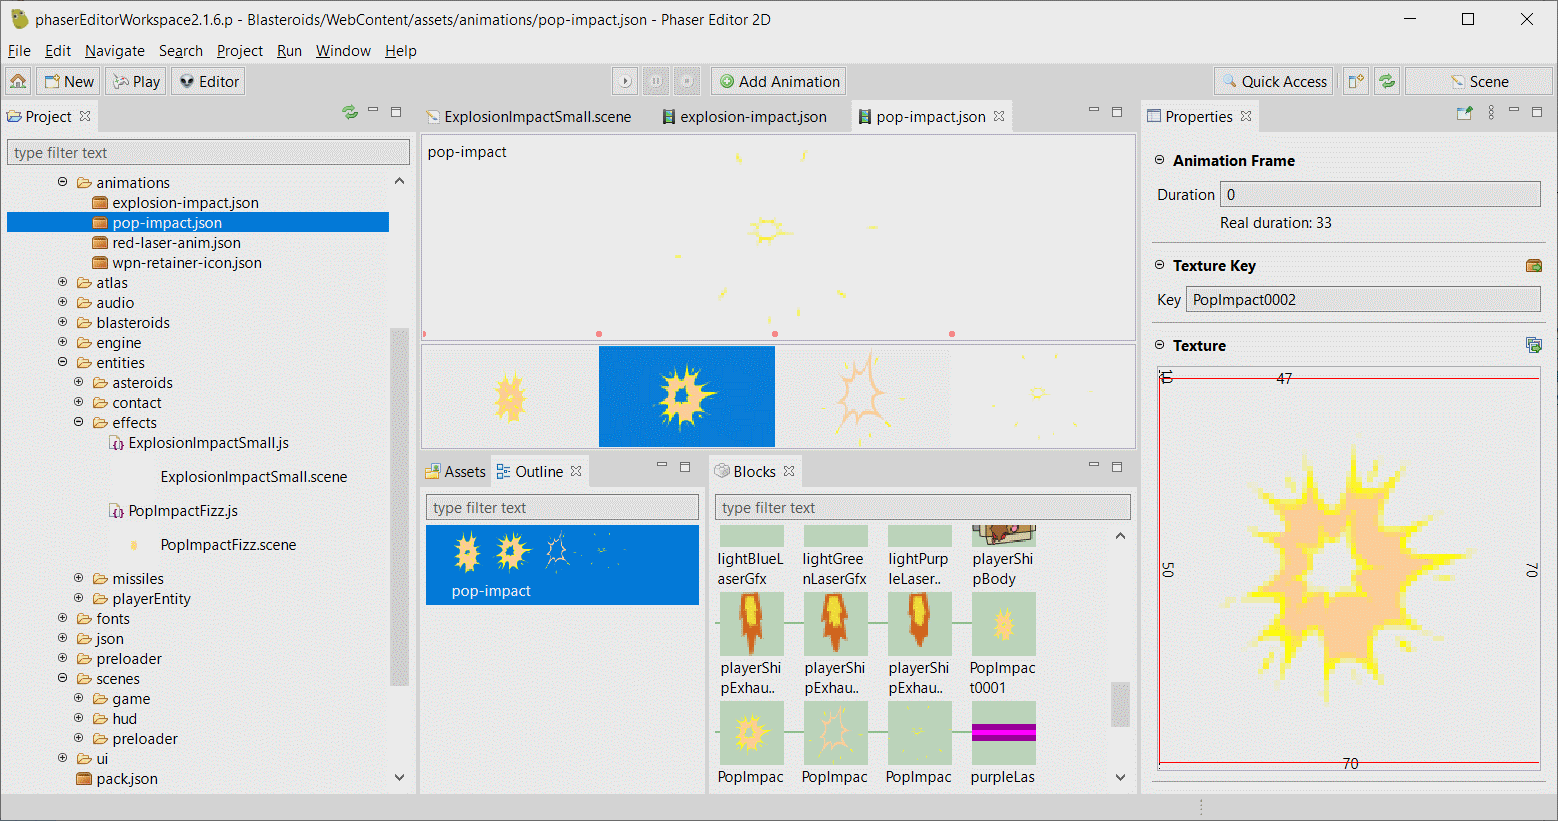
Setting Up The Explosion Animation
First, we export all the frames in this animation as individual PNG bitmaps, then recreate them as an animation in Phaser Editor. Part 3 of this series went over how to do that, if you’d like to see how that’s done.
In the original ActionScript 3 code, when explosion game objects are created, they are done so using as class constructors defined in a variable. To accomplish this in Phaser, we return to our EntityFactory class. In Phaser Editor, we can create a new Scene, remove the Scene Key, change the Super Class to Engine.Entities.EntityFactory, and change the name of the create method to _create.
When you want create an instance of this missile explosion, you’d use the Entityconstructor and pass it the name of the class name of the explosion scene. This article assumes it’s named “MissileExplosionScene”.
To create the missile explosion animation, you could start with something like this:
let missileExplosion = new Entity(missile.scene, missile.x, missile.y, MissileExplosionScene);
Let’s assume you have created the explosion animation from earlier, with an animation key named, "missile-explosion". Phaser Editor will automatically create the code for you, looking something like this:
As the player fires missiles and explosions, we want to remove them when we’re done with them. Leave them hanging around (even if they’re no longer visible on the scene), and they’ll continue to use up memory resources.
The missile is simple to remove. When it collides with something (which we’ll cover later in this article), or if it travels its full distance, we want to remove it from the scene. Then, we create the explosion animation in the same location the missile was, when we removed it.
Removing a missile is simple. You can use Phaser’s destroy method.
Now that the missile is removed, the explosion animation can be created and added to the scene. The animation should be removed once it’s finished playing. We can tell when this happens by using attaching an event listener to the animation. The animation is attached to the explosion sprite, but first, we need to gain access to the sprite object itself.
When the Entity constructor is called, with its displayFactoryClass parameter as MissileExplosionScene, it will attach its display object to this Entity. We can get the sprite object with code like this:
let sprite = missileExplosion.getAt(0);
let anims = sprite.anims;
Note: When the missileExplosion object is created, recall it calls the EntityFactory.DisplayMixin to move all the display objects from the scene onto this Entity display object container. Because there was only one sprite added to the scene, it will be placed at index 0. Hence, the getAt(0) function call above to retrieve that sprite.
Once we have the anims reference we can listen for the completion of the animation with this code:
When the explosion animation is complete, Phaser will automatically call the onSpriteAnimationComplete method. In that function, we can finally remove the missile explosion using the destroy method.
That’s it for the explosion animation. Creating the explosion for the asteroid is done the same way, except a different explosion animation is used.
Adding Collision Checking
When we first started creating game objects, we created the Matter physics bodies on them for collision detection. Now, we’re going to actually perform the collision detections.
Let’s assume we have a similar body assigned to an asteroid game object, with an instance game object named asteroid. To check for collision, check something like this:
The overlap method returns true if the two bodies overlap with each other. From there, you can take the necessary action (in our case, damaging/destroying the asteroid, and exploding the missile).
Note: Since we’re not using the Matter physics system in its traditional matter (Phaser automatically moves the bodies and sprites around in a rigid-body-simulated world, we need to update the positions of the bodies ourselves. Each time a sprite of a game object’s moves, we must move the body attached to it ourselves. Assuming both your sprite and body have origin points in the center, you can simply update the position of the body to match that of the sprite.
That’s it for this article! Now we’re starting to see more playable aspects of this conversion process come together, and there is much more to come! I hope you continue to stay tuned as I make more progress. 🙂
But, Flash is not the only Adobe technology being discontinued. Announced on May 30, of 2019, Adobe is also discontinuing Adobe AIR by end 2020. If you’re interested, you can read more details here.
So, if you want to preserve your Flash, you’ll have to re-build it in another platform, and if it’s to remain as a web-based game (meaning you’re NOT converting it from web to mobile), then HTML5 (Canvas/WebGL) is likely your best bet.
I previously announced that I was challenging myself by creating this side project to convert a previous Flash game I made for a previous client to HTML5.
Part 2 – Displaying objects, keyboard input, and object wrapping collisions
Part 3 – Missiles and HUD (this article)
With further ado, let’s dive right in. The progress covered in this article are:
Adding a player missile
Adding HUD details
Here’s a quick video of what’s done so far:
1. Adding A Player Missile
Well, you won’t be able to survive for long if you can’t even fire weapons to defend yourself, right? (: So let’s add a missile projectile to the game.
Blasteroids contains over 20 missiles, but at this time, we’re only adding this one (think of it as an MVP). The remaining missiles are added in similar fashion.
A little background on how the player’s weapons system is designed.
When I was first building Blasteroids, I got inspiration from Gunstar Heroes, a run and gun game on the Sega Genesis. That game featured a “weapons combination” mechanic. There were four weapons, and you could hold any combination of one or two of them at once. If you had two, they would combine to form a stronger weapon.
You can see a few seconds of several weapon combos being demoed here.
Well, in Blasteroids, I did something similar. I took a series of weapons, and gave them various 2-weapon combinations, hence having so many missile objects.
With that, let’s convert the player’s default missile.
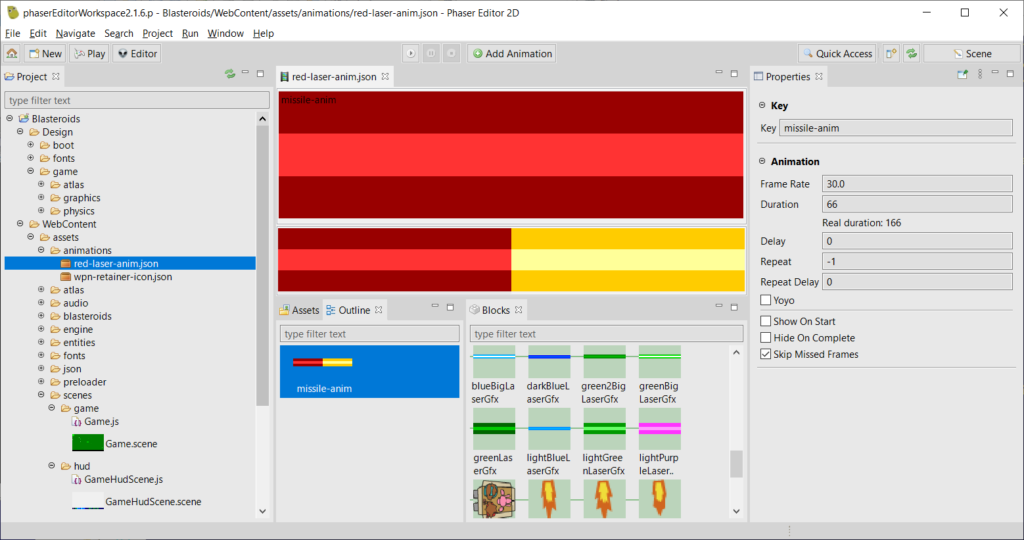
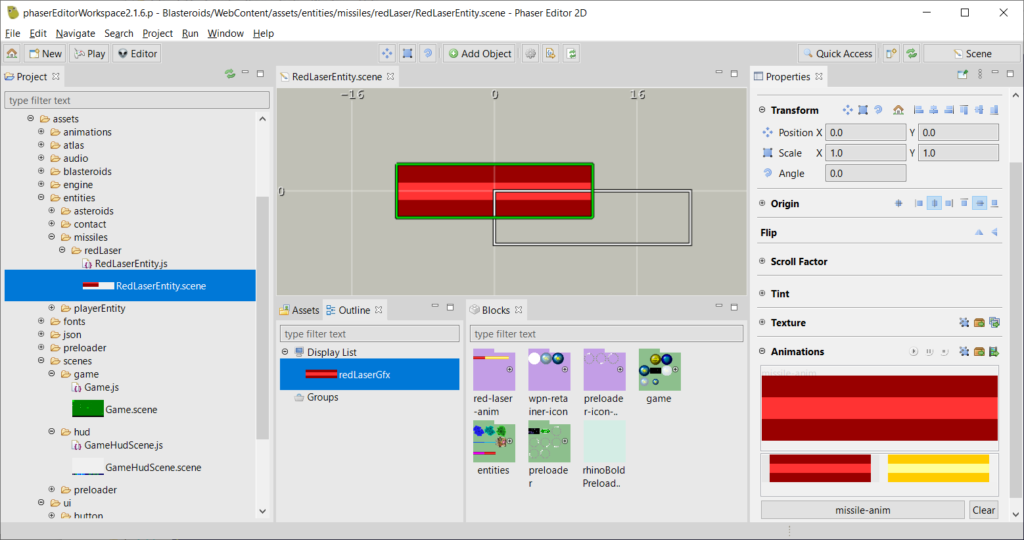
Setting Up The Missile Animation
In the Flash version, most missiles were made of a two-keyframe animation.
First thing’s first. You need to extract both vector graphics, the red and the yellow lasers, and save them as PNGs. I eventually added them to the game’s texture atlas, which you can easily set up in Phaser Editor.
Next, you can create a Phaser animation using those two graphics inside the Editor.
Remember: I want the HTML5 version of Blasteroids to maintain the look and feel of its original Flash counterpart as much as possible. This includes animation speeds and how long each of animation frame is shown.
In a previous article, I added code to make the game appear to run at 30 FPS (frames per second), as the browser runs at 60 FPS, and you can’t change that. So at 60, the game runs too fast.
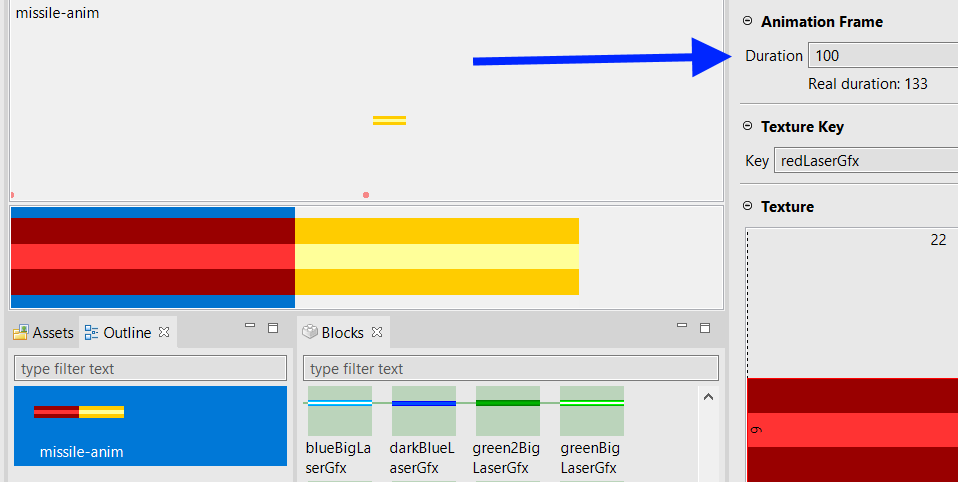
With that in mind, let’s have another look at the original animation frames in Flash. From the image below, that animation is composed of six frames: the first three showing the red laser graphic, and the remaining three showing the yellow laser graphic:
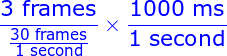
Each frame in that animation is shown for one frame of execution. And each of the two laser images lasts for three frames. But Phaser doesn’t measure duration in frames; it uses milliseconds. So we need a way to convert 3 frames (running at 30 FPS) to milliseconds. This formula is used:
Frames-To-Milliseconds Equation
Both “frames” units cancel each other out, as well as both “second” units. The only unit left is ms (milliseconds), which is what we want.
Now we can do the math: 3 / 30 x 1000 => 3000 / 30 => 100
So, each animation frame in Phaser Editor will be 100 ms in duration.
A duration of 100 ms is set for both, red and yellow graphic animation frames.
Setting Up The Missile Object
Now that the missile animation is ready, we can setup the game object that will be displayed when the missile is fired in-game.
First, create a new Scene in the Editor, add a Sprite. Make sure to add a Sprite, not an Image, because Phaser sprites support animation, while images do not. Be sure it is positioned at (0, 0) on the scene, and assign it the red laser graphic.
Next, select the image, go to the Animations section, and assign it the missile animation you just created. Just like how the player ship object was set up, assign the Super Class as EntityFactory.
We’ll be revisiting the EntityFactory class, because we need to replace the add factory for Phaser Sprite objects similar to what we did with Image objects in the last article.
We’ll need to update the EntityFactor constructor also:
The highlighted lines are the new line added. As you can see, the first one references a new function make_sprite, which is written below. The second one maps this.add to the base Phaser Container object.
EntityFactory.make_sprite
make_sprite(x, y, texture, frame) {
var spr = new Phaser.GameObjects.Sprite(this.scene, x, y, texture, frame);
this.scene.sys.updateList.add(spr);
this._add(spr);
return(spr);
}
Note the highlighted line. Unlike make_image, we want to add the sprite to Phaser’s “update list”. Objects that are added to this list will be updated every frame of Phaser execution. The sprite uses animation, and animations need to be updated every frame, so they can, well, animate 🙂
Finally, to create an instance of the missile (when the player “fires” a missile), you’d use the Entity constructor, passing the class of the missile factory scene display you created earlier.
Note: You may have noticed there is no green collision box like there was with the player scene. Since this missile is a rectangle itself, you can simply add a physics body with the same bounds as the missile graphic itself. See EntityFactory.make_rectContact for this. Of course, you can still add a green collision box if you want. (:
2. Adding HUD Details
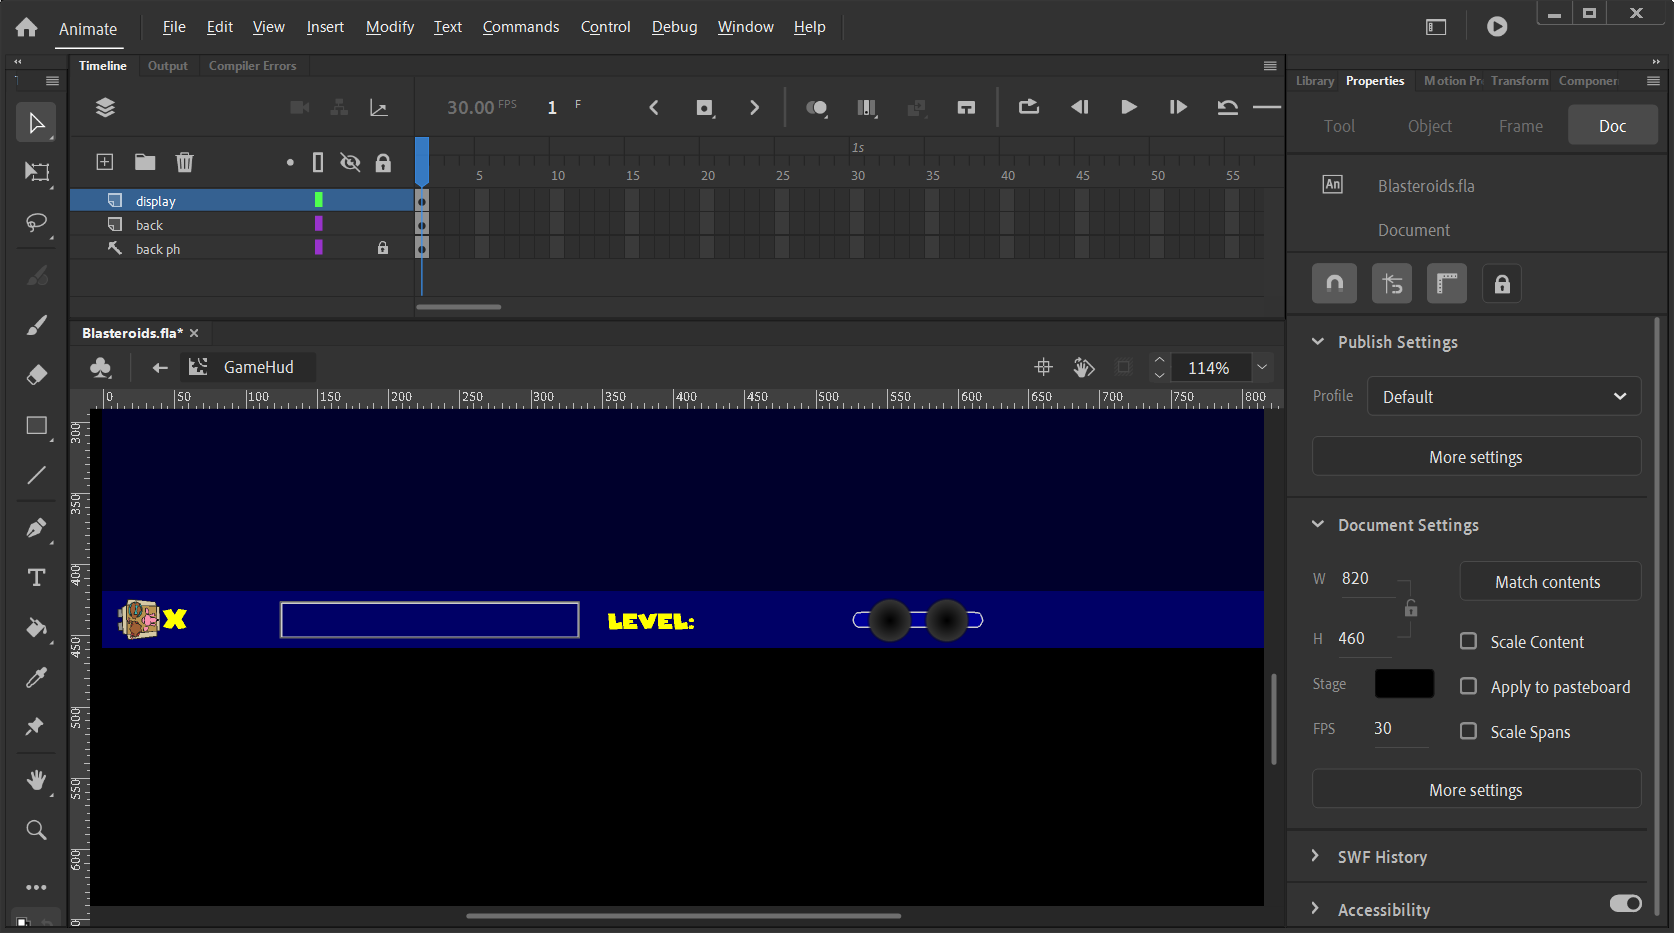
The HUD as it appears in Adobe Animate.
We’ll begin creating the HUD (Heads Up Display) in this article. But for now, we’re not going to add any functionality to it. We’ll just be adding all the static objects (those that don’t change), and merging them to form the back panel bitmap of the HUD.
Elements like the text, power up icons, and health bars will be created in a later article.
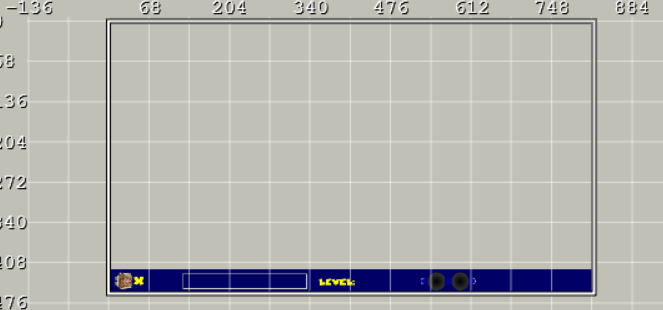
In this image, I’ve temporarily hidden all the non-static objects, then converted the image to a bitmap to be imported into Phaser Editor.
The HUD is another scene, but it is not a game object to be setup like the player or missile. Because the HUD will be shown on screen along with the rest of the game, you can see the HUD is placed at the bottom of the scene view (The original Flash Blasteroids game used a screen size of 820 x 460, so we also use that in the HTML5 version.) The HUD objects placed at the bottom, because you can’t set the position of a scene; it’s always offset at (0, 0) (at least, I don’t know of any way to reposition a scene, if someone knows how, please let me know! 🙃)
I want to keep the HUD code separate from the other game logic, so the HUD will be an additional scene added to the game scene at run-time.
At the same time, I prefer not to add game logic code to the JavaScript scene files created by Phaser Editor. So, I’ll be using object composition, by creating a GameHud class, and from within, creating the GameHudScene.
This code creates the game HUD scene as a new Scene object and adds it to Phaser’s scene manager.
From your main game scene, you can create an instance of the GameHud class with some code that looks like this:
Game constructor
class Game {
constructor(scene) {
this.gameHud = new GameHud(this);
}
}
We’re passing the game scene as the argument for the GameHud instance, so that it can in turn create the GameHudScene, and add it to the scene manager.
That’s it for this article. Next, we’ll add more to the game HUD, including text that shows the lives, current level, and score, the health bars, and game icons. Stick around for more!
Also, Flash is not the only Adobe technology being discontinued. Announced on May 30, of 2019, Adobe is also discontinuing Adobe AIR by end 2020. I found this a bit surprising, because AIR – when used along with FlashDevelop – made it easy to take a single code base and target both major mobile giants, Android and iOS, without the aid of their native development tools (Android Studio for Android, and Xcode + Mac OS for iOS). If you’re interested, you can read more details here.
So, if you want to preserve your Flash games, you’ll have to re-build them on another platform, and if they’re to remain as a web-based game (meaning you’re NOT converting from web to mobile), then HTML5 (Canvas/WebGL) is likely your best bet.
I previously announced that I was challenging myself to convert a previous Flash game I made for a previous client to HTML5.
After many hours of studying Phaser 3, working with Phaser Editor, reconfiguring graphical assets, and re-writing ActionScript 3 code as JavaScript, there is finally a moving spaceship on the canvas!
Check this out
It’s not much, but there’s a lot that went into just this, coming from a conversion standpoint. 🙂
Converting Code
First thing’s first: I wanted to get minimal functionality, while upholding this rule: The HTML5 version of Blasteroids must maintain the mechanics and look & feel of its Flash counterpart as closely as possible.
Sure, I could just make a brand new Blasteroids game from scratch, throwing out the former AS3 code base, and only copying the assets (graphics and audio), but the mechanics and look & feel would also be different.
So, I needed to convert a large portion of the AS3 codebase over, even for this simple functionality. For the most part, the game-logic portions translate from AS3 to JS relatively easy, albeit laborious. However, I focused on the following five areas:
Setting up the scene/stage in Phaser Editor
Displaying game objects
Handling keyboard input
Collision detection
Game execution speed
So let’s have a look at these one at a time.
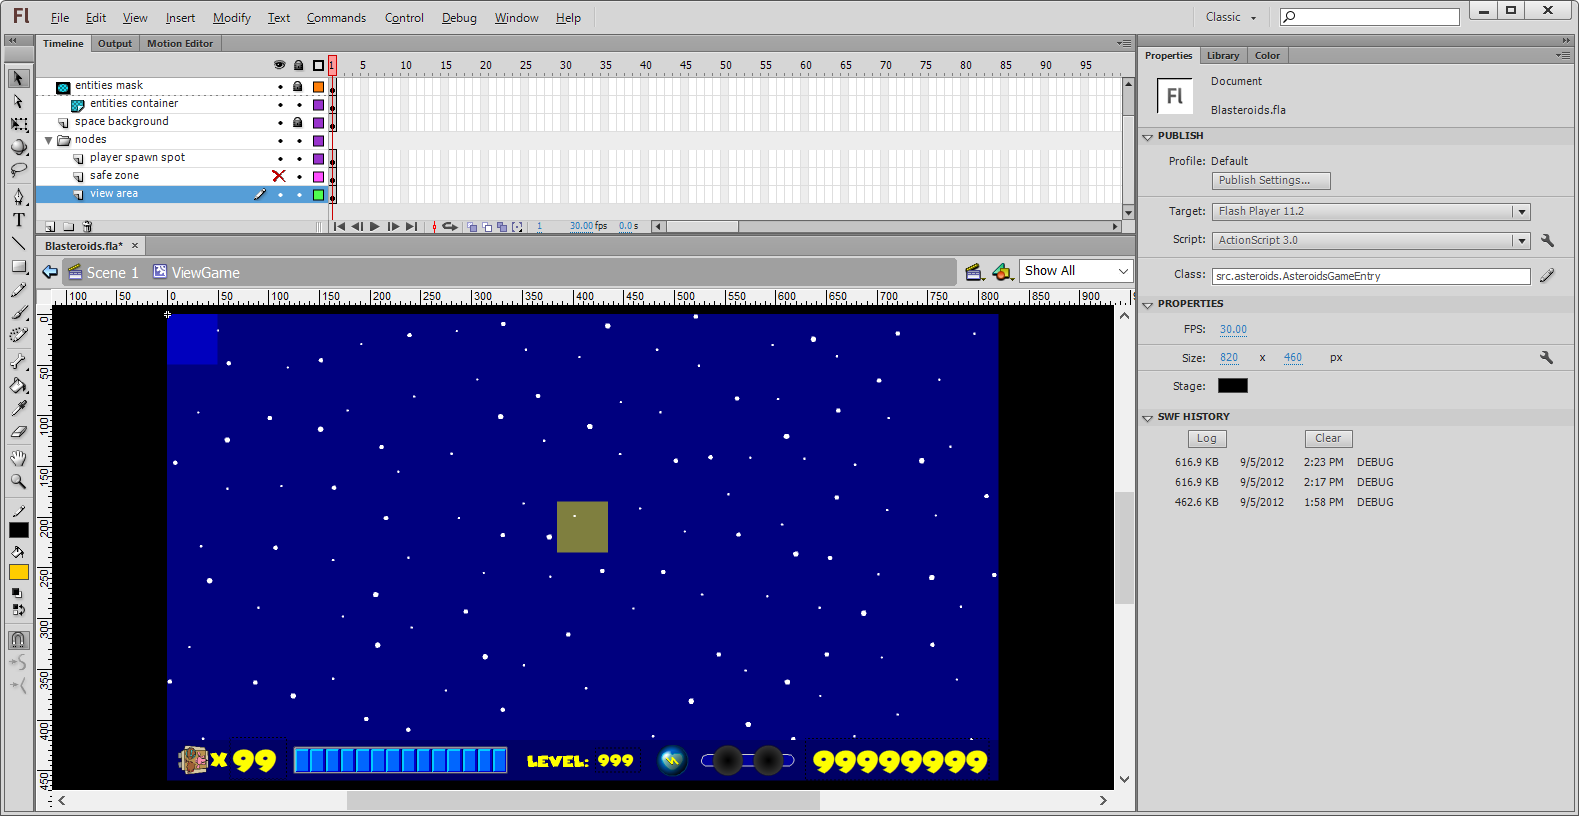
1. Setting Up The Scene/Stage In Phaser Editor
First, let’s have a look at the primary game view in the Flash editor:
And the Phaser “equivalent” looks like this:
The square and rectangular nodes here are green instead of blue, but it’s pretty much the same. Also, the HUD at the bottom is missing all the details. This is intentional; I’m only making a “MVP” at this point.
I’ll start off by re-creating most of this in Phaser Editor.
You can see a HUD (the blue bar at the bottom), two squares, one in the middle, another in the upper-left, and a space background that occupies most of the scene.
The functionality and visual elements of the HUD are not needed for this demo, so for now, I just made a blue rectangle at the bottom. The square in the middle acts as a placeholder for the player’s start location. The square in the upper-left acts as a container for all the in-game objects (player ships, missiles, asteroids, items, explosions and enemy ships).
Note: Rather than hard-code the locations of things like the in-game view and player start location, I’d rather just have those set visually, then write code that takes the locations and/or size of the rectangles, then finally removes the rectangles. The rectangles themselves only serve as temporary visual aides for the editors.
Player’s Start Location
The player’s ship will always appear in this location. All that is needed is to store the location of this node, then remove it.
Something like this works nicely:
initPlayerStartPoint
function initPlayerStartPoint() {
var node = this.scene.children.getByName("playerStartPh");
var point = new Phaser.Geom.Point(node.x, node.y);
node.destroy();
return(point);
}
Game Objects Container
This container node serves as the z-order index of where to place the in-game object container. The in-game objects are things like the player ship, asteroids, missiles, and power-up items. Every type a new object appears on the screen, it will be placed inside this container.
This node is not the container itself, but is placed at within order on the Phaser scene, to make sure all in-game objects are aligned where they are supposed to. For example, in-game objects should not appear in front of the HUD, but behind it.
The code for creating the container looks something like this:
initEntitiesContainer
initEntitiesContainer() {
var node = this.scene.children.getByName("entitiesContainerNode");
var container = new Phaser.GameObjects.Container(this.scene, node.x, node.y);
this.scene.sys.displayList.addAt(container, this.scene.sys.displayList.getIndex(node));
node.destroy();
return(container);
}
It’s worth noting that we want our container to have the same positing in the z-order as its placeholder. The highlighted line does this.
In-Game Area
This is another node where the location is saved like the player start location. In addition, we want the size of this area also.
If you’re familiar with classic Asteroids mechanics, the player’s, the asteroids, and the ship missiles wrap to the opposite side side of screen when they go off screen, while others are removed from the game when they go off screen. This area defines the bounds of the “game world”, and when an object goes outside that area, one of the two aforementioned actions will occur.
The game area can be set from the placeholder node with this:
initArea
function initArea() {
var node = this.scene.children.getByName("viewAreaPh");
var rect = node.getBounds();
node.destroy();
return(rect);
}
Note: When defining these nodes in Phaser Editor, you’ll need to obtain them in code somehow. An object will need to either be assigned a name or specified as a property of the scene, or assigning it “game object” name. As you can see in the code, I decided to give the game objects a name, then use the getByName method to get the node by its name.
2. Displaying Game Objects
Once you have a basic game area setup, you can begin adding game objects. We’ll be adding only the player game object for now.
From part 1 of this series, to set up the player’s ship, I used a scene as a Phaser game container object, and created a factory so that container could be created within code.
Since I also want to preserve the original class structure from the AS3 codebase, I needed a way to assign the visual ship container to the game object class (called Entity). In Flash, using its IDE, you can export it as an ActionScript class so you could create the display object from code.
You could then use new Player() to create a display object.
In the player ship scene, the Super Class is EntityFactory. It was Phaser.GameObjects.Container in the previous article, but in your code, EntityFactory will extend the Container. We’ll need to add some custom code, and creating EntityFactory allows us to do that.
The challenge is with how images are created in a Scene vs in a Container. In a scene, you have something like this: this.add.image(x, y, texture, frame);
But, this won’t work in a container, because it doesn’t have the add (Phaser.GameObjects.GameObjectFactory) property like a scene does. Instead, it has an add method which accepts a GameObject to add to it.
So, in order to make use of the add (from the factory) in a container, while continuing to use Phaser Editor to use scenes as makeshift containers, a little creativity needed to be worked in order to use scenes in the editor as game object containers. 😏
In the EntityFactory constructor, the code could look like:
make_image(x, y, texture, frame) {
var img = new Phaser.GameObjects.Image(this.scene, x, y, texture, frame);
this._add(img);
return(img);
}
What’s going on here? First, we want to replace the container’s add method with our own custom property that contains an image property which points to a make_image method.
When the Phaser Editor generates this.add.image calls, instead of the scene’s add.image factory method being called, our make_image function will be called instead, and we’ll go ahead and create the image from within that method, as well as use the container’s original add method to add it to the container.
Have a look at this line from the constructor:
this.add.image = this.add.image.bind(this);
Since our make_image is coming from within the this.add object, the scope will be bound to this.add, so this will reference that object, and not the container itself. The bind method creates a new method, where the this context points the value sent to bind, and we want that to be the container object.
Now that we can create a display object using our custom class from the Editor, the final piece here is to attach that display object to our Entity game object class. All our in-game objects will extend this class. The Entity class itself extends Phaser.GameObjects.Container. So we’ll start off with something like:
Entity constructor
class Entity extends Phaser.GameObjects.Container {
constructor(scene, x = 0, y = 0, displayFactoryClass = null) {
super(scene, x, y);
this.initDisplay(displayFactoryClass);
}
...
initDisplay(displayFactoryClass) {
if (typeof displayFactoryClass === 'function') {
EntityFactory.DisplayMixin(this.scene, this, displayFactoryClass);
}
}
}
The constructor takes the usual scene, x, and y parameters. But there’s this displayFactoryClass parameter? That would reference a custom class that extends the EntityFactory class. This would be the scene class that we’re using to build the player display.
Since the Entity class (from Flash) has all the child images already built into the container (when we exported it as AS3 code), we want to re-create that here in Phaser. This is where the EntityFactory.DisplayMixin method comes in, which is called from inside the initDisplay method.
EntityFactory.DisplayMixin
static DisplayMixin(scene, targetEntity, sourceEntityFactoryClass) {
var sourceEntityFactory = new sourceEntityFactoryClass(scene, 0, 0);
var display = sourceEntityFactory.list.shift();
while (display) {
targetEntity.add(display);
display = sourceEntityFactory.list.shift();
}
sourceEntityFactory.destroy();
}
What this method does is:
Creates a temporary display object using the specified entity factory class
Remove the first (bottom-most) each child display object from the factory object
Add that display object to the in-game target entity
Repeat steps 2 and 3 until all child objects have been removed from the factory object and added to the target entity
Destroy the temporary display object
To retain the correct z-ordering of the child objects, the bottom-most child display is always removed from the factory object. When that child is added to the target entity, it will be the top-most at the time it was added.
The Player class is what create its display, as well as handle all its other in-game logic. It looks something like this:
Player class
Player = class extends Entity {
constructor(scene, x, y) {
super(scene, x, y, PlayerEntity);
}
};
As you can see in its constructor, the PlayerEntity display factory class is passed to its parent Entity‘s constructor. This will create the player display and add all its visual objects to thus Player container.
Finally, to add this player ship to our view so we can see it, add it to the entities container we created in the previous step. Then use this code:
var player = new Player(scene, x, y);
entitiesContainer.add(player);
3. Handling Keyboard Input
The next functionality to be re-written is handling keyboard input.
In Flash, handling keyboard input is done by adding a KeyboardEvent.KEY_DOWN event listener to the stage (or another object that accepts keyboard input). When the event is fired, the event data will contain the key code of the key that was pressed.
Then in your game logic, if you wanted to check, for example, if the up arrow was pressed, you’d write this AS3 code:
function setupKeydownHandler():void {
stage.addEventListener(KeyboardEvent.KEY_DOWN, onKeyDown);
}
...
function onKeyDown(event:KeyboardEvent):void {
var keyCode:uint = event.keyCode;
if (keyCode == 38) {
//do whatever (38 is the key code for the up arrow)
}
}
Phaser has its own keydown event handler for capturing keyboard input. You could write something like:
function setupKeydownHandler() {
this.scene.input.keyboard.on('keydown', this.onKeyDown, this);
}
...
function onKeyDown(domKeyboardEvent) {
var keyCode = this._getKeyCode(domKeyboardEvent.code);
if (keyCode === "ArrowUp") {
//do whatever (ArrowUp is the key code for the up arrow)
}
}
Note: If you’d like to learn more about KeyboardEvent of the Web API that browsers use, check this page. You can also see the supported key codes, like “ArrowUp”, on this page.
There’s also a corresponding keyup event that you can respond to when the player releases a key. It’s setup is similar to keydown. You’d like to have the player stop their ship from moving when they release the key, right? Riiiiiiiight?? 😼
When moving the player ship around, you can check (in the keyboard handler), when the appropriate arrow button is pressed, then increment the x and y properties of the player ship accordingly.
4. Collision Detection
In Flash, you were more or less responsible for handling collisions yourself, as there was no out-of-the-box physics/collision system. And unless you used a third-party library like Box2D or Nape you’ll have to use built-in rudimentary functions like DisplayObject.hetTestObject.
But for my purposes in this game, hitTestObject was sufficient enough, though it has its flaws, particularly when it comes to collision detection on rotated AABBs.
Phaser currently uses three different physics systems: Arcade, Matter, and Impact. Arcade, AFAIK, is the most commonly used one, and it’s perfect for AABBs (But don’t quote me on that. You know what. Go ahead ‘n quote me on that if you want. I don’t care. 🙃)
Matter is a bodies-based physics system. Since our game involves lots of rotating objects in it, we’ll “upgrade” our collision system by using Matter instead of Arcade. Matter is also designed to use elements like gravity, friction, mass, density, restitution (“bounciness”). However, we won’t need any of those in this game. We’ll be using Matter for its ability to rotate AABBs and accurate collision detections.
When creating the Phaser Game object, we can setup the Matter physics system like this:
var game = new Phaser.Game({
...
physics: {
default: "matter",
matter: {
debug: true,
gravity: {
y: 0
}
}
}
...
});
We don’t want any gravity, and we want to see the bodies during development (debug is set to true for this).
In the Flash editor, we don’t want the entire player ship (including exhaust flames) to collide with other things. So, I defined a set of “contact” AABB nodes which were responsible for collisions. You can see this image:
All the green AABBs are the contacts.
In Phaser, we’ll only need one contact, and you can see it defined here:
This contact will be created as a Matter physics body in our code. There are several ways you could handle this, and you’ll need to revisit the EntityFactory class, the PlayerEntity scene, and the Entity class. You could follow this strategy:
Create a factory class called ContactRectEntityFactory with the factory name rectContact.
Create a display object class for the factory that extends Phaser.GameObjects.Image. When you register rectContact with Phaser.GameObjects.GameObjectCreator.register be sure not to add the display object to the display or update lists.
In Phaser Editor, add a rectangular image to the PlayerEntity scene and assign it the rectContact factory. Phaser Editor will generate code in the format of: var node = this.add.rectContact(x, y, texture, frame);
In EntityFactory constructor, add this to the this.add object: rectContact: this.make_rectContact
Of course, you’ll need to create a new make_rectContact method for the EntityFactory class:
EntityFactory.make_rectContact
make_rectContact(x, y, texture, frame) {
var img = new ContactRectEntityFactory(this.scene, x, y, texture, frame);
this._add(img);
return(img);
}
Finally, in the Entity class you want to create a Matter physics body for every display object that’s an instance of the ContactRectEntityFactory class.
You can obtain the bounds of a rect entity by calling the Phaser.GameObjects.getBounds() on that contact object. Then you can use that rectangle to create the physics body and add it to the physics world.
var rect = rectContact.getBounds();
this.scene.matter.add.rectangle(
  rectangle.centerX,
  rectangle.centerY,
  rectangle.width,
  rectangle.height,
  {
    isSensor: true
  });
Since we won’t be using any collision response functionality of Matter physics, all the bodies will be sensors. Bodies that are sensors won’t generate any response (bounce or blocked) by other bodies when they intersect with them.
Note: Some final notes about the physics bodies. Normally, you’d attach your physics body the the Phaser display image itself. However, our display objects are Containers, and according to the Phaser docs, there are some caveats when using physics bodies with Containers. Taken from the Containers page:
Containers can be given a physics body for either Arcade Physics, Impact Physics or Matter Physics. However, if Container children are enabled for physics you may get unexpected results, such as offset bodies, if the Container itself, or any of its ancestors, is positioned anywhere other than at 0 x 0. Container children with physics do not factor in the Container due to the excessive extra calculations needed. Please structure your game to work around this.
Because of this, I decided NOT to add physics bodies at all to containers or any of its children, but just as separate objects added to the physics world. So within the Entity class, I’m also keeping reference of which bodies “belong” to it.
Normally, the physics body will automatically move along with the display image and rotate how it rotates. Since they are not coupled, you’ll need to update the position and rotation of the physics bodies so they stay in sync with the display object.
The final function regarding collision detection in this article is the ability to wrap a display object when it reaches one end of the view area to the other side.
Phaser Matter physics does support built-in wrapping using code adopted from matter-wrap. However, I’m using manual wrapping instead because:
Already wrote the original logic in AS3 🙂
Using the built-in wrapping, there’s no way to determine when a display object would wrap. When objects would go past an edge of the view area, Blasteroids needs to wrap some display objects while removing others.
5. Game Execution Speed
Whew! The final section of this long article! Kudos to you if you made it this far. 💪🏾
When I first started testing player movement, I noticed that the player ship was moving a bit too fast. The browsers (using Chrome 80 and Firefox 73 at the time of this writing) run at 60 FPS, and this is a bit too fast, as the Flash SWF was designed to run at 30 FPS.
In Flash, you’d add an event listener to the ENTER_FRAME event, and that function would be called based on the number of FPS the SWF was set to run at. So an FPS of 30 would cause your enterFrame method to be run approximately 30 times each second.
Phaser uses the Phaser.update() method which is called the number of frames, acting as Phaser’s version of enterFrame.
There’s no way to change the FPS. So the update method would be called approximately 60 times each second or whatever FPS the browser is set to. I decided to use timing to simulate a 30 FPS environment. Start off with the following code in your Phaser game Scene:
Then for each call to update you can write something like this in your game scene:
function update() {
  ...
  this.delta += this.game.loop.delta;
  if (this.delta < this.msPerFrame) {
    //too soon to update game objects
    return;
  }

  this.delta -= this.msPerFrame;

  //update all game objects here
}
That’s pretty much it for this ultra-long article! I’m really excited about the progress I’ve made and what I’m learning about Phaser, the editor, and the conversion process in general. As I continue to make more noteworthy progress, I’ll keep you updated.
If your game is to be preserved, you’ll have to re-build it for another platform, and if it’s to stay as a web-based game, then HTML5 (Canvas/WebGL) is likely your best bet.
In the last article, I was challenging myself to convert a previous Flash game called Blasteroids that I made for a previous client to HTML5.
Digging up the original source code, I jumped in. But first thing’s first. I’ve also been learning Phaser 3, and the latest version of Phaser Editor, (awesome tool by the way; I highly recommend it for Phaser game development) which supports Phaser 3.
Most of the time spent on the project so far has been figuring out how to convert resources over. Sure, I could just “make” a new Blasteroids game, but the challenge is for the Phaser version to maintain the play and feel as closely as possible to the original Flash game.
So I started with both editors, Phaser Editor, and Flash CS. I’m examining how the scene is set up in Flash CS and replicating it as closely as possible. Images and locations are super-easy to move over. However, the way that the code is assigned to the images and their underlying “game objects” will change, simply due to how Phaser interacts with the scene, and how Phaser Editor sets up images for you on the scene.
For example, in Flash, many game objects are actually a composition of several images, and not just one image. Flash uses a DisplayObjectContainer class to accomplish this, and images on the scene are based on the ‘Sprite’ class, which extends DisplayObjectContainer.
In Phaser 3, the closest matching class is Container class, which contains other images. However, there may be some potential caveats to using Containers, as noted below from the container’s help page:
It’s important to understand the impact of using Containers. They add additional processing overhead into every one of their children. The deeper you nest them, the more the cost escalates. This is especially true for input events. You also loose the ability to set the display depth of Container children in the same flexible manner as those not within them. In short, don’t use them for the sake of it. You pay a small cost every time you create one, try to structure your game around avoiding that where possible.
I’ll need to test this as I move forward and see what impact it might have. Fortunately, Blaseroids doesn’t use input events on any game objects using containers.
Another challenge is that, as of this writing, Phaser Editor does not use the Container class when creating game objects in the scene.
Adding The Player Game Object To The Scene
In the Flash version, the main player’s ship is composed of three visible images (the ship body, and two exhaust flame images). You can place this on Flash’s stage (similar to Phaser 3’s scene).
All three images are contained in a single sprite.
As I mentioned, Phaser 3 uses containers, but is there a way to do something like this in Phaser Editor? Not officially, but there is a workaround, which I’ll explain in two steps.
Step 1: Create The Player “Scene”
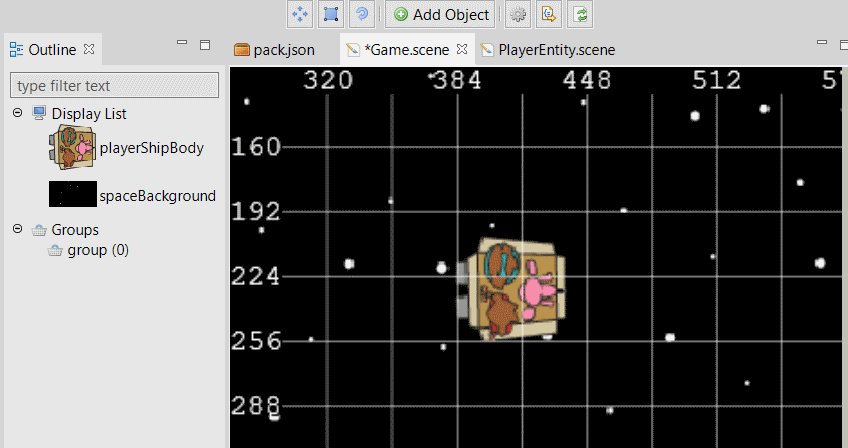
First, we need to recreate the player’s ship which is composed of the three images. The workaround is to create the player object as a scene. When you create a scene, you can add multiple images to it. The player scene would look like this:
The same three images, ship body, and two flames.
Phaser Editor automatically generates the code that will setup and position them for you. Also, there are some properties you’ll need to adjust, so that it technically won’t be a scene anymore.
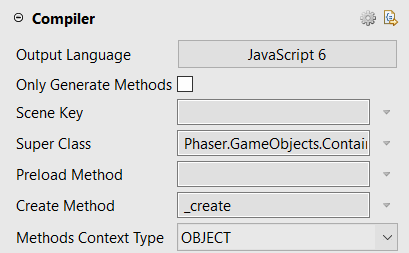
Name the scene PlayerEntity.scene
Uncheck the Only Generate Methods box if it’s checked
Clear out the Scene Key
Change the Super Class to Phaser.GameObjects.Container
Change the Create Method to _create
Change the Methods Context Type to OBJECT
This gives us a container game object that contains all the ship images.
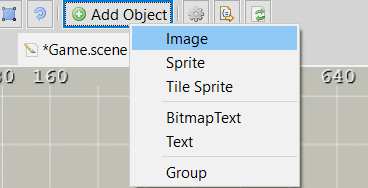
In Phaser Editor, you can’t add one scene to another (the other being whatever you;re using as your main scene to show to the player). But, you can add an image to the scene using the Add Object button located at the top of the editor.
You’d then select the ship body and add it where ever you’d like it placed.
Note: You don’t need to add the flame images, just the ship body. The ship image we’re adding here is just a visual placeholder for the container game object we created earlier.
Step 2: Create The Player Factory
In Phaser, when you create game objects, you use a “factory” which allows you to quickly create many types of game objects, and have them added to your scene. Phaser has many built-in factories, for example, ‘bitmapText’, ‘group’, ‘image’ and ‘sprite’, and you can create your own. If you wanted to create a sprite and add it to your scene, you could write something like:
this.add.sprite(x, y, texture); The this keyword references the scene that the sprite is being added to.
This would create a sprite image with the given texture, add it to the scene, and locate it at the specified x and y position.
We want to have our player container game object added to the scene, and we’ll use the player ship we added to the scene earlier. But as is, this will create just an image, and we want our container instead. Also, instead of Phaser Editor writing this for us:
this.add.sprite(x, y, texture);
it’d be nice to have it write this instead:
this.add.player(x, y, texture, frame);
Note: Although we ultimately won’t use the texture and frame here, these are created, are we can see the image in the editor.
Note the player part of the code. That is a custom factory, and Phaser allows you to create your own factories. And what’s awesome about Phaser Editor… it supports custom factories YES! 👍🏾
If you’d like more details on how Phaser Editor uses factories, have a look here.
When you create your player factory, the code might look something like this:
Phaser.GameObjects.GameObjectFactory.register("player", function (x, y) {
    var container = new PlayerEntity(this.scene, x, y);
    this.scene.sys.displayList.add(container);
    return container;
});
You want to run this code before you load your main scene, preferably, at your earliest convenience. The PlayerEntity class will come from the player scene you created earlier.
The player string registers your factory with Phaser, so you’ll then be able to write the this.add.player... code shown earlier. It would then create that PlayerEntity object, which in turn creates the three images: our player ship, and the two exhaust flames, places them inside a container, and adds that container to the scene.
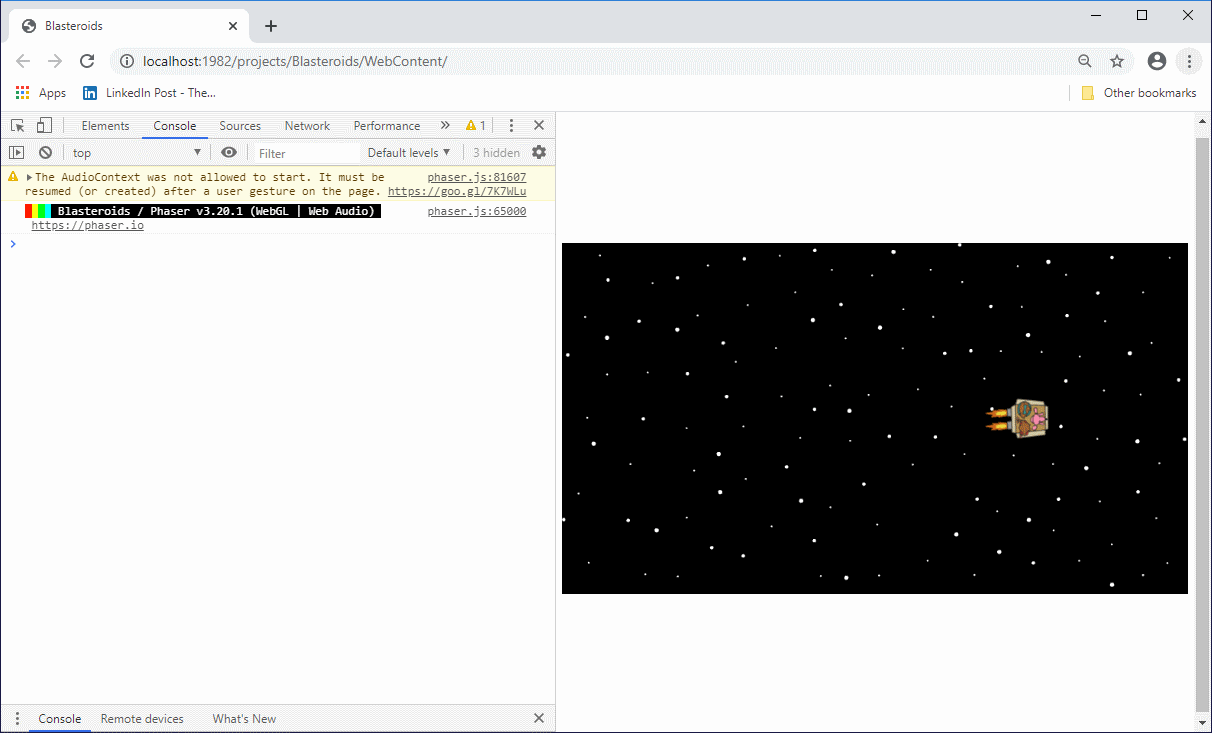
When ran in your web browser, the final output will look something like this:
I added the space background to my main scene as well.
That’s it for now! I’m really excited about the progress I’ve made so far, but there’s still lots of ActionScript 3 code and images to convert over. As I make more noteworthy progress, I’ll keep you updated.
It’s been pretty quiet lately here on GameplayCoder, but I’ve also been busy behind the scenes learning new skills for more games to add to my portfolio.
Poker Game
Having finished up the card-matching and hand-comparing techniques for poker, the next project will involve coding an actual poker (Texas Hold’em) game.
As for implementing the rules for poker itself, I found a useful article on 888poker that goes over basics, terminology, and flow of the game. There is also this game available from 24/7 Free Poker, which I’ve been playing to help further understand the game/
But I want it to be a multiplayer game (as well as single-player vs AI), and it’s the multiplayer functionality that will prove most challenging.
So, I’ve been taking a course over on Zenva called MMORPG Academy, which teaches you how to build a multiplayer game using various technologies, and middlewares, including but not limited to:
The only tool in this list I did not use was Docker, because it requires virtualization to run, and if your operating system is Windows 10 Home, you’re pretty much outta luck. Of all the suggestions I’ve tried around the net, none of them worked, and I wasn’t about to upgrade to Pro just for Docker. Besides, you don’t really need it to complete this course anyway.
Everything except Phaser and JavaScript on that list was completely new to me. 🙃 So, I’m taking in a lot of new material in this course. But as Tony Stark himself said,
Flash To HTML5 Game Conversion
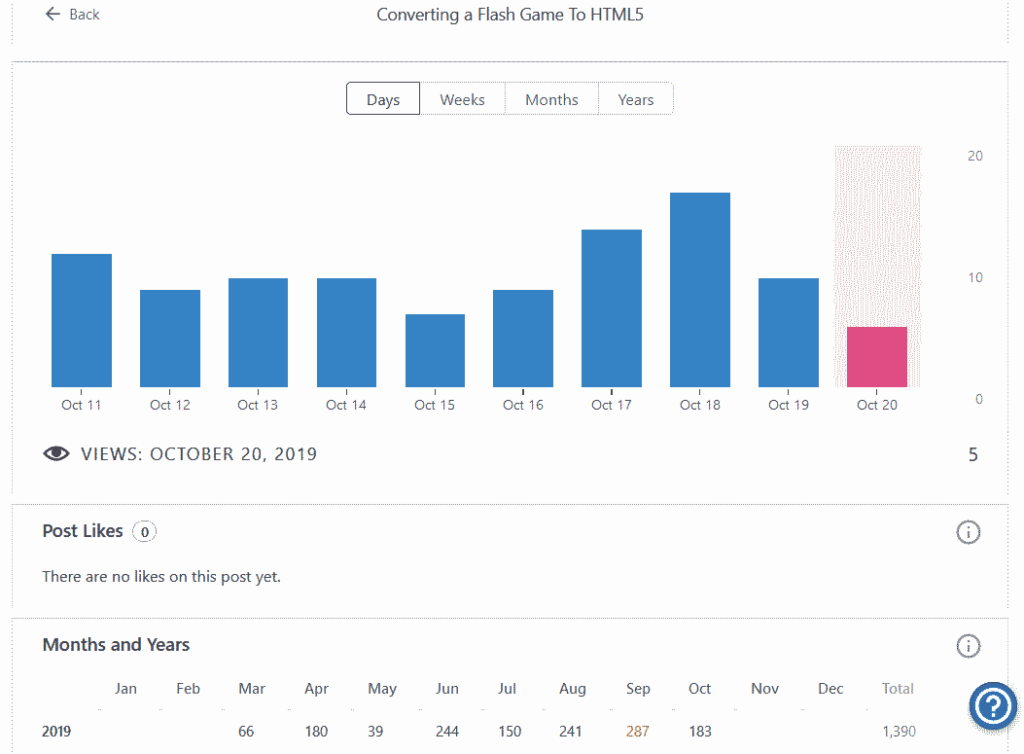
According to my data, an article I wrote, Converting a Flash Game To HTML5, by far, has received the most views.
After looking at these numbers, I’m like:
So I will be revisiting this topic by converting another Flash game I coded for a previous client, called Blasteroids. This is a remake of Atari’s Asteroids.
If you’d like to play the Flash game I coded, you can play it on my old portfolio site here. Otherwise, if you can’t (or won’t) be bothered with Flash, you can watch this video of my gameplay – and epic fails. 😅
Thanks for being a reader of this blog, and stay tuned. There’s more to come!
When you have two poker hands, and both are straight flushes, this article will show you the code that compares them to find which one wins.
A previous article for poker hands demonstrated how to compare a hand to determine if it was straight flush (the article also covered a royal flush as well). A straight flush is a hand where all the cards are in sequential order, and they all have the same suit. This hand is a straight flush:
Setup
Note: The first stages of the setup can be found on the introduction page to comparing poker hands, here.
There aren’t any other specific preparations we need before we begin.
Writing The Code For Comparing Fours Of Kinds
When two hands that are both a straight flush, the GetWinningHand function will call the FindWinnerStraightFlush function that compares the two hands.
Note: As it turns out, comparing two straight flush hands is the same as comparing two straight hands! The only addition is that you have to make sure all the cards are the same suit.
The only code featured in this article are the functions specific to comparing straight flushes. To see the concepts and code for comparing two straights, see this article.
FindWinnerStraightFlush
FindWinnerStraightFlush = function(hand1, hand2) {
  SET workingHand1 = CardMatchUtils.SortCardsByDescendingValue(hand1);
  SET hand1Info to an empty object { }
  CardMatchUtils.AreCardsStraight(workingHand1, hand1Info)
  SET workingHand1 = WildsAssumeValues(workingHand1, hand1Info)

  SET sortedHand2 = CardMatchUtils.SortCardsByDescendingValue(hand2);
  SET hand2Info to an empty object { }
  CardMatchUtils.AreCardsStraight(workingHand2, hand2Info)
  SET workingHand2 = WildsAssumeValues(workingHand2, hand2Info)

  SET winningPlayerIndex = CardMatchUtils.CompareHands(workingHand1, workingHand2)
  RETURN winningPlayerIndex
}
WildsAssumeValues
WildsAssumeValues = function(hand, info) {
  SET index to 0
  WHILE index IS LESS THAN number of cards in the hand (for example, "hand.length")
    SET card = hand[index] (get the nth card in hand)

    IF the card is a wild (card.value EQUALS CardValues.wild)
      SET the card value to the last value in the info.cardValues array
      REMOVE the last card value from the info.cardValues array (info.cardValues.pop())
    END

    SET index = index + 1
  END

  SET sortedHand to CardMatchUtils.SortCardsByDescendingValue(hand)
  RETURN sortedHand
}
Compare Your Own Hands
You can use the controls below to build your own hands and compare fours of kinds. Have fun playing around with it!
Player 1
Card 1
Card 2
Card 3
Card 4
Card 5
Result:
Player 2
Card 1
Card 2
Card 3
Card 4
Card 5
Result:
Player 3
Card 1
Card 2
Card 3
Card 4
Card 5
Result:
Who Won:
If you have any questions about anything in this article, please let me know at cartrell@gameplaycoder.com.
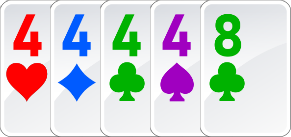
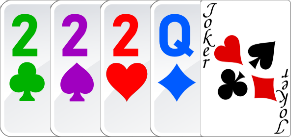
When you have two poker hands, and both are a four of a kind, how can you determine which one ranks higher? In this article, you’ll learn how to code a solution.
A previous article for poker hands demonstrated how to compare a hand to determine if it was four of a kind. A four of a kind is hand where four of the cards are the same value, and the remaining card is a different value. It’s like a three of a kind, but instead of matching three cards, it matches four. Here’s an example of a four of a kind:
Also, the comparison process is very similar to a comparing threes of kinds:
Compare the values of the quadruplet (the four cards that have the same value).
If those values are equal, compare the values of other the kickers, which is the card that has the other value.
If no kicker breaks the tie, and all cards have been compared, then both hands are equal.
Let’s look at some examples:
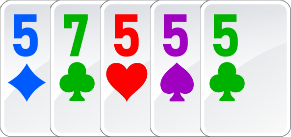
Hand 1
Hand 2
Hand 1 has a quad value of 5, while hand 2 has a quad value of 3. Since 5 is greater than 3, hand 1 is the higher four of a kind.
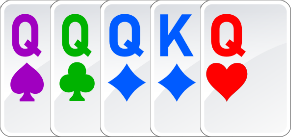
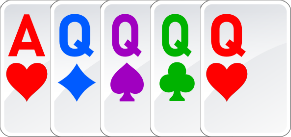
If the quad values of both hands are the same, then you compare the kicker card. Check this out:
Hand 1
Hand 2
Both hands had a quad value of queen. Hand 1 has a kicker value of king, while hand 2’s kicker value is ace. Ace beats king, so hand 2 is the winner here.
And one more thing before we get into the code – the wild cards (:
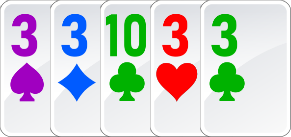
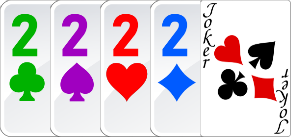
But handling wild cards in comparing a four of a kind is similar to that of a three of a kind. Take these hands:
Hand 1
Hand 2
In hand 1, the wild card is swapped for a 2 to form a four of a kind. The kicker value is a queen. For hand 2, it already has a four of a kind from the twos, so you can use the wild card to substitute the highest possible value, an ace.
When comparing both hands, hand 2 wins, because it has the higher kicker value (ace winning over queen).
Note: In hand 1, you could’ve substituted also the wild with the highest possible value, ace. But then, it would no not form a four of a kind, but a three of a kind. You also could’ve substituted it with another queen to form a full house, twos over queens, but a full house ranks lower than a four of a kind. So, substituting the wild for as a two produces the highest possible hand.
On a side note, in hand 2, you could’ve substituted the wild as a two, forming a five of a kind, which ranks higher than a four of a kind. However, we won’t be covering fives of kinds in this series. I’ll leave it as a challenge to you, should you accept it (: If you’re interested, you can learn a little more about a five of a kind here.
Setup
Note: The first stages of the setup can be found on the introduction page to comparing poker hands, here.
There aren’t any other specific preparations we need before we begin.
Writing The Code For Comparing Fours Of Kinds
When two hands are both a three of a kind, the GetWinningHand function will call a function that compares two hands of said poker hand.
In this case, GetWinningHand function will eventually call FindWinnerFourOfAKind (shown below) to compare the hands. This function accepts two parameters, the hand for both players, and it’ll return the ID of the player who has the winning hand. If both hands are equal, it’ll return 0 (which we’ll use to indicate a draw). The pseudocode below starts by comparing the values of the pairs first, then comparing the kickers if necessary.
FindWinnerFourOfAKind
FindWinnerFourOfAKind = function(hand1, hand2) {
  sortedHand1 = CardMatchUtils.SortCardsByDescendingValue(hand1);
  SET hand1Info to an empty object { }
  CardMatchUtils.DoCardsHaveSameValue(hand1, 4, hand1Info);

  sortedHand2 = CardMatchUtils.SortCardsByDescendingValue(hand2);
  SET hand2Info to an empty object { }
  CardMatchUtils.DoCardsHaveSameValue(hand2, 4, hand2Info);

  SET winningIndex = CompareQuads(hand1, hand1Info, hand2, hand2Info);
  IF (winningIndex NOT EQUAL TO -1)
    RETURN winningIndex (one hand's quad outranks the other hand's, and no further checking is necessary)
  END

  (both hands have the same ranking quad, now compare the kickers of both hands)
  SET winningIndex = CompareKickers(hand1, hand1Info, hand2, hand2Info);
  RETURN winningIndex;
}
Like most poker hand matching and comparing functions, you’ll need to first sort the cards in descending order of value (highest to lowest) before processing. This helps tremendously in the code. Yeah, you and I could just “look” at a couple hands and see the winner, but code? Not so much. 🙃
If you already read the article for comparing threes of kinds, this function looks very similar to FindWinnerThreeKind!
(Psst, here’s the big secret! 🐱👤 You catch a break with comparing fours of kinds. It’s mostly a copy-paste job, changing threes to fours, and replacing “trios” with “quads”)
Comparing The Quadruplets
In the FindWinnerFourOfAKind function, the code above sets the hands up for comparing their quadruplets. It then sorts the cards or descending order by card value. Next, it uses the DoCardsHaveSameValue function to get the four cards in the hand that make the quad, as well as determine the quad’s value.
CompareQuads
CompareQuads = function(hand1, hand1Info, hand2, hand2Info) {
  SET hand1WorkingQuadValue = hand1Info.cardValues[0]
  IF (CardMatchUtils.CountCardsByValue(hand1, WILD_VALUE) GREATER OR EQUALS 4)
    hand1WorkingPairValue = ACE_VALUE
  END

  SET hand2WorkingQuadValue = hand2Info.cardValues[0]
  IF (CardMatchUtils.CountCardsByValue(hand2, WILD_VALUE) GREATER OR EQUALS 4)
    hand2WorkingQuadValue = ACE_VALUE
  END

  IF (hand1WorkingQuadValue > hand2WorkingQuadValue)
    RETURN 0 (hand 1 has the higher ranking quad)
  ELSE IF (hand1WorkingQuadValue < hand2WorkingQuadValue)
    RETURN 1 (hand 2 has the higher ranking quad)
  END

  RETURN -1 (both hands' quads have the same value)
}
This function is very similar to the CompareTrios function in our recent article for comparing threes of kinds, except instead of dealing with three cards, we’re dealing with four. If you’d like details on the workings of that function, please check here.
Comparing The Kickers
If the quads of both hands have the same value, then you’ll need to compare the final card in each hand, its kicker.
Like you did when comparing the kickers with previous poker hands, when comparing the kickers, you first remove the quads from both hands so you’re left with the remaining kicker. You can use the CardMatchUtils.BuildHandExcludingValues function to remove the quad.
GetKickers
GetKickers = function(hand, info) {
  (get the value of the cards that form the quad)
  SET quadCardValue = info.cardValues[0]

  (count the number of cards in the hand that match the quad card value)
  SET numQuadValueCards = CardMatchUtils.CountCardsByValue(hand, quadCardValue)

  (if there are at least as many quad value cards as there are non-kicker cards, specify the quad card value to the values of cards to exclude)
  SET numNonKickerCards = 4
  IF numQuadValueCards >= numNonKickerCards
    SET valuesToExclude = quadCardValue

  ELSE {
    (otherwise, if there are at least as many wild cards as there are non-kicker cards, add the wild card value to the values of cards to exclude)
    SET numWildCards = CardMatchUtils.CountCardsByValue(hand, CardValues.WILD)
    IF numWildCards >= numNonKickerCards
      SET valuesToExclude = CardValues.WILD
    ELSE
      (finally, specify BOTH, the quad card value and the wild card value as the values of cards to exclude)
      SET valuesToExclude = [ CardValues.WILD, quadCardValue ]
    END
  }

  (create the temporary kickers hand by excluding the specified values and returning the rest)
  SET handOfKickers = CardMatchUtils.BuildHandExcludingValues(hand, valuesToExclude, numNonKickerCards)

  (finally, sort the kickers hand in descending order, with wilds as the highest value)
  handOfKickers = CardMatchUtils.SortCardsByDescendingValueHighWilds(handOfKickers)

  RETURN handOfKickers
}
In the GetKickers above, the info object is the same one used in FindWinnerFourKind. It’s either the hand1Info or hand2Info object, depending on which hand you’re getting the kickers from.
There are three situations in GetKickers that determine which values of cards to exclude as kickers.
The first is the simplest. It’s the quad card value used to form the four of a kind. Cards of this value obviously can’t be the kickers. This means they’ll be excluded, leaving the remaining card as the kicker.
The second situation is a hand that contains at least four wilds cards. These cards can assume the highest non-wild value, which is an ace. So the four wilds would form the four of a kind, using an ace as the quad card value. So the wild card value itself would be excluded from the hand of kickers.
Finally, the hand doesn’t have four cards with the same value, but it does contain one of the following combinations:
One wild and a triplet
Two wilds and a pair
Three wilds and the higher non-kicker of the remaining two cards
Note: When excluding cards, you’re always excluding exactly four cards (the number of non-kicker cards).
Those wilds will assume the value of the whatever the quad value is, forming the four of a kind. In this situation, you want to exclude both values of both, the wild card, and the quad card value.
The GetKickers function from above helps with this.
CompareKickers
CompareKickers = function(hand1, hand1Info, hand2, hand2Info) {
  SET hand1Kickers = GetKickers(hand1, hand1Info)
  SET hand2Kickers = GetKickers(hand2, hand2Info)
  SET winningPlayerIndex = CardMatchUtils.CompareHands(hand1Kickers, hand2Kickers)
  RETURN winningPlayerIndex
}
The CardMatchUtils.CompareHands function is the same one we used here.
The CompareKickers will return 0 if hand1 has the better kickers, 1 if hand2 has the better kickers, or -1 if both hands are the same rank.
That’s pretty much it! 😎
Compare Your Own Hands
You can use the controls below to build your own hands and compare fours of kinds. Have fun playing around with it!
Player 1
Card 1
Card 2
Card 3
Card 4
Card 5
Result:
Player 2
Card 1
Card 2
Card 3
Card 4
Card 5
Result:
Player 3
Card 1
Card 2
Card 3
Card 4
Card 5
Result:
Who Won:
If you have any questions about anything in this article, please let me know at cartrell@gameplaycoder.com.