When I first started, I was only going to build just the multi-player aspect of the game. You start the game, join a lobby, and join a room already in play, or create your own room for others to join.
However, this wouldn’t really be too much involved (even for a simple multi-player game), if I don’t flex my muscles, and include user accounts + authentication.
As a player, you’ll be able to create an account by signing up using an e-mail and password. You can also setup your own user avatar icon for display. Should you forget password or want to change it, you’ll be able to reset or modify it as well. The game will also use an emailing system to aid you in the process of resetting or changing your password. Finally, you will also be able to delete your account altogether.
This means a database will be used on the back-end to store user accounts. The back-end will then effectively use the four basic operations of data persistence, or CRUD.
CRUD stands for create, read, update, and delete. Think of it this way:
Create – Creating a new account and signing up; a new user is added to the database. Read – When a user logs in, their credentials are checked against the existing users in the database. Update – A user changes their e-mail, password, or avatar image, or the number of credits they hold changes as they play poker, updating their entry in the database. Delete – A user deletes their account, also deleting their entry from the database altogether.
If interested, you can learn more about CRUD here.
In addition to the technologies listed from the prelude article of this series, I’ve decided to use the following technologies:
Ahem, actually, the Mongoose I’m talkin’ ’bout is an Object Data Modeling (ODM) library that allows Node.js and MongoDB to talk to each other. Long story short, with Mongoose, you easily define how your data is structured in your database, and write code that correctly manipulates that data so that the structure is maintained (and thus, the integrity of your data).
MongoDB stores data as JSON objects, and the formatting is arbitrary. One of the things Mongoose does is allow you to define a structure of how the data will be stored, and it will enforce the rules of that structure to the code you write.
If you like, you can learn more about Mongoose from this article.
This Node.js middleware is used for authenticating your users when they log into your system, as well as performing other tasks that you want to to secure. You can use this along with JSON Web Tokens (JWTs) to validate the user when they make requests to your Express app.
This library allows you to manage your JWTs. When a user logs in, the server will generate a JWT and return to the client. The server then acknowledges the user as “being logged in”, and the user’s client must send this token back to the server for each subsequent request.
A token is a credential that is digitally signed using a secret key (though you can use public / private keys also, but I’m using the secret key here). The signature is performed behind the scenes using an HMAC algorithm.
Although these details go beyond the scope of this article, you can learn more about JSON Web Tokens here and here.
This library is used for securely hashing passwords. Even in the database, the actual plaintext password is not stored in the database. Instead, an encrypted version of the password is stored instead.
So, even if you forgot your password, I cannot look up your user in the database and tell you what it is, because, I don’t know, either! 🙃
Cookies are small pieces of data that the server sends to the client. When the user performs certain actions (usually requiring authentication or validating data sent back to the server in our case), this cookie is sent with the request.
You can get a quick overview on how to use cookie-parser here.
You can use this Node.js module for sending e-mails from your server to your users. You can use this to send plain text or HTML messages, include attachments, along with many other features.
For this poker game, I’m using it to send e-mails when the user forgets their password, as well as notifications if they changed their e-mail address password (to make it was them who requested the change!), as a few other account-based notifications.
It would be a pain to have to manually setup your e-mail messaging system for the various types of messages you want to send to your users (as well as litter your code with lots of string interpolation). This is where Pug comes to the rescue.
This is an e-mail templates system, and it allows you to define templates. While it has it’s own scripting language, you can set up your templates and preview how they will look when sent to the user.
You can have a look at Pug2HTML, an online conversion and previewer. Of course, you’d still need to learn the Pug syntax itself.
dotenv
When using sensitive data like your JWT secrets and e-mail credentials for Nodemailer, you’ll want to store these in some place that’s not hard-coded in any of your files. That’s where dotenv comes into play.
You can use this to store this type of data in a separate file (often called .env), and Node will load these as environment variables. A good practice is to not share this .env file, but instead, each person on your team generates their own .env file.
That’s a lot more added onto this tech stack!
It took quite a while to implement all of these and get them to play nice together. Of course, the client side also has to be able to respond, but all of these tools are used on the server side.
And I’ll admit – at first, I didn’t want to do any back-end user authentication. But then I realized that the value of an app that can perform user authentication is much more valuable than one that can’t. So I went through all the steps.
But I didn’t do it alone… hell no! I had help. Mainly help from this amazing course over on Zenva called called the MMORPG Academy.
With Scott Westover as your instructor, this course is a conglomerate of smaller courses to build a (relatively) simple multi-player MMORPG type game using all the techs mentioned above, as well as Phaser 3 on the client side.
I found this course invaluable on getting me started.
And I’m not quite done with it yet! Still to come is deploying the poker game onto a live web server (or in this case, onto the cloud using Heroku). Excited, and looking forward to finally getting this game done, hopefully within first quarter of 2022!
As I work on the game, I’ll post noteworthy updates in future articles. And you can play the work-in-progress versions of the game as I make playable updates, before the game is released to the public!
Sign up using this form to get on my mailing list:
Thanks for reading, and I hope you continue to stay tuned!
As I continue to move forward with the multiplayer poker game, much of the in-game logic on both client- and server-side is now complete. I’m in the phase of cleaning up code, smoothing out functionality, and squashing 🐜🐛
While learning to us the Socket.IO library for client/server communications, there’s once thing I’ve noticed about its event handlers:
They don’t provide a way to specify an context (this) that the callback handlers should use.
Most of the time, it’s assumed the handler is used with an arrow function like this:
socket.on("event-name", (...args) => {
  // ...
});
Now, If I’m using this inside a class, the scope (context, or this) will reference the class, which is what I want.
Note: Socket.IO uses Node’s EventEmitter class for the server-side, while on the client-side, the component-emitter library is used. However, neither of these event libraries allow you to specify a context, like the way EventEmitter3 allows, which is also what Phaser 3 uses (and I’ve become spoiled by, heh 😏 )
But there’s another problem with this approach. Say you want to later turn off the event handler. You won’t be able to because there is no reference to the callback function. You could instead write something like this:
const callback = (...args) => {
  // ...
}

socket.on("event-type", callback);

// and then later...
socket.off("event-type", callback);
The issue here is that callback is a local function, and it’s eventually lost when it goes out of scope.
Even if the callback is a method of a class, this will reference the function, not the class. So not even this code will work as expected:
class SomeClass {
  ...
  public callback(): void {
    // ... 'this' will NOT reference this class instance
  }

  public setupSocket(socket): void {
    socket.on("event-type", someClass.callback);
  }

  public disposeSocket(socket): void {
    socket.off("event-type", someClass.callback);
  }
  ...
}
This is where the bind function comes in. This function allows you to specify what context the this will reference. In this case, we want it to reference the class instance itself.
class SomeClass {
  ...
  private boundCallback;

  public callback(): void {
    // ... now 'this' will reference this class instance
  }

  public setupSocket(socket): void {
    this.boundCallback = this.callback.bind(this);
    socket.on("event-type", someClass.callback);
  }

  public disposeSocket(socket): void {
    socket.off("event-type", this.boundCallback);
  }
  ...
}
Looking at the previous code, the first highlighted line shows how a bound callback was created, by wrapping the original callback method, and making the this reference the class as expected.
Buuuuuuut!
There’s an issue with this approach as well! 🙄
What is we want to setup another socket with this class? Each call to setupSocket to overwrite the previous boundCallback reference. It would be nice for each bound callback to be mapped to the corresponding socket. That, plus it’d be nice to not have to litter the code with a bunch of bind calls or get static classes or methods involved…
EventsManager Class
Let’s introduce an EventsManager class ⭐
This will allow us to gracefully solve all the issues at once:
Specify a context of our choice
Keep references to bound callbacks
Allows adding and removing of handlers
Keeps code nice and tidy
type Callback = (...args: unknown[]) => void;

interface IEventData {
  // the callback that will be bound to the original callback meth of the EventsManager class
  boundCallback: Callback;

  // reference to the user's custom callback
  userCallback: Callback;

  // the event type
  id: string;

  // specifies if the event should only fire once
  isOnce: boolean;

  // what `this` should point to
  context: unknown;
}

class EventsManager {
  private eventsDataById: Map<string, IEventData[]>;
  private socket;

  constructor(socket) {
    this.eventsDataById = new Map();
    this.socket = socket;
  }
}
A few new things here. 😉
Note: The pseudocode is influenced by Typescript, such as type aliases and interfaces, but you can make the same thing in JavaScript.
The Callback type is just a shortcut for specifying callback handler functions.
The IEventData interface is a template that we’ll use to define plain objects that should have all the specified properties.
The eventsDataById property is a Map of key/value pairs. Each key is a string (the event id type), and the data is an array of IEventData objects. This will make it possible to assign (and keep track of) multiple handlers to the same event type.
We’ll also be specifying event frequency (one-time events vs continual events).
But this code alone doesn’t allow us to do anything practical yet. Let’s add our own version of the on method, the event emitter de facto standard if adding a handler.
The EventsManager.on Method
on(eventId: string, callback: Callback, context: unknown, isOnce?: boolean): void {
  // get the array of events handler data based on the specified event id. if it doesn't
  // exist, create an empty array and add it
  let eventsData = this.eventsDataById.get(eventId);
  if (!eventsData) {
    eventsData = [];
    this.eventsDataById.set(eventId, eventsData);
  }

  // create event handler data for this new event being added
  // also create the bound callback, wrapping around the original callback method
  const eventData: IEventData = {
    // when binding the callback function, pass the event id. this will allow us to
    // reference the event data in the callback to access the user callback and
    // context
    boundCallback: this.callback.bind(this, eventId),
    userCallback: callback,
    id: eventId,
    context,
    isOnce,
  };

  // add the new event handler data to the array (the array is stored in the map)
  eventsData.push(eventData);

  // specify the BOUND callback in the socket
  this.socket.on(eventId, eventData.boundCallback);
}
In the above code, we’re adding the event handler onto the socket as usual. However, its callback will point to the newly bound callback. But how do we call our own callback function that was specified in the on method? 🤔
And, how do we use the context that was also specified? 🤔
Well, the best part happens in the callback method itself…
To be continue in part 2…!
…
Nah, I’m just kidding, read on to find out!
The EventsHandler.callback Method
private callback(eventId: string, ...args: unknown[]): void {
  const eventsData = this.eventsDataById.get(eventId);

  let length = eventsData.length;
  let index = 0;

  while (index < length) {
    const eventData = eventsData[index];
    if (eventData.isOnce) {
      // if this is a one-time event handler, remove it
      this._eventTarget.off(eventId, eventData.boundCallback);
      eventsData.splice(index, 1);
      length -= 1;
    } else {
      index += 1;
    }

    eventData.userCallback.call(eventData.context, ...args, this);
  }

  if (length === 0) {
    // it's possible that removing the one-time handler caused the eventsData array
    // to become empty. if so, we can remove it from the map. it's not strictly
    // necessary, but it helps to keep things clean ^_^
    this.eventsDataById.delete(eventId);
  }
}
All events that we’re listening for will call this callback function. Since it’s bound to this class, this will point to our class instance of EventsManager.
When a socket event handler fires this function, it’ll loop through all the event handlers that we attached onto it, and call them in the order they were added. Any one-time handlers are removed after they’re called.
Let’s have a look at the first line, the function signature:
You’ll see the eventId is the first argument. This is the argument we specified when we created the bound callback in line 16 of the on method. Here, it’s followed by an ...args parameter. This is for any parameters that are passed in by the socket handler.
Now, have a look at line 18. This is where the user’s callback is called, with context they wanted. The call method is another method of the Function object, like bind. The call method allows invokes a function while allowing us to specify a particular context on it – in our case, the one specified in the on method, and later saved in the IEventData object.
call also allows us to specify any parameters. Here, we want pass along the arguments received from the socket’s handler.
The EventsHandler.off Method
Since we can listen for events with the on method, we need a way to un-listen to them. We’ll make our own off method for this.
off(eventId: string, callback: Callback, context?: unknown, isOnce?: boolean): void {
  // get the specified events data array based on the event id. if not found,
  // exit early
  const eventsData = this.eventsDataById.get(eventId);
  if (!eventsData) {
    return;
  }

  for (let index = eventsData.length - 1; index >= 0; index -= 1) {
    const eventData = eventsData[index];

    // if removing handlers by callback, check that it matches. if not, skip
    if (callback !== undefined && callback !== eventData.userCallback) {
      continue;
    }

    // if removing handlers by context, check that it matches. if not, skip
    if (context !== undefined && context !== eventData.context) {
      continue;
    }

    // if removing handlers by frequency, check that it matches. if not, skip
    if (isOnce !== undefined && isOnce !== eventData.isOnce) {
      continue;
    }

    // turn the event handler off in the socket, referencing our bound callback
    this.socket.off(eventId, eventData.boundCallback);

    // remove this events data object from the array
    eventsData.splice(index, 1);
  }

  if (eventsData.length === 0) {
    this.eventsDataById.delete(eventId);
  }
}
In this code, we first need to get access to the events data array, based on the event id. However, unlike the on method, the array must exist before continuing.
When removing event listeners, it will optionally only remove listeners that have a specific callback, context, or frequency.
Finally, if this were to be used in your application, you could do something simple like this:
class YourClass {
  private socketEvents: EventsManager;

  constructor(socket) {
    this.socketEvents = new EventsManager(socket);
  }

  public foo() {
    socketEvents.on(eventId, this.onSocketEvent, this);
  }

  private onSocketEvent(args) {
    // do stuff here
  }
}
That’s pretty much it for a bare-bones version of this code.
You could do more to it, like add a removeAll method, which completely removes all event handlers – excellent for cleaning up the EventsManager class when you’re done. You could also build on this to handler server-side as well as client-side events, as they all use on, off, and once methods. But this is a very short class that makes event handling using sockets a helluva lot easier, IMO. 😎
And I continue onward with the poker game! I’ll keep you updated as I make major milestones. Though I’ll admit, client work has got me super-busy these days, but continue to stay tuned in. I appreciate your patience! 👍🏾
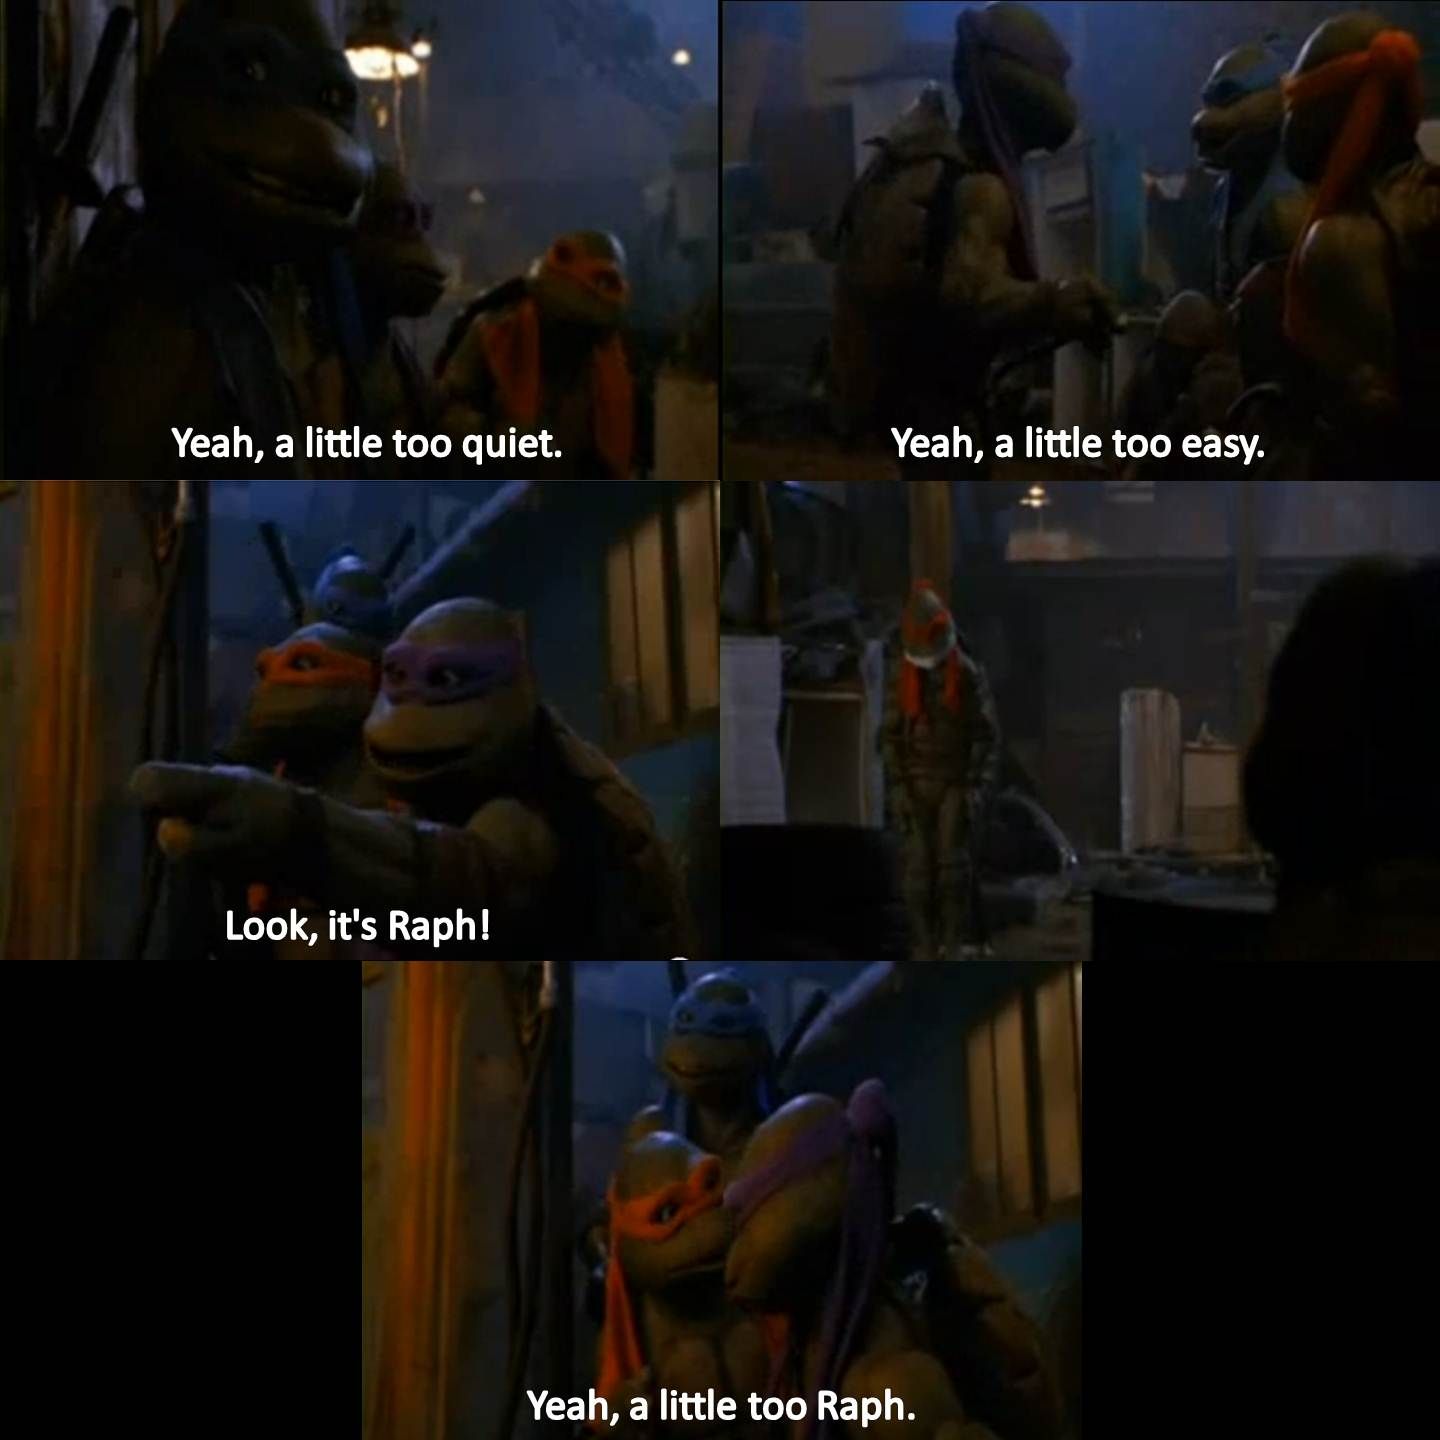
It’s been a minute since I’ve posted an update on the multiplayer poker game I’m working on, but it’s still on. While client work has kept me preoccupied for the most part, a lot of progress – and learning has been underway! 😎
Yeah, it’s been quiet around here… a little too quiet…
Ahem, without further ado, have a look at this video, which shows the WIP running in two different browser windows.
An interesting situation happened in this video. OF COURSE, the game would present it while I’m recording, haha! 😅
First off, there were four Straights. But that’s not even the most interesting part.
When more than one player wins, they all split the pot. Here, the pot was split four ways. It just happens to result in a fraction – each player winning (30 / 4 = 7.5) – which shouldn’t happen, because the lowest denominator I’m designing for is 1 chip – not partial chip. So I’ll need to correct that…
🤔
Hmm… well, I could leave it, but that might give the impressions that you can do something with a partial chip value – which you can’t. Or, I could distribute the chips like this:
(2) players win 8
(2) players win 7
I might want to look this one up to see how real poker games handle this situation!
What are your thoughts on how this should be handled?
The poker rules logic is mostly done, so I’ve been spending a lot of time on the back-end logic.
In between rounds, you’ll be able to:
Join a game if you were watching as a spectator (if there are any open slots – max players is six).
Watch a game if you were playing (there is no limit to the number of spectators, but there is currently nothing that shows how many people are watching. I might make an 👁 icon with a number next to it, and stick it in a corner or something.
Leave the game room and return to the lobby.
What I’m currently working on is handling those untimely situations of a player leaving a game mid-game, either because their connection died, or they closed their browser tab.
Leaving a game mid-game messes up the state, because the server and all the players need to be updated on who just left, so I’ll need to improvise here.
My original strategy was to treat it as the player folding, then when the round ends, automatically remove said player from the game. But this caused a problem, because if a player’s connection is lost, their socket is also gone. So, I decided to abruptly remove them from the game, forfeiting their hand.
Leaving mid-game also causes problems if it also happens to be the turn of the player who left. The decision here was to simply move to the next player’s turn.
Every game needs to have a dealer (D), a small blinds (SB), a big blinds (BB), and a host.
Note: The host is not part of poker – that’s a design for this particular game. By default, the host is the person who originally create the game room. The host is also responsible for starting each game when all the players are ready. The host is indicated by the ⭐ icon. When playing offline (yes, there is a single-player mode as well), there is no host.
So, if the D, SB, or BB leaves, then the next person (to their left) automatically assumes that role. It’s also perfectly normal for one player to have more than one role.
There’s also a lobby where players will go once they’ve connected to the server. Here you’ll be able to chat with other players, host your own game, or join an exiting game. Both hosting and joining are demonstrated in the video.
Finally, if you’d like to get in when the first playable beta is ready before the game is released, sign up on my mailing lest here. You’ll also receive updates on other projects as I work on them.
The form you have selected does not exist.
I can’t wait to have this one finished. Definitely a challenge worth completing!
And I don’t care what anyone says. Coding a multi-player game is a LOT harder than it’s single-player counterpart. 🤨
As I continue working on the multiplayer Poker game, I’m working on adding a game lobby to it. There, you’ll be able to see who else is online, join existing games in session, or start your own game for others to join.
I realized that in order to create the list of players and games, I’ll need to build a list view. And since I’m using Phaser Editor v3 and its User Components functionality, I decided to build the list view, similar to how I made the button component.
What’s a List View?
A list view, also known as a list box, is a user interface control that allows you to select one or more items (usually lines of text) from a vertically aligned list of “list items”.
On a side note, this list view class was inspired by a similar custom list view class I wrote in Flash using ActionScript 3 several years ago. I needed a way to be able to display custom list items, instead of just plain ol’ text (games are usually more visually appealing than their non-game compadres).
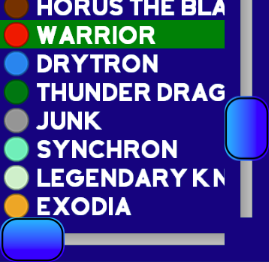
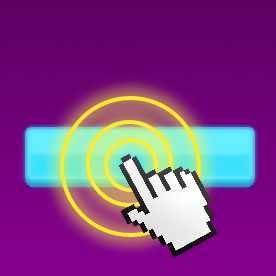
You’ve likely used list views many times. They are often presented in the form of a drop-down combo box, where you click on a box of text, and a list of items appears underneath, allowing you select one of them. Today, we’re focusing on the actual list itself. I decided to make a test app to develop the list view component. Have a look below; it’s a short clip of the demo app I’ve created.
Here’s a short demo of a list view.
Best part? You can play around with the list view demo here! 😁
Building a List View
As you can see, this list view:
is a collection of buttons (the list items) inside a container
is masked so the list items are only visible within the container
is scrollable, so you can view more items (sliders, swipe, or mouse wheel)
allows multiple items to be selected
It seems simple on the surface, but actually coding the damn thing took me a minute! 😅
Note: I won’t cover every single aspect of the list view in this article, so I’ll try to cover the essentials. Also there are some aspects of the list view component that will not be covered in this article, such as sliders (scrollbars). However, the project is on GitHub if you want to examine the play with the demo or code.
Setting Up The List View Component
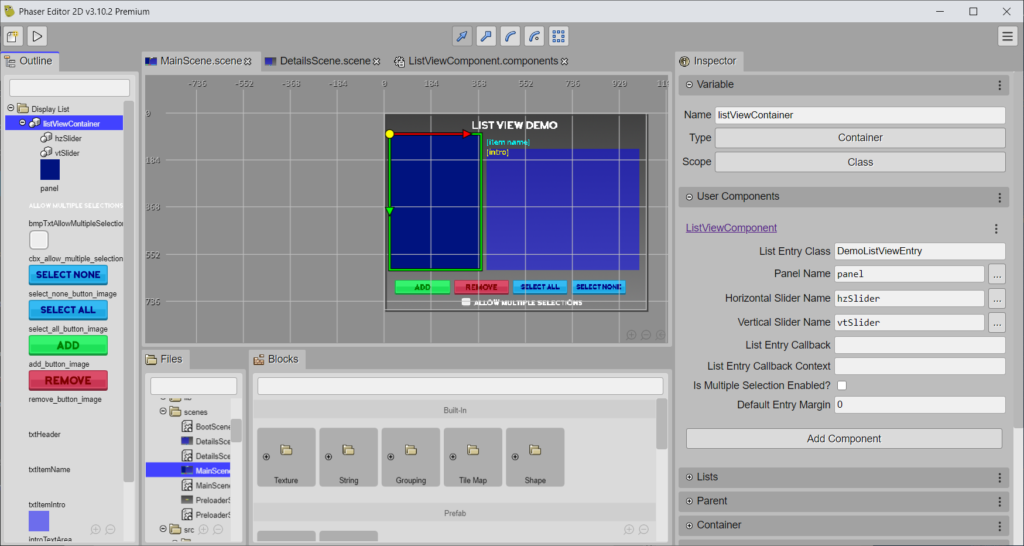
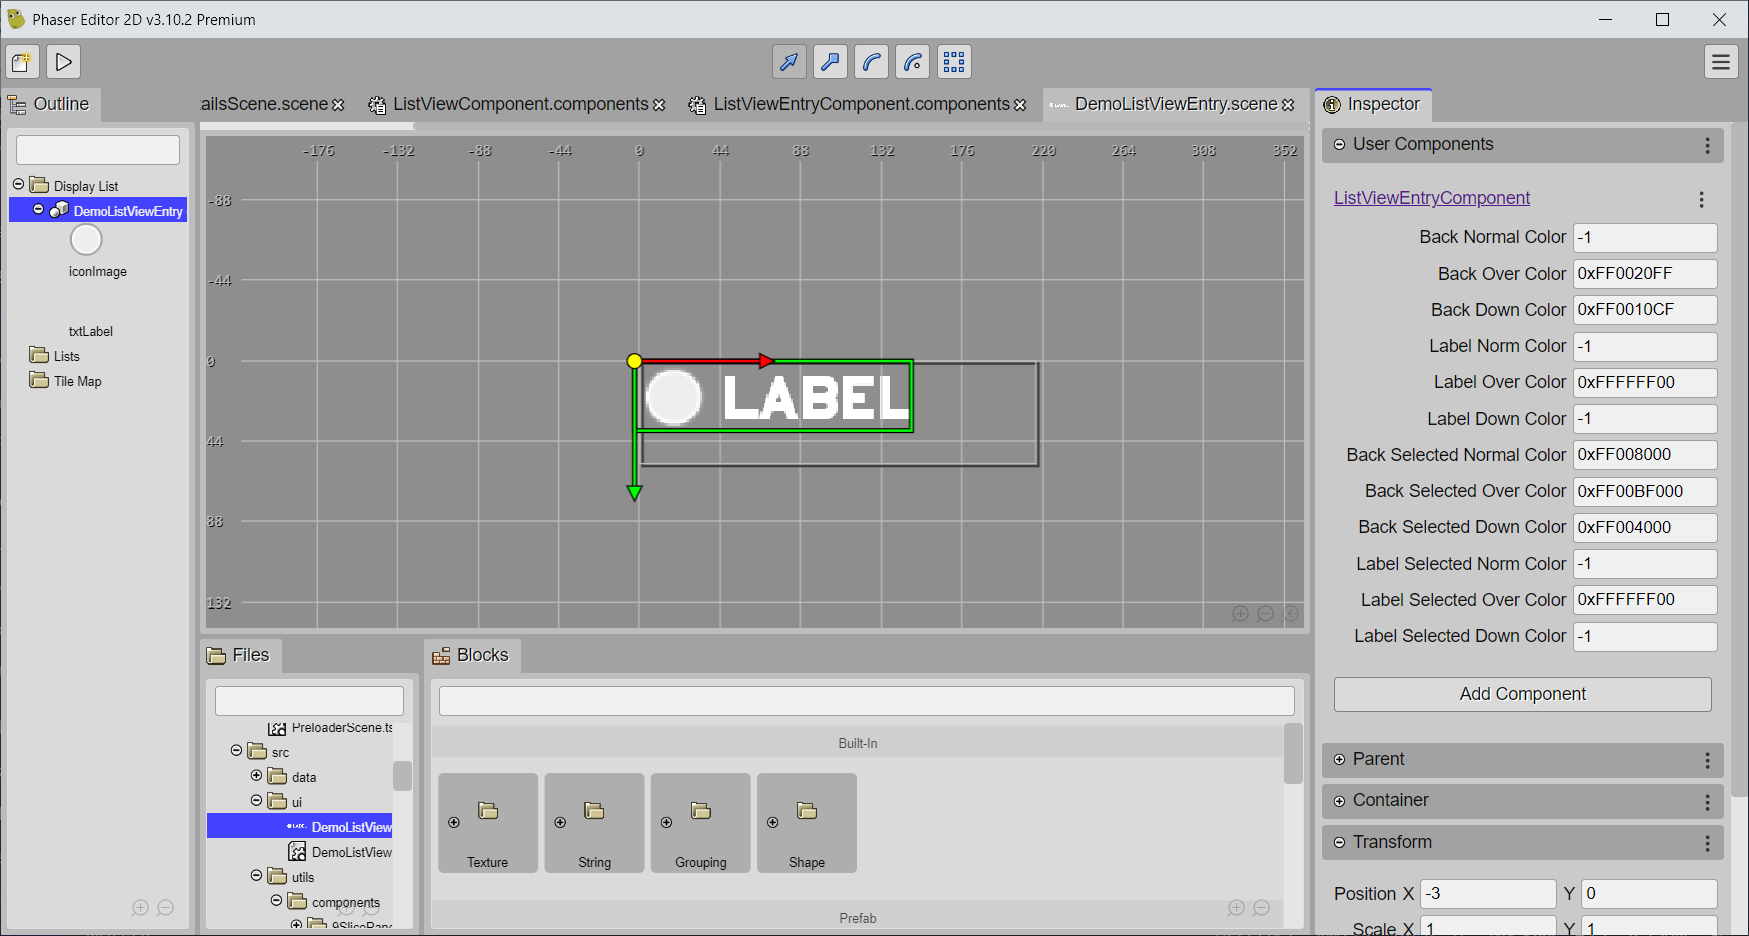
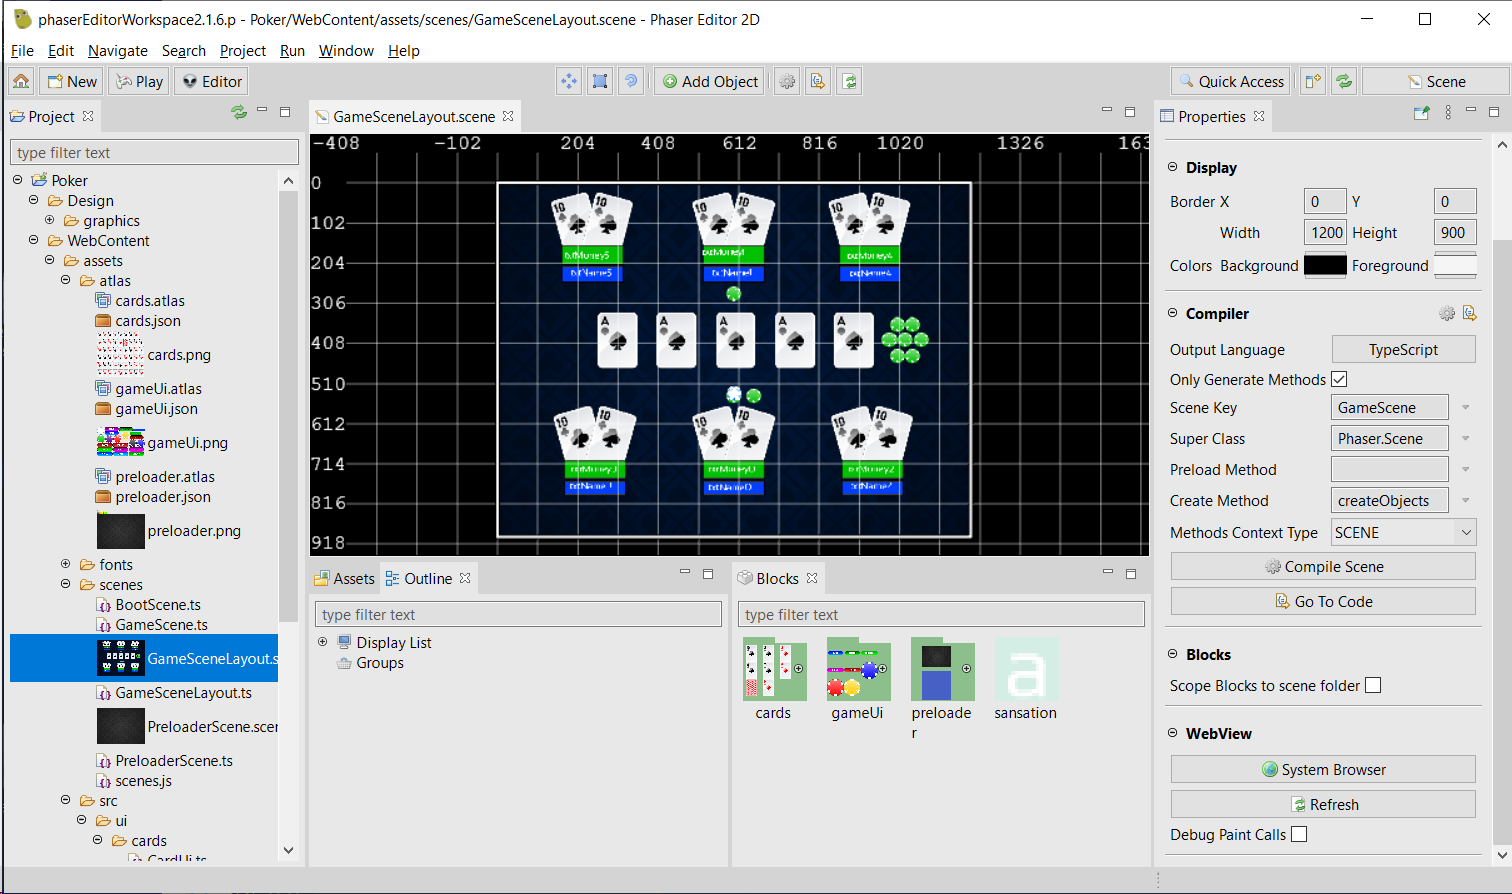
First, let’s have a look at the list view User Component in Phaser Editor:
Note that the Game Object Type is Phaser.GameObjects.Container. That’s because the list view will ultimately contain several other game objects.
When setting up a list view component in your scene, first I created that empty container. Then I add the ListViewComponent to is. Then, I added the following game objects inside the container:
An image. Assign this a square/rectangular texture, which serves as the visual background. This image also determines the size of the mask. (The mask is what keeps lots of items from being visible if they are scrolled outside the list view.)
Two more containers inside this container. These would represent the horizontal and/or vertical sliders/scrollbars. Note that the slider is an additional component not covered in this article.
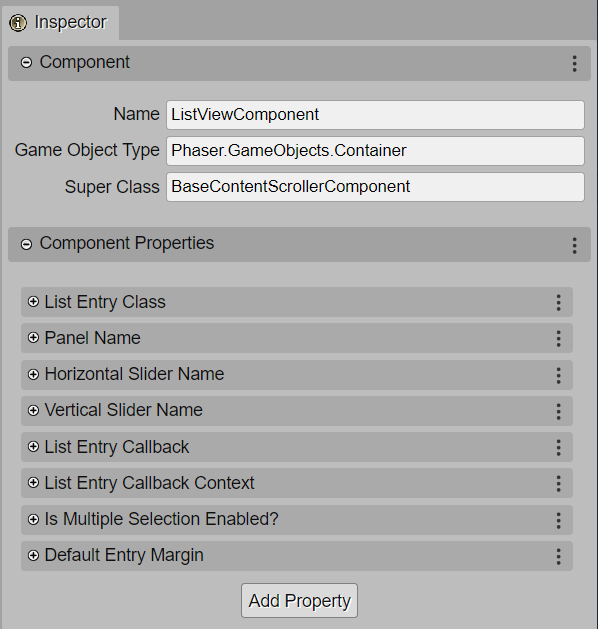
Let’s go over each of the component properties.
List Entry Class: The class that list entries will use when added to the list view. This allows you to customize how each list entry will look. There is no default class, so you must specify one. But don’t worry; setting up a custom is easy. This custom class must extend the ListView class. More on that later.
Panel Name: The property name of the back panel image. We need a way to for the list view to reference other game objects instances from withing the editor. Since we cannot name an instance within the editor, I decided to reference them by using their property variable name. The panel should be a rectangular image that represents the background and visual area of your list view.
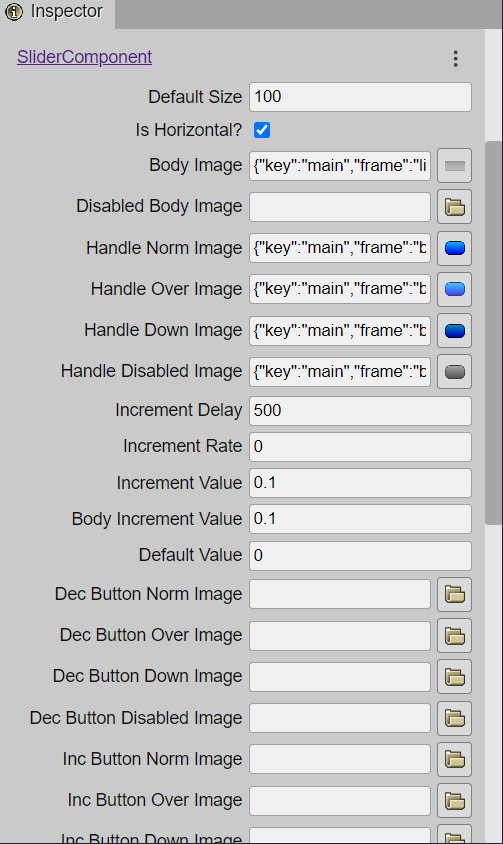
Horizontal Slider Name and Vertical Slider Name: The property names of the game object containers that represent the horizontal and vertical sliders. Sliders are optional, and if you know ahead of time how your list view will scroll, you need only specify the appropriate slider name. The containers themselves also have a SliderComponent User Component added to them.
List Entry Callback: A function that is called when a list entry is pressed.
List Entry Callback Context: The context (this) to be used when calling the callback function.
Is Multiple Selection Enabled?: Specifies if multiple items can be selected at once. When enabled, you can Shift+Click or Control+Click (on a keyboard, which means desktop machines) to select multiple entries.
Default Entry Margin: When adding entries to the list view, this determines the vertical spacing in between them. By default, there is no margin, meaning entries are directly adjacent to each other.
Notes: 1. When setting up objects to be referenced by property name, make sure those objects are using Class or Public scope, so property names can be created for them in the scene. 2. The list entries are also inside a sub-container, which is automatically created by the list view component.
This following image shows the setup of a ListViewComponent on a Phaser Container, as well as the game objects inside the container.
The property names must match up with the names specified in the component.
Setting up the Custom List View Entry Component
When setting up your list view, it needs to know what each list entry will look like, so a custom class must be defined here. Have another look at the image above. It the ListViewComponent properties, the List Entry Class is set to a DemoListViewEntry. This is the custom list view entry class class that we’ll use for this demo. To accomplish this, we’ll explore another User Component to go with the list view component: ListViewEntryComponent.
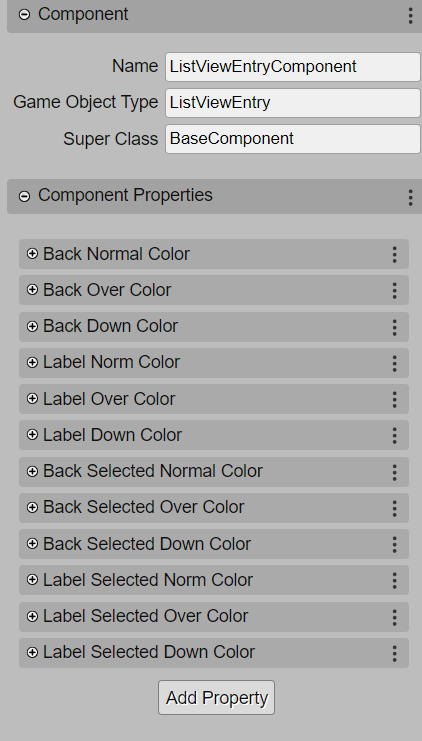
The list view entry component looks like the following:
The Game Object Type is set to ListViewEntry, which is the base class that your custom list view entry class will extend. The ListViewEntry itself extends the Phaser.GameObjects.Container class. When you create your custom list view entry class, it will actually be a Phaser Editor prefab. That prefab will have its Super Class set as ListViewEntry, but more on that later. First, let’s examine this component’s properties.
There are two basic visual elements of a list view entry: 1. Back: the background of the entry. This is a Phaser.GameObjects.Rectangle that is created internally by the list view entry class, so you do not place anything in your prefab scene for this. The list view entry internally creates this button for you. It also serves as the button (a ButtonComponent) of the entry and response to input events. 2. Label: the text of the entry. This can be either Phaser.GameObjects.Text or Phaser.GameObjects.BitmapText, but it must be named txtLabel, and Scope set to Public.
That said, you can see that the properties are all about either the back or the label. You’ll also notice that there are two selected “states” for each element: Selected or not. Finally, there are button states – the same as the button component: Norm, Over, and Down. Each of these would specify a number which represents the RGB color of the entry when it’s selected or not, and corresponding to the button state.
The list entry creates its own button, which handles the state changes for itself and for the label as it responds to your user input.
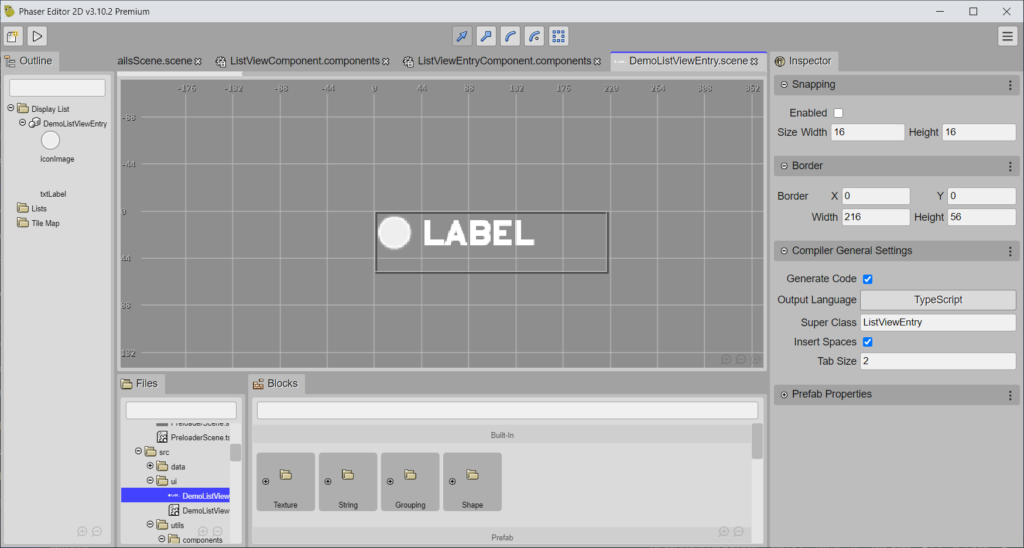
Now, let’s have a look at the custom entry defined for this demo, the DemoListViewEntry.
Notice that the Super Class is set to ListViewEntry, as I mentioned previously. You’ll also notice the “LABEL” graphic, which is a text object named, txtLabel.
You would attach the ListViewEntryComponent to the container of your custom list view prefab entry, as in this following image:
Notice that the various colors for the back and label have also been specified.
Note: If your list has more items in it than it can display, it;ll only create enough list view entry objects that are needed. In other words, say you added 30 items to your list, and it is only tall enough to display, 12 of them, it won’t create 30 entry objects. Instead, it will recycle the 12, reassigning their data as they scroll in and out of view. Pretty cool, huh? 😏
Using the List View
The final section of this article talks about how to use the list view component in your app.
But first, here are the steps to add one to your scene:
Add a container to your scene.
Add the ListViewComponent User Component to that container. Assign it a variable name. For these steps, let’s use listViewContainer. By default, the component will have the variable names of the panel and sliders populated. You can use the default names, or change them.
Set a custom class for the List Entry class property. From the demo, you can use DemoListViewEntry.
Specify a function name for the “List Entry Callback” property. You’ll create this function later in the scene’s source code file.
Set the “List Entry Callback Context” property to this. This makes the scope of the callback function the scene itself.
Add an image inside the main container, and assign it a square/rectangular image. This will be the panel (background) of the list view. Set its variable name to match up with the “Panel Name” property specified in the list view component.
Create another container inside the main container, and add the Slider component it. Check the “Is Horizontal?” box for one slider to make it the horizontal slider. Set its variable name to match up with the “Horizontal Slider Name” property of the list view component.
You’ll need to set the images for the body, and for the handle. The handle acts as a button, hence the norm, over and down state images.
Create one more container inside the main one, and add the Slider component to it as well. For this one uncheck its “Is Horizontal?” box to make it the vertical slider. Set its variable name to match up with the “Vertical Slider Name” property of the list view component.
In the source file of your scene, create a function using the name you specified in the “List Entry Callback” property of the list view component. The function signature looks like this (TypeScript): function listViewCallback(data: IListViewCallbackData): void { console.log(data.item); }
Each time an item is selected in the list view, that function is called. The data parameter will describe the item that was clicked: interface IListViewCallbackData { item: IListViewItem; index: number; listViewComponent: ListViewComponent; }
The item property will contain the label of the item, as well as any custom data that is assigned to the list item: interface IListViewItem { label?: string; data?: unknown; }
To add an item to your list view, consider this code: const listView = ListViewComponent.getComponent(this.listViewContainer); listView.addItem('first label', 12345); listView.addItem('second label', 23456); listView.addItem('third label', { key: 'some key', value: 'some value' } ); The first param is the label of the list item, and the second is the custom data of the item.
After running the app, adding an item to it, and pressing on that item, you should see some output in your console. If you inspect the output, it should find in it the same data that you added with the addItem method.
To see the scroll bars at work, you’ll need to add more items than the list view can display.
Then, you should be able to scroll the list.
I know a lot is presented in this article, and not every aspect of the list view component is covered. My intended audience is not other game developers; it’s those who themselves don’t do the technical part of building games, but are looking for a game programmer to help them with their project. However, some of my articles will include lower-level coding and topics like this one. Nonetheless, for the list view, code is your thing (or you’re curious), feel free to examine the list view demo on GitHub.
That’s it for this article. If you’ve any questions (you probably will if you’re trying the demo code), shoot me a message.
In this article, I explain the difference between a game designer and a programmer, and why you need need at least one person who specializes in both to help you build your game.
If you’ve been working in game development for a length of time, you’ve probably heard these terms “game designer” or “game programmer”. (Or maybe you’ve come across of the more umbrella term, “game developer”.) But is there an actual difference between a game designer and programmer, and if so, what are those differences?
In very simple terms, game programming makes the game work, while game design makes the game fun.
Now, let’s have a more in-depth look at both professions.
Roles of Game Design
This profession involves the creative process of deciding what the game will be about. The designer is responsible for coming up with the game’s general idea, what type of game it will be, and who the game is for (think target market). The game’s design also includes what each screen will look like, how any levels are built, and the setting/environment/story.
You can think of the game designer as the glue, binding all other technical aspects of the game together to create one gaming experience that player will enjoy playing.
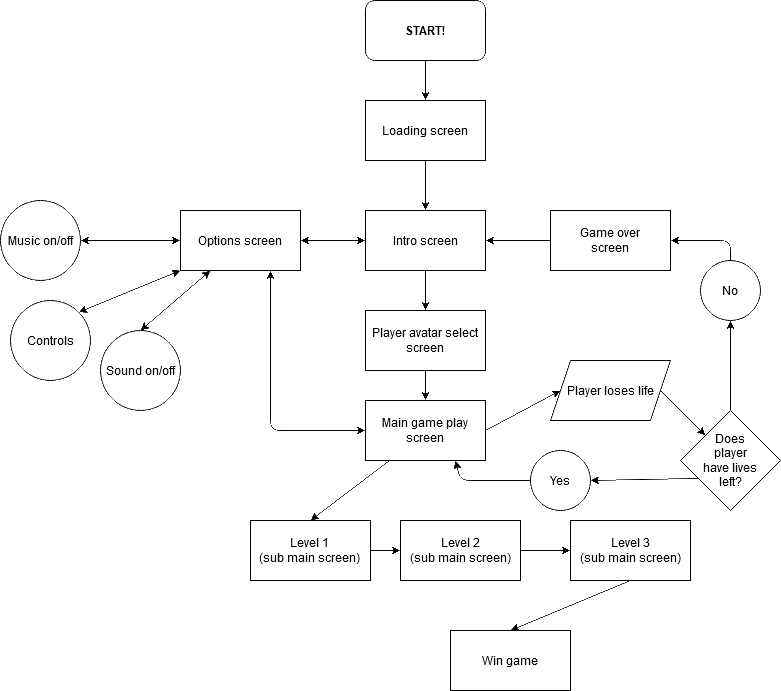
The designer creates the “flow” of the game. The flow of the game could be illustrated using the following chart, and might and look something like:
Please excuse my flowchart-makin’ skills. (:
As you can see, the designer decides what happens during each stage of the game. Of course, you could delve deeper into any of these boxes, especially if your game is large. You might have even heard of a game design document, which goes into heavy detail on how the game will work. Everyone on the team should be aware of this, though the designer, programmer, and likely artist will be using this the most.
In addition to the programmer, the designer works with team member in other professions like the artist, writer (for games with story), audio engineer (music and/or sound effects), and producer (there could be other members as well). Eventually, the design specs will need to be relayed to the programmer so he/she knows what the game should do at every stage.
The designer is responsible for determine how the game will be monetized. They’d be work more on the marketing side, and what strategies will be used (in-app purchases, one-time app purchase, subscriptions, ads, etc.) The decided strategies will be relayed back to the programmer to implement.
Some other tasks of the designer can include:
Come up with game ideas that are fun and engaging.
Decide the genre of the game. What kind of game is it? Puzzle, platformer, shooter, RPG, cards? Is it a single-player or multiplayer? Of course, it gets more specific than that, but that’s the general idea.
Decide what the main objective of the game is. What will the player spend the most time doing, and is this a fun activity? Bonus points if it’s addictive! 👍🏾
Craft a player experience. What should the player feel or experience while playing the game?
Understand what the players/market wants.
Come up with the game’s narrative, plot and characters, for example, if the game is an RPG. The designer can work closely with story writers for this.
Decides how the game should look (this is NOT the artist’s responsibility, unless the artist is also the designer, but the artists can of course assist).
Ensure the challenge of the game is balanced (not too easy or hard, doesn’t get too hard too quickly, or stay too easy for too long).
Decide how many levels the game has, and what each level looks like.
Maintain open communication with other team members
Decide how the game “flows”. For example, when this button is pressed, what should it do? (See the flowchart above/) It sounds trivial, but do not leave this up to your programmer. Often, the programmer’s interpretation will not be the same as the designer’s.
Decide what each screen looks like, for example, menus, intro/outro screens, where the player’s health is located, which fonts to use.
Decide what the game sounds like. When a button is pressed, does it play a “click” sound? If so, what? Does the game use BGM (background music)? If so, use music appropriate for whatever player experience the game aims to create.
Tips for designers working with programmers
Simple games can get away with just a designer, and a programmer. Graphics and audio can be purchased or free resources can be found online.
But do not expect your programmer to build a fun game, or to come up with the immersive elements themselves! In my experience, programmers make lousy designers, as their games are usually not very fun. Sure, they can put together lots of gameplay mechanics, but will the game keep the players’ interests? Probably not. Also, the designer will need to break down steps to the other team members, especially your programmer (and artist, if applicable) as to what each element of the game should do. They’re not mind readers. Sure, you may encounter a programmer who can also design a badass game, but again, that are the exception.
Likewise, do not expect your programmer to provide art for the game. If your programmer does produce art (link to programmer art) on their own, especially if they are artistically challenged, it should be treated as temporary, until the final elements.
These are some roles and responsibilities of a game designer. These are not written in stone, as a designer may do more or less than these. Very (and I mean very) games may only need a few of these, and depending on the game’s genre, the designer may be involved with more or less tasks as well.
Next, let’s have a quick look at game programming.
Roles of Game Programming
This professions is very heavily vested in the technical side of building the game. The programmer is mostly involved in writing the code that makes the game work.
Of course, programming involves more than just the code. The programmer decides what software, and coding language would best be suited for the game. Once the programmer starts to build the game, he/she needs to determine how the game stores data, as well as which algorithms to write to best create the desired pieces of functionality.
A programmer will often use third-party coding packages (you might’ve heard of SDKs, APIs, libraries, kits, or frameworks). These packages can speed up development by a huge amount, as they prevent the programmer from having to re-invent the wheel by creating all the functionality provided by the package themselves. Phaser, for example, is a framework for developing web browser games in the browser using HTM5.
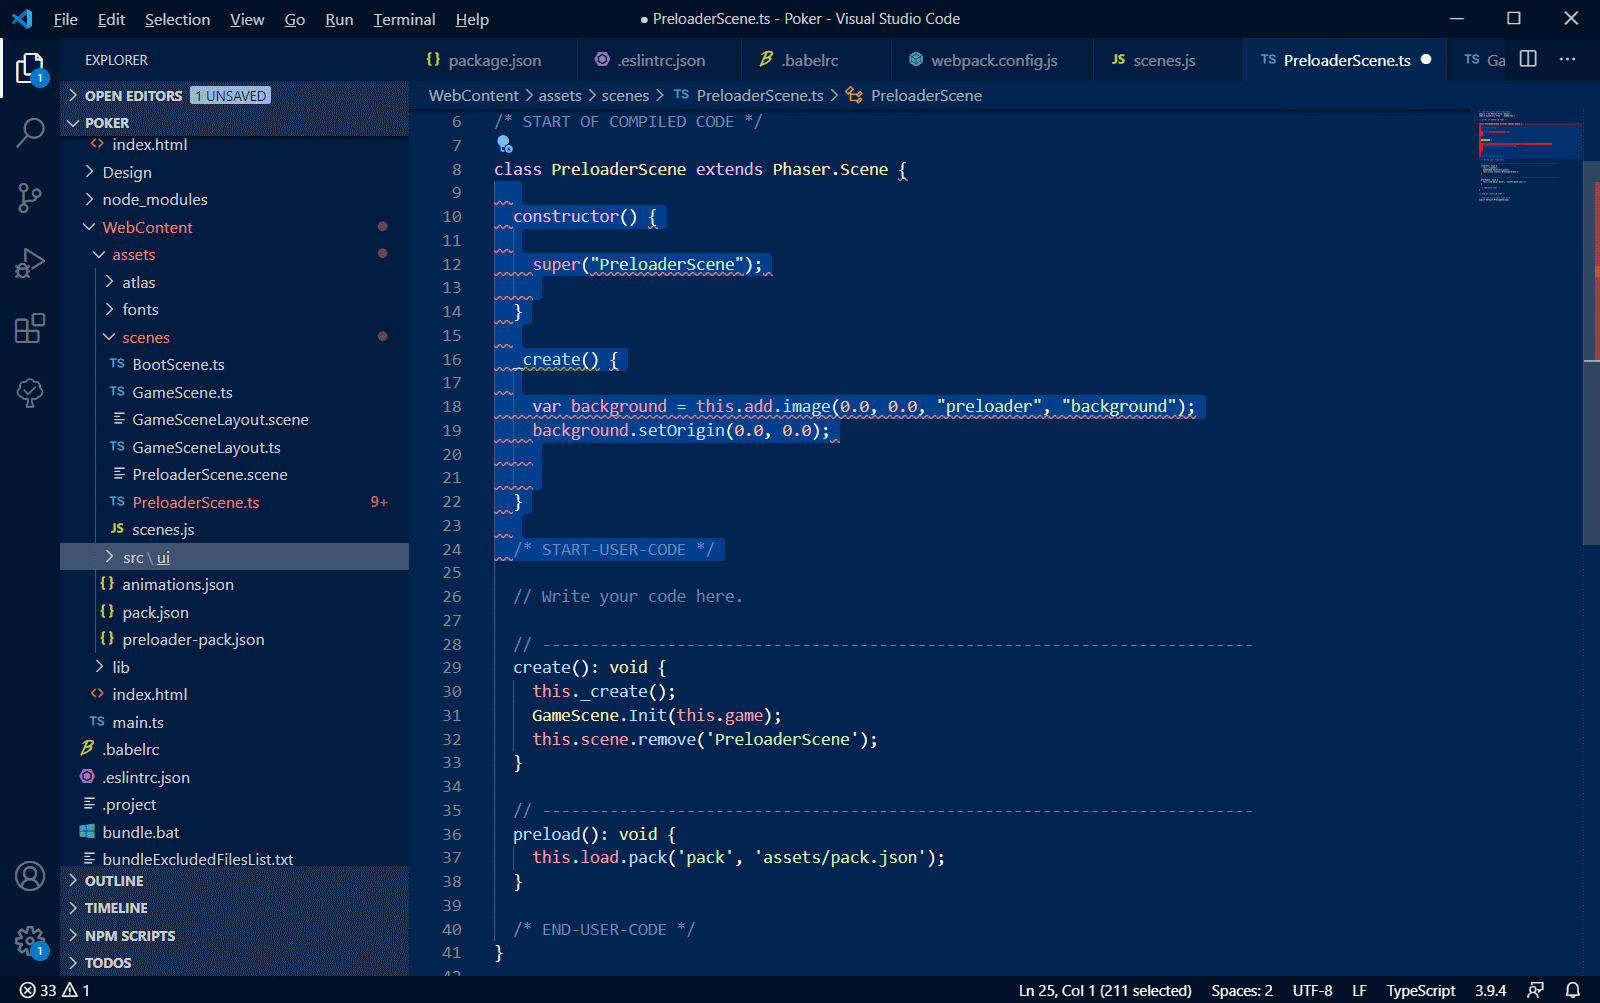
Building a game will require use of several pieces software, the main one being a coding editor. There a lots of them out there, depending on which coding environment the programmer is using. A popular one is Visual Studio Code. Other tools may require graphics editors, sound editors (NOT for building these assets, but for perhaps making minor adjustments).
As the game is being developed, the programmer will also spend a lot of time fixing bugs. Remember: the programmer’s main responsibility is to make the game work. Correctly.
Squashing bugs is a common task. Fixing them can take time, and the programmer may need to speak further with whomever discovered the bug first, if it wasn’t them. Unless it’s blatantly obvious what the bug is (9 times out of 10, it won’t), the first thing a programmer should do is to try and reproduce the bug. You can’t fix what you can’t see. Just like a referee in the Dubba-dubba-EE, you can’t call what you didn’t see.
Then, they have the nerve to get mad at you. Haha!
Some other tasks for game programming are:
Writing the code that implements the game’s functionality, such as:
Loading and displaying graphics
Loading and playing audio (music & sound effects)
Moving characters or other game objects around on the screen around
Collision/hit detections
Handing user input (WASD movement keys, spacebar to fire, etc)
Game logic (puzzles, math, physics, etc.)
Making the UI (user interface) respond to player actions (button clicks, etc)
AI (artificial intelligence, computer-controlled players, bots)
Networking (for communication with servers, or if the game is multi-player)
Using third-party code or libraries (APIs or SDKs) to help speed up the development process and/or make it easier.
If on a team of other programmers, collaborating with them. Other programmers could specialize in niche areas of game development: gameplay, tools, front-end, back-end, network, etc.
Have understanding of game engines and frameworks, and which ones work best on certain target platforms.
Communicate with other members of the game dev team (designers, artists, producers)
Write algorithms that solve problems.
Determine the best data structures to use to store certain types of data.
Fix errors that occur during development and testing, and even after the game has been produced.
Being familiar with various coding software and/or IDEs (integrated development environments).
Tips for programmers working with designers:
If you’re working with a designer, don’t expect them to know all the technical jargon like you do! They might know a little about coding or scripting, but don’t expect them to understand low-level concepts. You’ll need to learn how to communicate using layman’s terms. This is not meant to insult game designers, but in my experience, game programming, especially at the low level, is a relatively esoteric profession.
If you’re unsure of how a specific piece of functionality should work, don’t be afraid to speak up and ask questions. You’ll have your hands full writing code, coming up with algorithms and data structures. You don’t have the time (nor the skill) to make a “fun” game, or to guess what your designer meant.
If you’re not a designer (or an artist), be sure to speak up and say so. Early. Do not allow your team members to place this expectation on you.
Programmers are generally socially awkward individuals. Asserting themselves, setting boundaries, saying “No”, and being the “nice guy” are challenges that they often struggle with. If this is you, you’ll need to start with working on yourself, your communication skills, and your own self image. You can check out Bulldog Mindset (started by John Sonmez). Below are a few of his videos for some insight, ESPECIALLY THE FIRST ONE:
In closing, just some things to keep in mind when working with designers and programmers, so you’ll have an idea what is expected (and not expected) from each profession.
Finally, I myself, am a programmer, and if you’re looking for one to help you build your next 2D, single-player, web browser game, then reach out to me! You can use the contact form, leave a comment in this article, or e-mail me directly at cartrell@gameplaycoder.com.
Subscribe to my e-mail list by using the form below. I spend a lot of spare time making games to add to my portfolio, and if you’d like to get behind-the-scenes updates to playable test builds as I make the games from start to finish, you’ll definitely want to sign up.
That’s it for this article! Thanks for reading, and until we meet again! 🙋🏾♂️
If you’ve been following me for a while, you’re aware that one of the services I offer is to convert Flash games to HTML5 canvas. I’ve done this with the game Blasteroids, which was originally a Flash game I coded for a client.
Now, when doing the conversion, if you have the all the original code and assets, including any Flash FLA files that Adobe Animate use, that’s the best option. Some smaller Flash projects (and I mean very small) may use a single FLA file with all the code and assets built into it. Usually, that will not be the case…
But for the sake of this article, let’s assume that is the case. But!… You do not have this FLA file or any of its assets! And without that FLA file, you’re f*cked right? Well, maybe not! That’s where a tool called Sothink SWF Decompiler may come to the rescue!
This tool is designed to extract code and assets from Flash files so you can use them to rebuild the game in HTML5 canvas. The tool can even extract any FLA files it finds, and there is even a function to export to HTML5 format (more on this later).
Remember: When converting a Flash game to HTML5, you will need to rebuild the game from scratch, particularly, the coding and functionality.
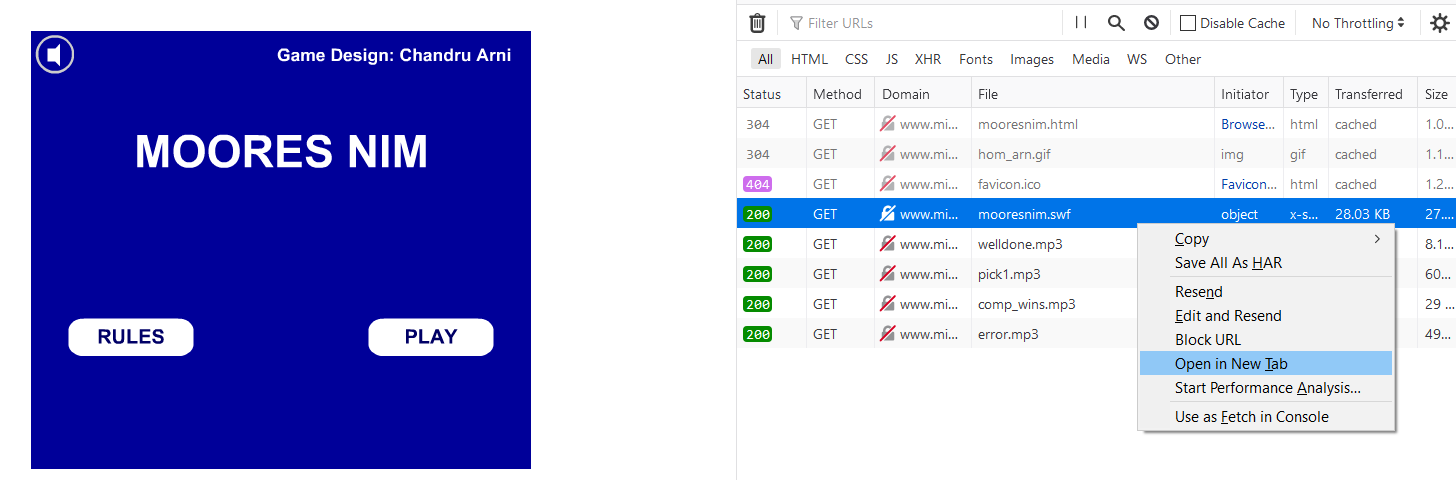
I’ve been working with a client who has several Flash games that needed to be converted. He does not have the FLA files for most of them. And the only way for me to even get SWF files was to download them by accessing the developer console within the browser.
Trying Out Sothink SWF Decompiler
Without the FLA files, I decided to give Sothink SWF Decompiler a try. I told the client that there may not be a guarantee that the decompiler might not be able to assist with converting all his SWFs (because you don’t know what you’re dealing with – it would be dumb to assume you can do the job without having seen how anything works yet).
Fortunately, the makers of the decompiler, SourceTec Software, allow you to download a trial. They even allow you to send them a SWF file, and they will decompile the SWF and inform you the test result (albeit they keep the resultant FLA file).
I opted to try the latter option, and to my surprise, they were able to successfully extract assets from the SWF!
Deciding to take a risk, I went ahead and bought the full version of the decompiler, and took on the client’s request to convert all his requested games (or to let him know of any that could not be converted).
And so far, the decompiler has delivered! I’ve been able to extract the main FLA file, as well as all the necessary code and assets from the every SWF encountered.
You can extract pretty much any element from the SWF file to your computer to reuse it when you build the game as HTML5 from the ground up.
Exporting the FLA File from the SWF
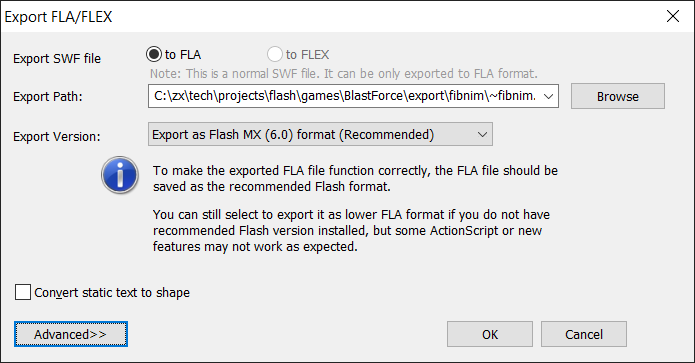
When you open a SWF with the decompiler, it will attempt to run the SWF and display the output in the main window. The Export panel to the right will allow view and extract individual elements found within. You can press the Export FLA/FLEX button to attempt to extract an FLA file it finds.
The only issue I’ve encountered so far is how it handles text. The text inside TextField objects may not display properly you export them has TextFields. You can export them as graphics and they’ll appear correctly, but you won’t be able to edit the text should you need to.
Exporting Code And Assets From The SWF
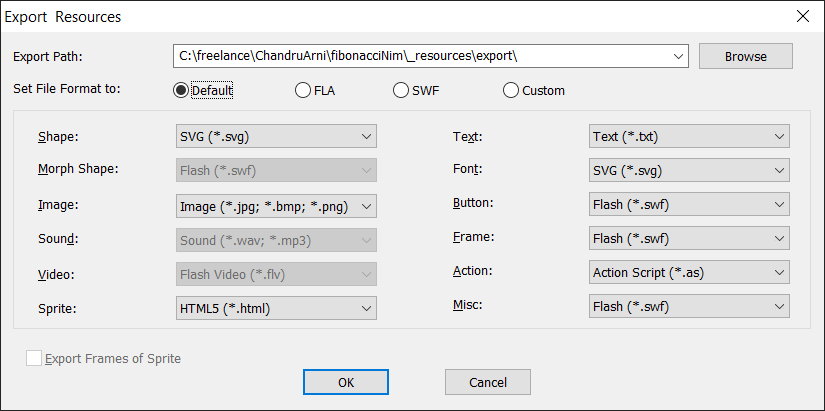
When you open the the FLA file using Adobe Animate, it will contain all assets inside. However, you can still all the extract individual assets to separate files (many will be contained inside smaller FLAs) using the Export Resources button.
For some resources, you can specify the format you want them to export to. I find FLA useful for things like buttons and actions.
This method can be useful if you want to export graphics and button images, because the FLA files that they are contained within will already have the stage size to match the graphic you’re exporting.
As for the ActionScript code, if there was any code placed inside timelines of the FLA, they will be preserved in the conversion process, which is super. Your task here – and this is the most laborious part of the process – would be to rewrite all the ActionScript code to JavaScript (or TypeScript in my case). But at least you don’t have to reinvent the wheel, with designing the game’s logic, as the previous programmer has already done that for you. 😏
Rebuilding The Game Into HTML5
After you’ve exported all the assets, next begins the process of transferring graphics to your new HTML5 project. Raster graphics such as bitmaps, PNGs, and JPEGs can simply be copied over if exported in their native formats. However, for vector graphics, you’ll need to export them as rasters, so they can be loaded onto the HTML5 canvas. Adobe Animate can do this conversion for you.
You can package up all the extracted graphics into one or more spritesheets using TexturePacker. And if you’re using an HTML5 canvas engine like Phaser, it has built-in support for the TexturePacker spritesheets.
If there were animations – hopefully simple ones – you’ll need to extract each frame as a separate raster graphic, then rebuild the animation for use with canvas. Again, Phaser, if you’re using it, can rebuild the animations.
As a super bonus ⭐… If you’re using Phaser, you can use Phaser Editor to rebuild the layouts exactly as they were (or as close to it as possible) in the original Flash. I’ve demonstrated this before, and you can use the Editor along with the newly extracted graphics to convert your Flash stage to a Phaser scene.
Export to HTML5
I previously mentioned that the decompiler can export to HTML5. If your Flash is simple enough, I suspect this can convert your Flash game without incident. I say suspect, because, unfortunately, when I tried it, it didn’t work out too well for me.
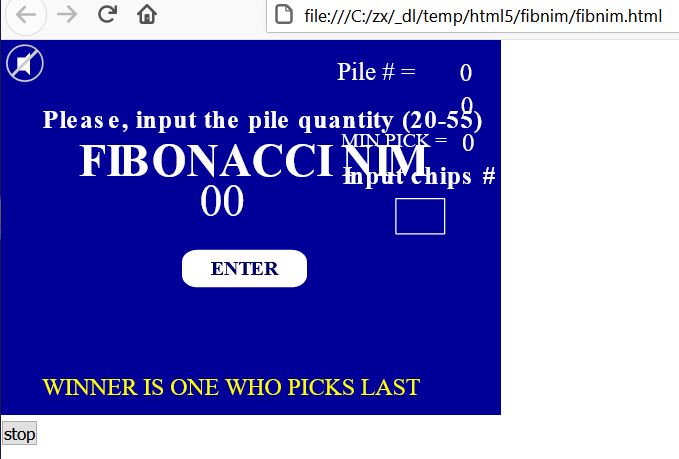
When I tried it, it produced two files: one HTML file, and once JavaScript file. However, when I ran it, it didn’t behave as intended. The stage content was transitioning from one frame to the next, but it was leaving behind the previous frame’s content. Furthermore, the game logic wasn’t running as expected. Here’s a screenshot of the result:
The text from the previous frames wasn’t removed, and they’re jumbled behind the current frame’s text.
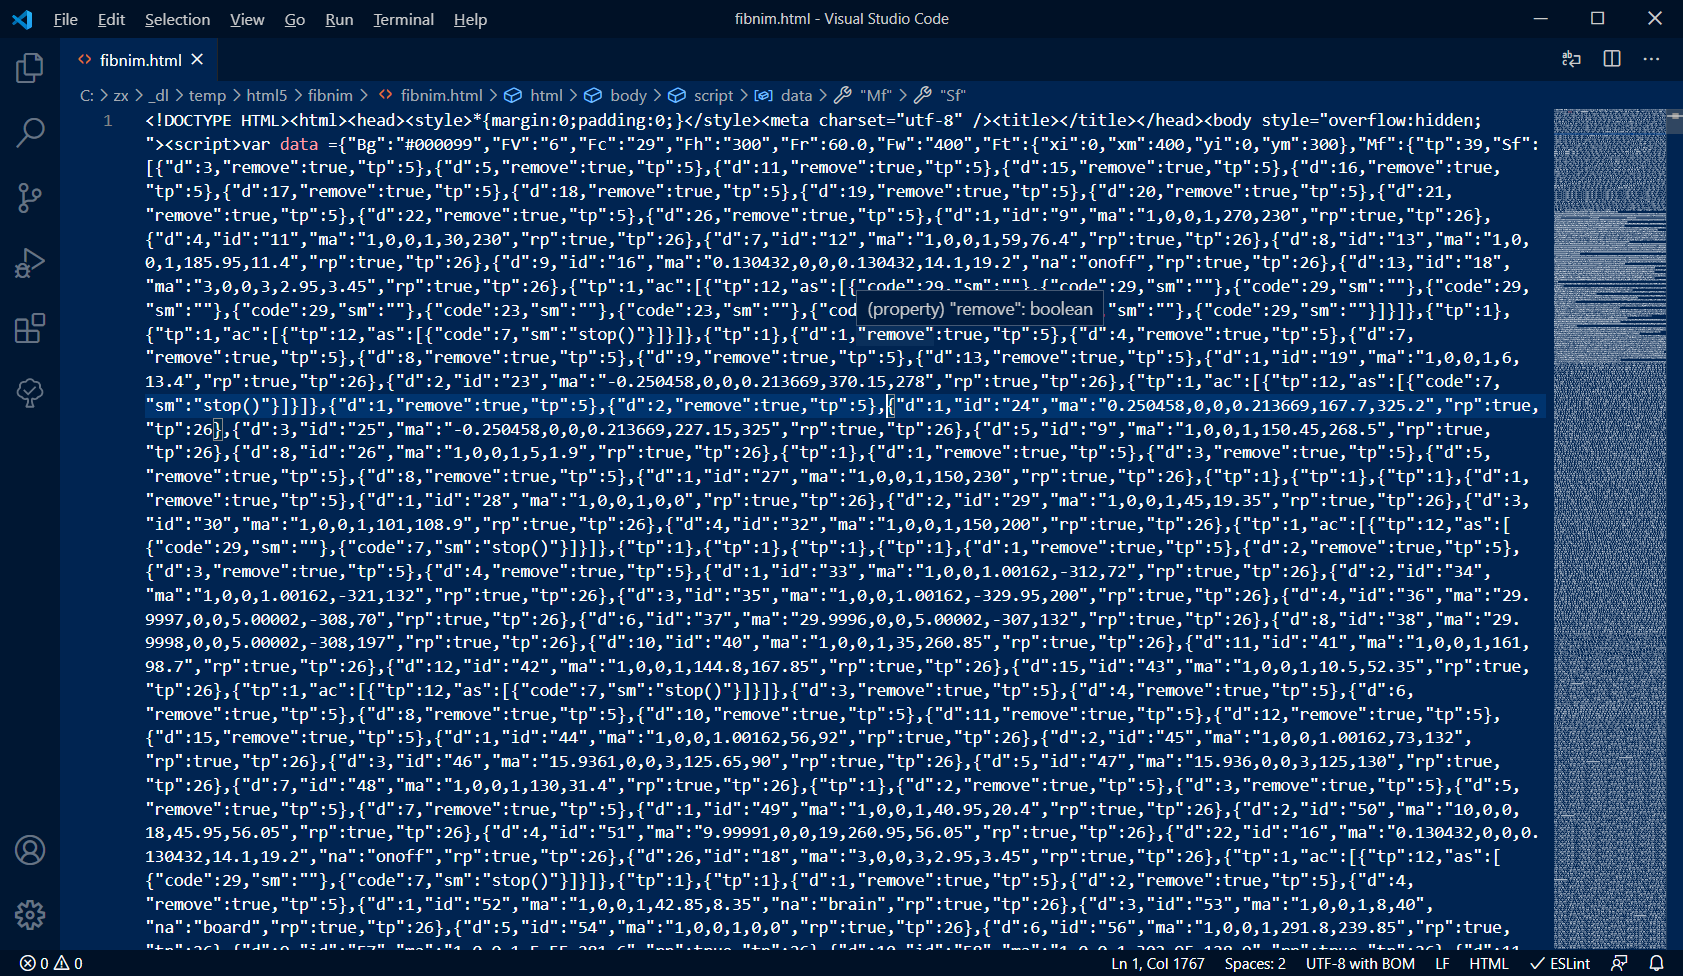
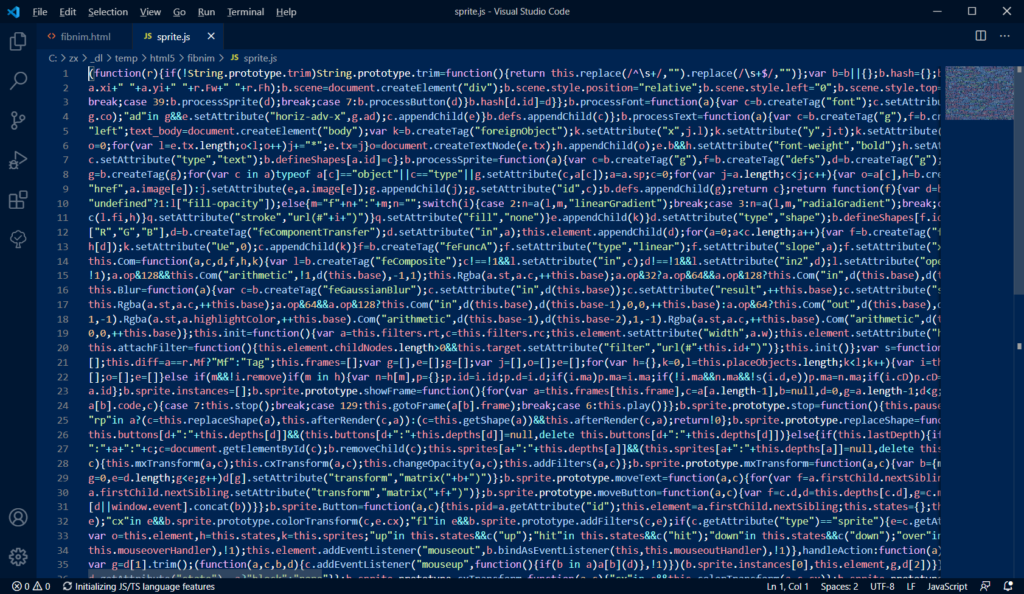
So, let’s have a look inside the HTML and JavaScript files:
What the…! 😵
Good luck trying to edit that! Even with a code formatter like this one, you’ll still be hardpressed with fixing the game to make it work. As I’ve said before, best to rebuild the codebase from scratch, converting the ActionScript code to JavaScript/TypeScript.
Closing
Even if you don’t have the original FLA and assets, there may be a way to still convert the Flash game to HTML5 with a tool like Sothing SWF Decompiler. Overall, I’ve not had much trouble using this tool, and I would recommended giving the trial a try if you’re working to convert your Flash content.
And if you can’t (or don’t want to ) be bothered with the conversion process, reach out to me. I could take a look at your SWF. Or even if you have all the original code and assets, and are looking for a programmer to convert it for you, contact me directly at cartrell @ gameplaycoder dot com, or you can use this contact form.
And if you’d like to get on my e-mailing list, you can sign up using the form below. There, you’ll get first access to projects that I’m working one as I make noteworthy process. You’ll see the games I work on come to life as I continually work on them.
Continuing the series of building a multiplayer poker game, some progress has been made on the game. Development is coming along great using Phaser Editor v3!
A Bit More Technical Setup
I’m using several technologies, as mentioned in the first article of this series, and as I’m moving forward, I’m continuing to make adjustments to my development environment.
Since the game will perform as both a single-player and multiplayer game, I’m working on the single-player aspect first.
The game will be split into two primary projects: one for the client-side, and the other for the server-side.
Both will use common logic for running the game, and to avoid having to duplicate code across both projects. I made a secondary project, which is acts as a “common” repo for sharing code that will be used by both projects.
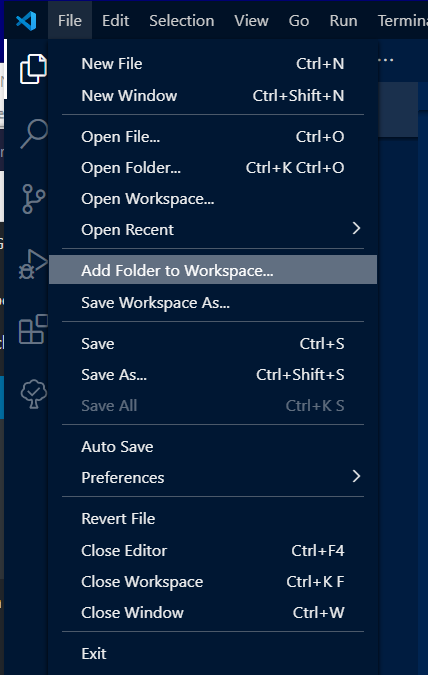
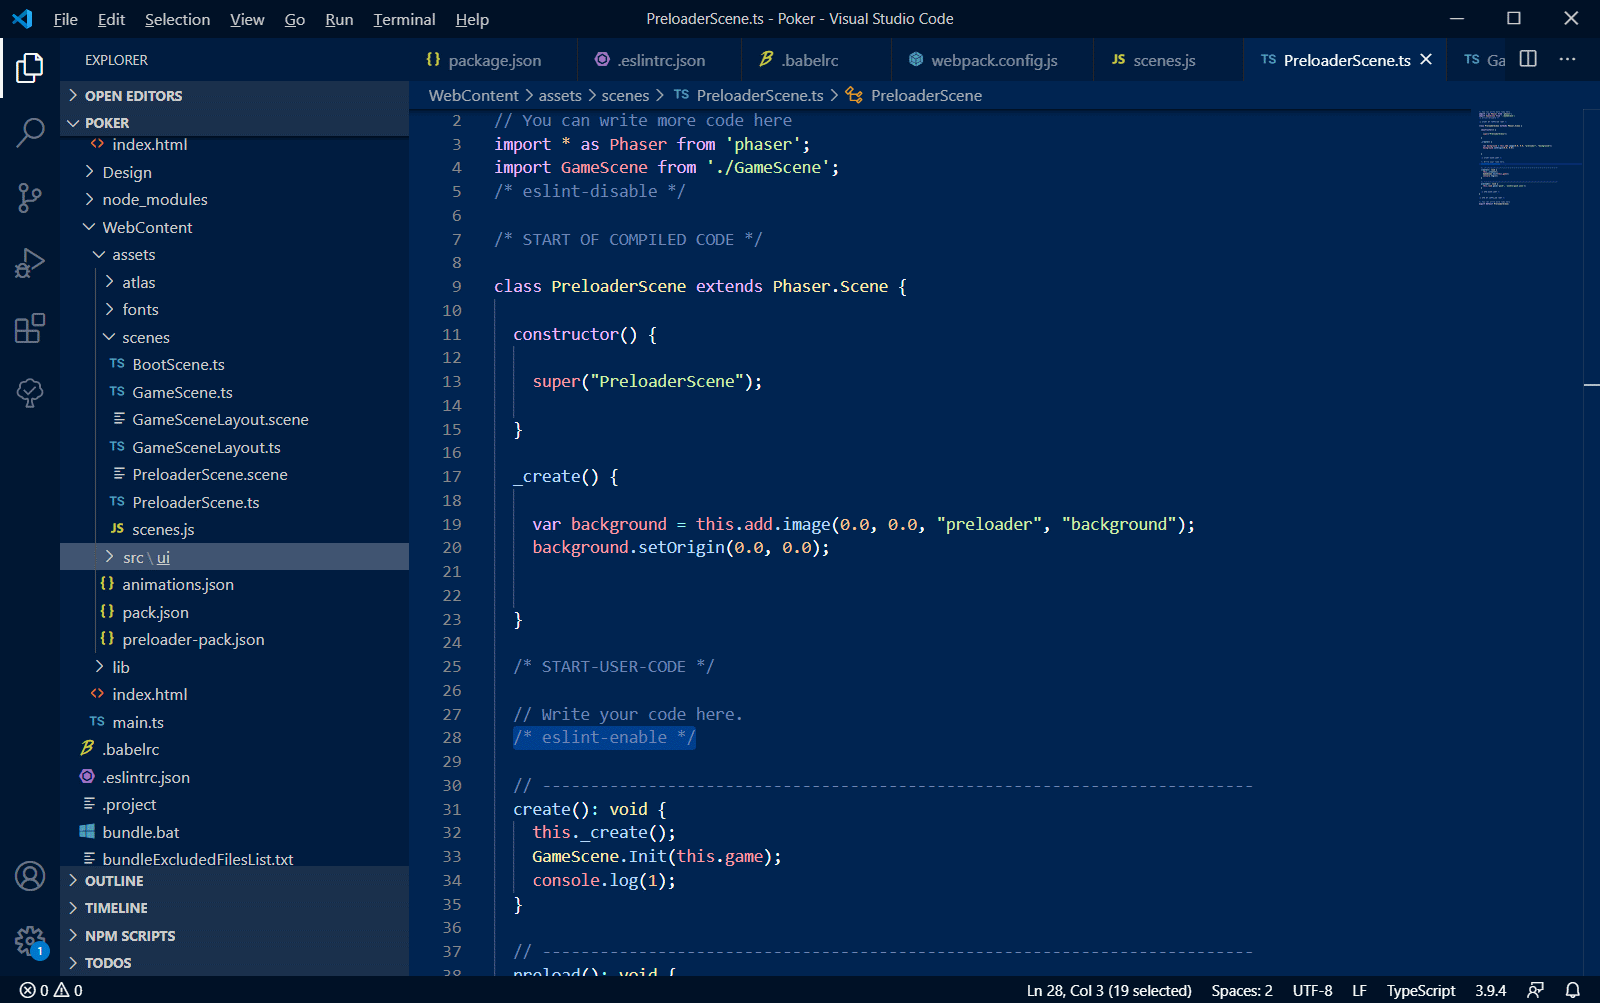
Since the common folder is outside of the client project root folder, I made come adjustments to VSCode to allow it to “see” this external folder and add it to the workspace.
The common folder is in the same folder as the client project (and server project). In order for Webpack to add the common files and folders to the build process, I made some adjustments to the webpack.config.js file. The alias inside of the resolve also makes the import statements look cleaner in VSCode.
I’m learning the rules of poker as I build this game, and the journey has been quite interesting. 🙂
The order in which the players take their turns was fairly straightforward. Play starts with player left of the dealer, small blind (SB). The player left of the SB is the big blind (BB). Play goes clockwise around the poker table.
The object of poker is to win all the money in the pot. You do this by having the best poker hand at the end of the game. Your hand must be built from any combination of two cards that you’ll eventually be dealt (the “hole” cards), plus the five community cards that will eventually be dealt. As players make their turns, they can place bets by adding money to the pot. The player who wins the game (by having the best poker hand) at the end of the game wins all the money in the pot.
The game is split up into rounds and each round doesn’t end until every player has contributed an equal amount of money to the pot.
To start the game off, the SB posts a forced bet bet of 1bb, and the BB posts another forced bet of 2bb, twice the SB’s.
After both blinds make their bets, each player is dealt two face-down cards. (You can see your own cards, of course 😉)
Image taken from Batman The Animated Series, Episode: “Almost Got ‘Im”.
When it’s the next player’s turn, if they wish to stay in the game, they must “call” by matching the BB’s bet of 2bb.
When play returns the the SB, they need only post 1bb, since they posted the initial 1bb star started the game. After this, all players still in the game (who haven’t quit, or folded) have posted an equal amount of 2bb.
After all players have placed equal bets the betting round comes to a close, and the first three of five community cards, the flop, are dealt, face-up in the center of the table.
The round begins again with the player nearest the left of the dealer. This would be the SB if They haven’t folded. Each players has the following moves:
Check: Pass to the next player without making a bet.
Bet: Increase the current bet by posting additional money into the pot. If a player does this, all other players must either match this bet, fold, or re-raise. More on re-raise later.
Fold: Forfeit their place in the current game. Their hand is surrendered face-down. Note that they can return to play the next game.
Call: If a previous raise has been made, the player can call by matching the previous bet.
All-In: If a player does not have enough money to match the current bet, and they wish to stay in the game, they must go “all in”, betting all their remaining chips. Note that if the player does not win this game, they will lose all their money and be out of the game!
Once the flop round is complete, the fourth community card is dealt, called the turn. Betting begins again with the player left of the dealer. And the round ends once all players have posted equal amounts to the pot.
Note: It is possible to no players to make any bets during a betting round by simple calling each time. But that would make for a slow and boring game, IMO. Maybe that’s the rookie talkin’, haha! 😆
Once the turn round is complete, the fifth and final community card is dealt, called the river.
Ahem! Anyway, betting begins again with the player left of the dealer. And the round ends once all players have posted equal amounts to the pot.
After this round ends, the showdown begins!
During the showdown, all players still in the game reveal their hands, and the player with the best hand wins the pot. If you’re curious, you can learn more about the poker hands here.
Re-Raising
Back to the concept of re-raising. This is when a player raises the bet, then another player raises again after them. Depending on the type of poker being played, the rules for determining the minimum (and maximum) amounts you can raise will vary. Since I’m coding a game using the rules by No-Limit, the maximum you can bet is all your available chips. However, the minimum you can bet can be a little trick to figure out, because it’s simply not just “double what the big blinds bet”.
I’m still working on this part, but I think I’ve got it (if not close 😅). Of course, if you’re an expert on calculating the minimum amount for re-raising in No-Limit 1/2 poker, please comment and correct any of my assertions. That would be greatly appreciated. 👍🏾
When re-raising against previous raise, the minimum amount must be at least the amount raised by the previous player. Take this example below.
Pot size is 6bb. Player 1 bets 4bb. Player 2 raises to 10bb. What would be the minimum raise for Player 3?
First, let’s have a look at the wording used. Player 2 raised to 10bb. However, Player 2 actually increased the bet amount by 10 – 4 = 6bb. So, the minimum Player 3 will need to raise by is 6bb.
This would be a total raise size of: 10 (previous player’s total raise to) + 6 (minimum raise by) = 16bb.
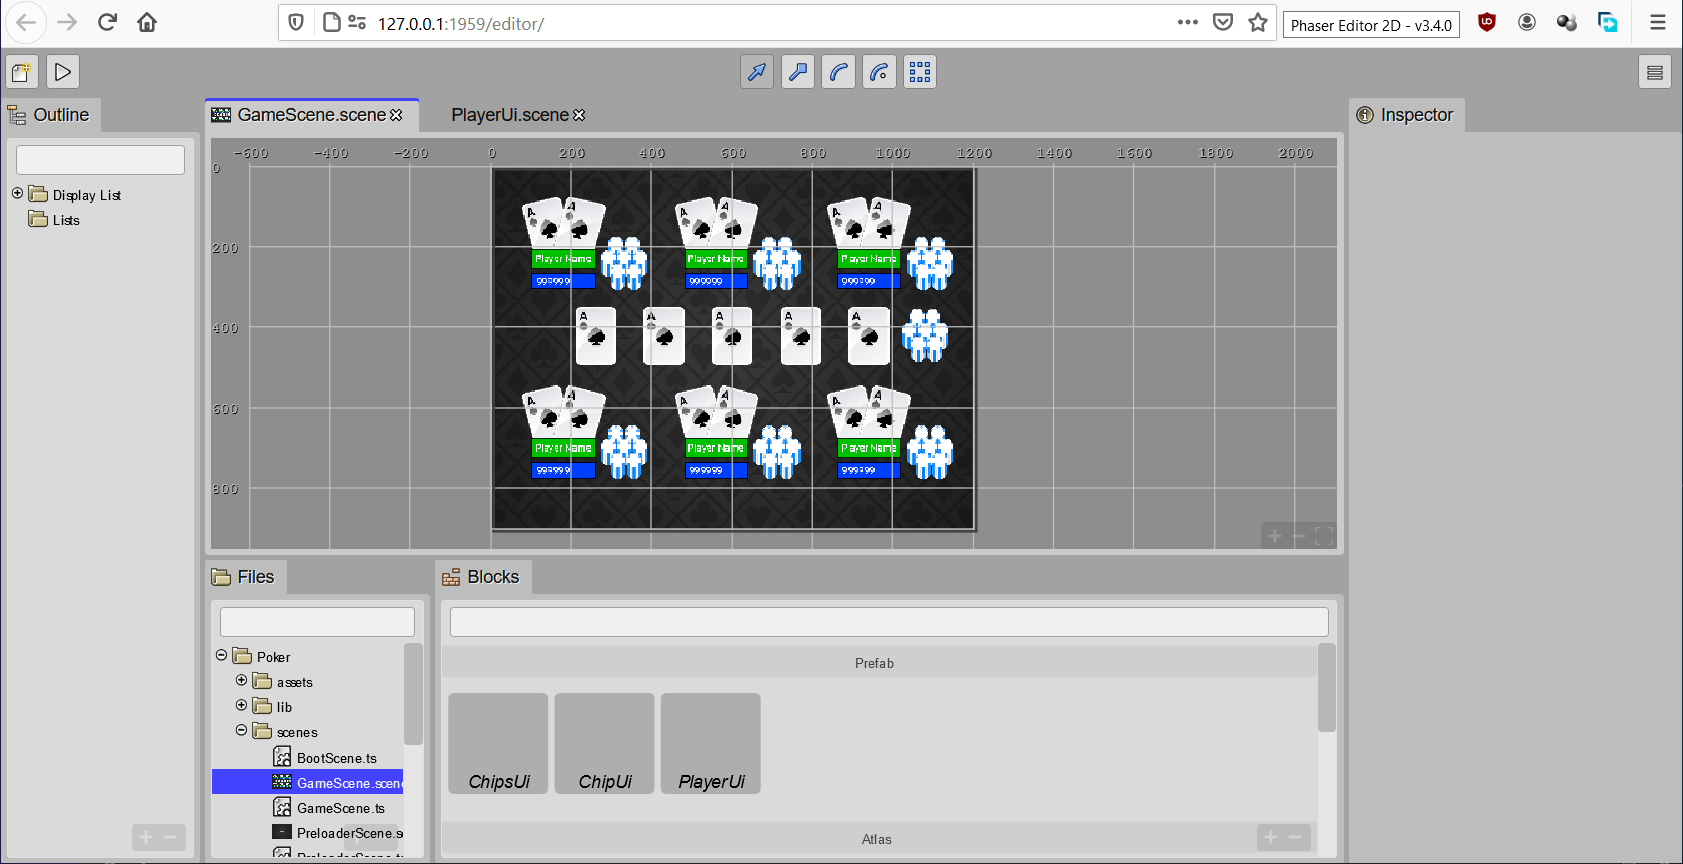
Back To The Game Dev
As I close this article, here’s a screen shot of the current progress. I’m currently working on the raise (and re-raise!) implementation, as well as a few other functions, such as folding and going all-out.
After that, I’ll move on to the showdown functions and determine the winner among the various conditions.
That’s all for now. I’ll continue to keep you updated as I make progress.
Finally, you can sign up using the form below to receive updates to playable builds (or at least interactable builds) as I make noteworthy progress.
As I’m working on the Poker game, I realize that I’ll need to add some buttons to it. While v3 of Phaser does not have a native button in it like v2 does. I decided to add one. And since I’m using Arian’s Phaser Editor v3, which recently got User Components added to it, why not use them to create the buttons? Let’s go for it!
User Components allow you to add custom properties to existing game objects and further extend their functionality. For example, if you have characters in a game, you can add a “Character” component to add the usual stats to character instances that you add to the scene, such as health, speed, name, etc.
When you build a User Component, you add properties to it, using some primitive data types, such as string, number, or boolean. You can also use expressions that can be evaluated as they are entered into the editor. They will run within the scene on which the game object they are added to lives.
This article will not go in depth on User Components. For more information, see the help pages. You can also look at Arian’s recent article for additional inspiration.
Building A Button Component
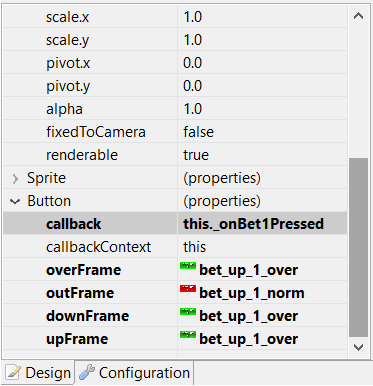
First, let me say where I got inspiration from regarding designing the User Component itself. It was from v1 of the Phaser Editor. Since it supported Phaser v2, which has native support for buttons, v1 took advantage of that. I decided to use its UI as a starting point:
As you can see, with Phaser Editor v1, you have several properties. Let’s go over them, and see how we would add them as properties for our User Component.
There are four frames that determine the button’s appearance based on its state. They are overFrame, outFrame, downFrame, and upFrame (which I will call normFrame, short for “normal frame”). Since these specify the frames of images that the button will use, they can be assigned strings in the User Components Editor.
Next, have a look at callback, and callbackContext. Since these two refer to functions or references to objects, they would be assigned the “Expression” type.
There are a few more properties we’ll add to our button component:
Disabled Frame: We’ll use this to display our button when it is disabled. While Phaser doesn’t natively support a disabled state, I decided to add that one myself. Like the other frames, this property will be a string.
Enabled: Since we can disabled the button, you can use this property to specify if the button will be enabled by default. This property can be assigned a boolean type in the User Components Editor. We’ll assign it a default value of true.
Note: When you are creating component properties, you can also assign them default properties.
Pressed Sound Key: Sometimes, you may want a button to produce a sound as additional feedback that a button was pressed. This can be a string.
Down Sound Key: You may instead want to define a sound that plays when the button is first down.
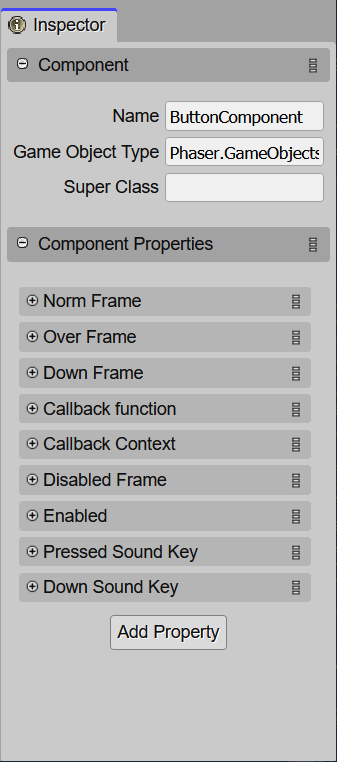
For this article, let’s name the button component…. waaaaait for it…….. ButtonComponent. 😋
After setting up the properties, my component in the editor inspector looks like this:
Setting Up The Game Object
The type of Phaser game object that will use this component will be a Phaser.GameObjects.Image. The image is an interactive object that can respond to pointer events (mouse for desktops and laptops, and ya fangah for mobile/touch devices), such as over, out, up, and down states.
The gist of it works like this:
In the constructor of your button component, you’ll make the game object interactive using Phaser.GameObjects.GameObject.setInteractive. In the config object, you can optionally set the useHandCursor property to true. Note that this only applies to mouse cursors.
Add the down, over, and out input events to the game object. Also add their respective event handler methods to the ButtonComponent class. (There are a few caveats to setting these up; these will be addressed later in this article.)
To handle “pressed” events, you’d listen to the up property. This is where the callback and callback context properties come in. (There are a few caveats to setting these up; these will be addressed later in this article.)
In their respective event handlers, you’d set the down, over, or up image frames using the corresponding frame from the User Component properties defined earlier.
Note: The event handlers (as well as the other code you’d add) would go into the code sections within ButtonComponent the User Components compiler allows you to add code.
You can add enabled getter/setter to determine if the button is enabled or not. This is where the Disabled Frame property comes in. You set the frame of the image to this frame if the value of the disabled frame if the button is disabled.
You could try setting the initial enabled/disabled state using the Enabled component property, but there is a problem to this… as you may have guessed, we’ll get to that later. 🙂
Caveats
Now, we finally get to those few things to be aware of when creating this button component. (:
First, when you press down on a button, it’s state changes to the Down Frame image. However if you hold the pointer down while moving over another button, you can also interact with that button an the same time. Normally, you should not be able to do this, as you should only be able to interact with one button at a time if it is pressed. Also, if the button is pressed, then the pointer is moved out of the button, then released, the button will not receive the up handler, not clearing the down status.
To handle this, I borrowed a concept from Microsoft known as capturing the mouse. The idea is when a button is pressed, that button “captures” the mouse, meaning, while the mouse button is down, that button accepts all mouse input, even if it moves over other buttons.
I took that concept and adapted it to this button component. When a button is first pressed, it will “capture” the pointer. A reference to that button can be saved in a static property; we’ll call it capturedButton.
Let’s See Some Damn Code Already! >:D
Only the down, over, and out event handlers were added to the game object. However, the up event handler was not added to the game object. Instead, the up handler is added to the scene that the game object is on. This is done, so that we can emulate the captured button component receiving events, even if the pointer has moved out of the component’s game object.
Also, this handler is only added inside the game object’s event handler – and remember to add it to the game object’s scene:
// "this" is the ButtonComponent instance

// add down, over, and out input event handlers to the game object
this.gameObject.on(Phaser.Input.Events.GAMEOBJECT_POINTER_DOWN,
  this.onInputDown, this);
this.gameObject.on(Phaser.Input.Events.GAMEOBJECT_POINTER_OVER,
  this.onInputOver, this);
this.gameObject.on(Phaser.Input.Events.GAMEOBJECT_POINTER_OUT,
  this.onInputOut, this);
...
onInputDown() {
  // capture the button component
  ButtonComponent.capturedButton = this;

  // update the down state flag
  this._isDown = false;

  // add a one-time up input handler to the scene
  this.gameObject.scene.input.once(Phaser.Input.Events.POINTER_UP,
    this.onScenePointerUp, this);

  this.updateButtonImage();
}
...
onScenePointerUp() {
  const captured = ButtonComponent.capturedButton;

  // clear the captured button component
  ButtonComponent.capturedButton = null;

  // if a button is captured, only handle up events from that button
  if (captured !== this) {
    return;
  }

  // clear the previously captured button's down state flag
  this._isDown = false;

  if (this._isOver) {
    this.updateButtonImage();

    // a button "press" only counts if the pointer was released while it
    // was also over that same button
    if (this.callback) {
      this.callback.call(this.context, this);
    }
  }

  // if an over-non-captured-button is set while the captured button is
  // being released, handle input for that button as if the pointer just moved
  // over it
  const nonCaptured = ButtonComponent.overNonCapturedButton;
  if (nonCaptured) {
    ButtonComponent.overNonCapturedButton = null;
    nonCaptured.onInputOver();
  }
}
...
onInputOver() {
  const captured = ButtonComponent.capturedButton;
  if (captured) {
    if (captured === this) {
      this._isOver = true;
      this.updateButtonImage();
    } else {

      ButtonComponent.overNonCapturedButton = this;
    }
  } else if (this.gameObject.scene.input.activePointer.primaryDown) {
    ButtonComponent.overNonCapturedButton = this;
    this.gameObject.scene.input.once(Phaser.Input.Events.POINTER_UP,
      this.onScenePointerUp, this);
  } else {
    this._isOver = true;
    this.updateButtonImage();
  }
}
...
onInputOut() {
  const captured = ButtonComponent.capturedButton;
  if (captured) {
    if (captured === this) {
      this._isOver = false;
      this.updateButtonImage();
    } else {
      // clear the non-captured button
      ButtonComponent.overNonCapturedButton = null;
    }
  } else {
    // this button
    this._isOver = false;
    this.updateButtonImage();
  }
}
Ok, quite a bit going on here. Well, you asked for some damn code, and you got it. 🤨
First the down, over, and out event handlers are added to the game object.
In the down event handler, onInputDown, the current button component is “captured”, and an up input event handler is added to the scene, instead of the component. The comments should give you the gist of what’s going on. However, I do want to point out something: ButtonComponent.overNonCapturedButton.
This static property is used when a button is captured, and the pointer moves over a different button. While we still want to ignore processing for that “over-non-captured” button, we want to set a reference to it.
Reason is, if the pointer is released (up input event) while over this button, after releasing the captured button, we want to immediately update the over state of the non-captured-button. You can see this happening in the last code block of the onScenePointerUp function.
Next, let’s have a look at enabling and disabling the button.
get enabled() {
  return (this._enabled);
}

set enabled(value) {
  this._enabled = value;
  this.gameObject.input.enabled = this._enabled;
}
Here, I assigned an ‘enabled’ getter and setter to the ButtonComponent class.
Normally, if the button is disabled, you disable the input property of the game object and update the game object display frame. to display the disabled image. But what if the button was captured while it was disabled? Or what if an over-non-captured button is set while the captured button is disabled?
And if you enable the button, the input property is also re-enabled, and the game object will display the “normal” (up) display frame. But what if the pointer is over the button at the moment it because enabled?
These questions can be answered in the updateAfterDisable, updateAfterEnabled, and updateCapturedStatesAfterOff functions.
Let’s make the following adjustments to the above code:
One final piece of code I want to highlight is actually updating the gameObject’s display image to represent the button’s state.
Sometimes, you don’t want to have over, down, or disabled display. You only want a single image (the “normal” / up) frame. I designed the component so that you only have to specify the Normal Frame of a button component, and it’ll use that for all it’s image states.
Let’s have a look at how this is achieved:
updateButtonImage() {
  const buttonImage = this.getGameObject();
  if (!buttonImage) {
    return;
  }

  let frame;

  if (!this._enabled) {
    // button is disabled. try the disabled frame first, and if it's
    // not available, try the normal frame
    frame = this.resolveFrame([this.disabledFrame, this.normFrame]);
  } else if (this._isDown) {
    // button is down. keep moving
    if (this._isOver) {
      // button is over AND down. try the down frame first, then try over,
      // finally, normal
      frame = this.resolveFrame([this.downFrame, this.overFrame,
        this.normFrame]);
    } else {
      // this would happen if the button is captured, but the pointer has
      // moved out of the game object image
      frame = this.normFrame;
    }
  } else if (this._isOver) {
    // button is over but not down
    frame = this.resolveFrame([this.overFrame, this.normFrame]);
  } else {
    // last case
    frame = this.normFrame;
  }

  buttonImage.setFrame(frame);
}

doesFrameExist() {
  const buttonImage = this.getGameObject();
  return (frame in buttonImage.texture.frames);
}

resolveFrame(framesOrder) {
  // frames are resolved in the order they are specified in the array.
  // the first frame that exists in the texture will be used.
  let index = 0;
  for (; index < framesOrder.length - 1; index += 1) {
    const frame = framesOrder[index];
    if (this.doesFrameExist(frame)) {
      return (frame);
    }
  }

  return (framesOrder[index]);
}
Bonus: Checkboxes and Radio Buttons
You likely noticed from the demo, that there are also checkboxes and radio buttons.
To create these types of buttons, I first tried to extend the BaseButton class and create a CheckboxComponent component. However, if you create a component that extends another component, it doesn’t carry over all the component properties from the base component class. So, I ended up using composition, adding the ButtonComponent as a member object of the CheckBox component.
Inside the Checkbox constructor, you could instantiate your button component like:
this.buttonComponent = new ButtonComponent(this.gameObject);
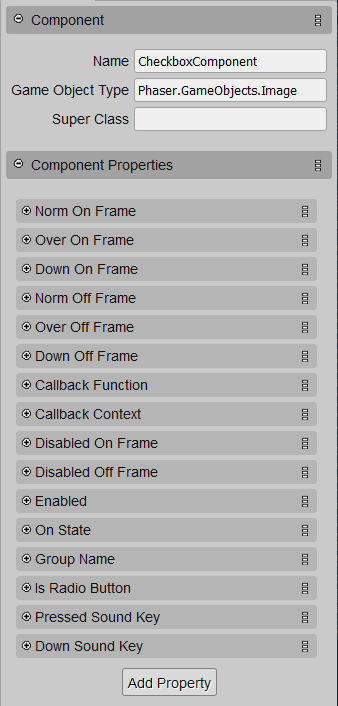
A normal button has four states: normal, over, down, and disabled. But a checkbox has eight states, those four, times an “on” (check) and “off” (unchecked). My Checkbox component properties ended up looking like this:
Whoa! Dem’s a lotta prop-tehs! 🤠
I won’t go into details about the check box, but the ButtonComponent does handle most of the work. Many of the functions just get passed from the Checkbox component to the Button component.
A key difference is toggling the checkbox’s “on” state each time it’s pressed…
this.isOn = !this.isOn;
Updating the game object’s image based on the state is handled a little a differently. Something like this:
We’re basically just setting up the button component’s properties depending on if the checkbox is on or off.
Setting Up A Radio Button
As for a radio button, once press it on, you can’t press it off, unless you press another radio button in the same “group”. That will turn that radio button on while turning this one off.
Implementing a group was a bit tricky, because I didn’t want to have to actually code anything additional outside of the inner workings of the Checkbox component every time I wanted to create checkbox objects. So, on the component properties, the “Group Name” (string) is a data property that gets added as a a data property of the Scene that the checkbox game object image is added to.
And of course, don’t forget to check the “Is Radio Button” box in the Checkbox component properties, if you want your checkbox to behave like a radio button. 😉
In the constructor, the Checkbox component will attempt to fetch an object (that would include an array of CheckboxComponent objects. If the array doesn’t exist, it creates it, and assigns the group to the scene’s data property. Then it assigns itself to the group.
Note: This “group” is not necessarily Phaser’s Group object. You might prefer to make a separate class for this to keep code organized, especially if your group will provide additional behind-the-scenes functionality.
Setting that up might look something like this:
// this.groupName is the "Group Name" component property

if (this.groupName) {
  const existingGroup = this.gameObject.scene.data.get(this.groupName);

  if (existingGroup) {
    this._group = existingGroup;
  } else {
    this._group = [];
    this.gameObject.scene.data.set(this.groupName, this._group);
  }

  this._group.push(this);
}
Note: If you use this method, if you use multiple groups, make sure each group name is unique.
Handling Press Actions For Checkboxes And Radio Buttons
Since there is an internal ButtonComponent handling all the input events, we need to have the “pressed” event forwarded onto the Checkbox component so it can properly respond, which includes invoking the callback provided in the Checkbox component properties.
You can set that up using something like:
this.buttonComponent.callback = this.callback;
this.buttonComponent.context = this;
...
callback() {
  // when the button is pressed this function is called
  if (this.isRadioButton) {
    this.handleRadioPressed();
  } else {
    this.handleCheckPressed();
  }
}

handleCheckPressed() {
  // toggle the on state and be done with it
  this.isOn = !this.isOn;
  this.dispatchCallback();
}

handleRadioPressed() {
  if (this.isOn) {
    // if the radio button is already on, skip everything else
    return;
  }

  this.isOn = true;

  // turn off all other buttons in the group EXCEPT this one
  this._group.forEach((checkbox) => {
    if (checkbox !== this) {
      checkbox.isOn = false;
    }
  });

  this.dispatchCallback();
}

dispatchCallback() {
  if (this.chkCallback) {
    this.chkCallback.call(this.context, this);
  }
}
Wrapping Up
To add the component to a game object image, turning it into a button, drop an image onto your scene, add the ButtonComponent to it, and set up the properties. Be sure your callback and context are properly referenced in your code.
There is another aspect of buttons: visibility, and playing sounds when the button is pressed or is down. Making a button visible is handled similarly to enabling and disabling a button. I’ll leave that to you as an exercise. 🙂
Again, if you want to have a look at the buttons demo, it’s here.
That’s pretty much it for building a button component in Phaser Editor using the User Component! At least, this is how I decided to design one, as I’m sure there are other ways to do it.
Finally, sign up using the form below to receive updates to playable builds (of the Poker game I’m currently working on). You’ll get e-mails to builds you can interact with to some degree as I make noteworthy progress.
Continuing the series of building a multiplayer poker game, I’ve decided to make a big turn in how the game will be built.
I’ve decided to give Arian’s latest version, Phaser Editor v3, a try.
Why? All my previous projects were deep in v1 or v2. However, I haven’t gotten very far into this Poker project, so it was easy to switch it from v2 to v3 sooner rather than later. Plus, after comparing its functionality with that of previous versions, it made sense to at least give it a try. And so far, it’s working out well!
Now, the biggest attraction, at least for me, was the fact that prefabs were back, which we haven’t seen since v1. Using factories in v2, while they took a bit of work to get them the way that I wanted, allowed me to learn a lot about how custom factories work in Phaser.
At the time of this article, v3 doesn’t yet supply an animations editor, or texture atlas editor. But that’s ok!
For animations, you can use a tool called Animator. You can learn more about animations in v3 here. I haven’t needed to use animations for my Poker game (at least not so far), so I can’t vouch for this tool. However, it is an option.
For texture atlases, you can use Texture Packer, which I’ve enjoyed using quite a bit over the years. To learn more about atlas editor usage in v3, as well as other options, check here.
Since this version now works in your browser (which also significantly reduces its download size), you start it up using your command prompt. So I made a simple batch file which starts the editor with the -desktop option since I work with a local server. My projects workspace is also in a location different than the default workspace, so I use the -ws option. For a full list of options, see this page.
As I’m learning the rules for Poker, the interactive tutorial on this page has been very helpful. Also, playing this game has also been useful. (No, I haven’t been screwing around, getting sucked into playing! Nope. Not me.)
I got a good chuckle from this scene from The Avengers.
That’s all for now. I’ll continue to keep you updated as I make progress.
Finally, sign up using the form below to receive updates to playable builds (or at least interactable builds) as I make noteworthy progress.
Getting started with building a multiplayer Poker game, I’m first setting up the development environment.
After setting up webpack, ESLint, Babel, and Typescript (getting them to all work together and the way I want was a challenge), I’ve started on building a the game’s main display using Phaser Editor.
Building The Game Layout
I decided to go with allowing up to six players, and the layout will look like this:
Just a very simple layout here. Nothing fancy. #ImNotAGameDesigner
Phaser Editor supports Typescript, which is awesome. However, the code the Phaser Editor compiler generates doesn’t make ESLint happy.
As you can see here, we have some lines of code that ESLint is nit-picking us about:
There are sections in the code where you can put whatever you want, and it won’t be overwritten by the Phaser Editor compiler. In this case, I’d surround the generated code to temporarily disable ESLint. /* eslint-disable */ and /* eslint-enable */
NOTE: Since you cannot directly control the generated code, disabling ESLint is fine in these situations.
Since I’m using modules, at the bottom of Scene files generated by Phaser Editor, you can export the Scene class, by doing so at the bottom of the file. Code placed here will not be affected by Phaser Editor (the editor will mark the file with comments, telling you where you can write your own code). At the bottom, you can write something like this:
/* END OF COMPILED CODE */

// You can write more code here
export default [NameOfYourSceneClass];
Setting Up A Factory For The Card Images
Still building the layout, I want the card images to be set up as their own factory in Phaser. When I recently converted the Flash game Blasteroids to HTML5, I used JavaScript. However, for this project, I’m using TypeScript and the code is being linted by ESLint.
First let’s create a class that will display the card image. I won’t go into full details for this class, but the setup could look like this:
NOTE: You can then create properties to store the suit and value of the card, as well as whether or not the card is face up or face down. Note that if you change the face up/down property, you’d need to update the card’s image as well.
Next, let’s create a factory file. The name of my factory would be cardImage, and the looks something like this:
import CardImage from './CardImage';

Phaser.GameObjects.GameObjectFactory.register('cardImage',
  function foo(this: Phaser.GameObjects.GameObjectFactory,
    x: number, y: number, texture: string, frame?: string | integer): CardImage {
    const scene = this.scene;

    const sprite = new CardImage(scene, x, y, texture, frame);

    scene.sys.displayList.add(sprite);
    // scene.sys.updateList.add(sprite);

    return sprite;
  });
NOTE: The CardImage class extends Phaser.GameObjects.Image. If your class extends Phaser.GameObjects.Sprite, you’d also need to uncomment line 11 as well.
When setting card images in the scene to use cardImage as the factory, then saving the scene file, and viewing the source code, you’ll see there are some issues:
NOTE: I’ve spent a day or so trying to figure out how to resolve this issue. The scene class was originally a TypeScript, and I was originally using the TypeScript version of scenes in Phaser Editor. Unfortunately, I’ve had trouble getting namespaces and modules to work together. My research eventually led me to trying Declaration Merging, and looking at declaration files (.d.ts). And while setting up factories with TypeScript came closest (actually, this resource did work) to helping me solve my issue, I was still unable to resolve error ts(2339) by VS Code in the above image.
Long story short: I’m using JavaScript for scenes that use factories to avoid these issues.
After changing Phaser Editor to use JavaScript instead of TypeScript for this scene, VS Code no longer reports issues, and the code still compiles and runs with no issues! 😎
Now, I can continue to build the game’s main display, and code the functionality for dealing and flipping cards, presenting chips, and building the buttons, call, check, etc. There are still the game logic for the rules of Poker itself, as well as the multiplayer aspect of the game, which will be the game’s main draw (and an excellent experience for me in developing a turn-based, real-time multiplayer game).
That’s it for now!
If you’d like to get on my e-mail list and receive updates are the progress continues, sign up using the form below.