Hello!
In this article, we’re going to look at how you place your bets before starting a round of Thunderjack!.
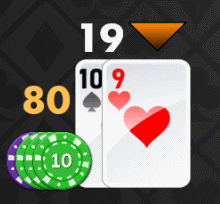
You can play from one to three hands against the dealer, and each hand has its own individual bet.
We’ll accomplish this through the following steps:
- Setup the hand buttons
- Setup the bet chip buttons
- Setup the bet button
- Setup the clear button
There’s quite a bit to these four steps, so the first step will be covered in two articles.
1. Setup the hand buttons
First, we’ll start with the three hand buttons. Each of these buttons represents a player hand:
- button 1 is for the left player;
- button 2 is for the middle player; and
- button 3 is for the right player
These are toggle buttons, meaning, like check boxes, you can press them to turn them on, off, and back. This means we will need two images for each button, one to represent each state.
Phaser does not have native support for a toggle button, nor does the Phaser Editor, so we’re going to create our own. We’ll do this by creating two buttons, one for the on state, and one for the off state, and switching their visibility depending whether or not the state is on or off.
Let’s start with button 1.
Phaser Editor manages your buttons (and all other UI you create with it) in a JavaScript file, by using its Canvas, which is a visual, WYSIWYG (what-you-see-is-what-you-get) game level/object editor.
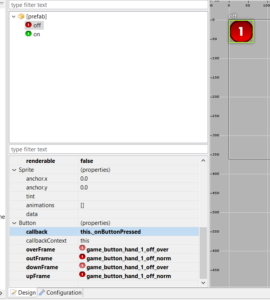
On the Canvas of, you can create a prefab and include in it two buttons. Both buttons should be the same size and shape, and in the same position (at 0,0 in the prefab). For the button that will represent the on state, set its varName to on. Likewise, for the off button, set its varName to off.
Save the canvas UI as hand_button_1_prefab.js.
Important!
Every time you make changes to the UI elements and save the file, the Canvas compiles the UI and updates the JavaScript file corresponding to that UI. This file is the prefab class that represents all the UI on the canvas. Thus, you can only directly modify the file in certain areas, otherwise, your changes will be lost the next time Phaser Editor updates it. The editor adds comments to the code, indicating the areas you can safely modify without your edits being lost.
In the source code, look for this comment:
-- user code here --
You can add your code under those lines.
However, watch for these comments:
/* --- start generated code --- */
...
/* --- end generated code --- */
You may not directly edit code in between these comment lines. If you do, your changes will be overwritten by the canvas compiler the next time you save your .canvas file, which causes it to update the code.
However, you can so indirectly by using the User Code dialog.
There are two ways you can access this (both from the Canvas UI):
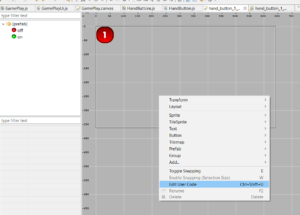
- Right click on the Canvas UI and select Edit User Code from the menu; or
- Use the keyboard shortcut Ctrl + Shift + U.
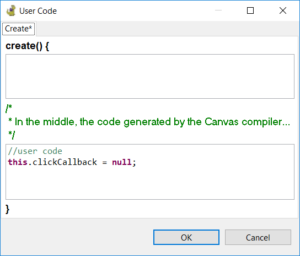
There are two text boxes in the User Code dialog where you can enter text. I recommend adding your own comment at the beginning of each of those, so that you can easily locate where your code was inserted by the Canvas when it rebuilds the JS file.
When you set a varName to a UI object, like we did by naming our buttons “on” and “off”, the canvas compiler will generate attach those objects as properties of the prefab class:
// fields
this.fOn = _on;
this.fOff = _off;
You can reference them in your user code with this.fOn and this.fOff.
This works for any valid varName. For example, if you assigned a varName of myTextBox to a UI object on the canvas. The compiler will assign it to this.fMyTextBox.
You may find yourself needing to add user code for things like custom initialization or responding to button callbacks.
If you’d like more information on the Canvas Editor, please see here. For more on User Code, see here.
We also want to be notified when either the on or off button is pressed, so that we can switch buttons. We do this by adding a callback function to each button.
To do this:
- Click on a button on the Canvas.
- The properties for the button will appear in the properties panel. Look for “Button”.
- In the “callback” field, add
this._onButtonPressed(You can name the button whatever you want, but be sure to precede it withthis.). - In the “callbackContext” field, add
this.
Follow the above steps for the other button as well.
In user code, add the following button click callback function:
hand_button_1_prefab.prototype._onButtonPressed = function() {
  if (this.clickCallback !== null) {
    this.clickCallback.dispatch(this);
  }
};
You’ll notice a this.clickCallback that we haven’t seen before. We’re going to use this as a Phaser.Signal. The signal will allow us to be notified from another location (which we’ll setup later) that a hand button has been clicked. Let’s create a reference to the click callback and set it to null in the middle section of the user code:
this.clickCallback = null;
Why we’re setting up to be notified from another location
I’m a firm believer that the UI code should be separated from the logic code as much as possible. Sure, we could put all the code in this hand_button_1_prefab class, but it would a jumble of the UI code (which what the Canvas compiler uses), and our logic code. I’d rather put the logic code into another file, and leave the prefab files to handle the UI and user code (which should also be kept to a minimum as much as possible, in my opinion).
You can create a new class, for example, HandButton.js, and place it in the WebContent/js folder of your project. The constructor might look something like this:
HandButton = function(s_handButtonId, handButtonPrefab) {
  this._id = s_handButtonId;
  this._handButtonPrefab = handButtonPrefab;

  //here's the same clickCallback we setup in the user code of the hand_button_1_prefab canvas.
  this._handButtonPrefab.clickCallback = new Phaser.Signal();
  this._handButtonPrefab.clickCallback.add(this._onButtonCallback, this);

  this._isOn = false;
  this.callbackSignal = new Phaser.Signal();
};
The other two hand buttons will eventually use this HandButton class, so this is not exclusive to hand button 1.
You’ll see a this._onButtonCallback referenced when setting up the signal. That’s the function that the signal will call when it’s dispatched in the button prefab user code. (See this.clickCallback.dispatch(this); in the hand_button_1_prefab.prototype._onButtonPressed function written previously.)
HandButton.prototype._onButtonCallback = function(button) {
  this.setIsOn(!this._isOn);
  this.callbackSignal.dispatch(this._id);
};
What this does is toggle the _isOn property between true (on) and false (off) each time the hand toggle button is clicked. We also have yet another signal, this.callbackSignal, which passes notification onto the main logic of the game that the button has been pressed. Another reason that we setup the first this._handButtonPrefab.clickCallback is so that we can provide the UI function of toggling between the button states. We’ll handle this callbackSignal at a later time.
Next, we’ll handle the functionality that updates the current state of the toggle button.
HandButton.prototype.setIsOn = function(b_value) {
  this._isOn = b_value;
  this._handButtonPrefab.fOn.visible = this._isOn === true;
  this._handButtonPrefab.fOff.visible = this._isOn === false;
};
Here, we’re referencing the buttons setup in the canvas, so that we can change their visibility. When one is visible, the other is not.
This covers most of the hand button functionality for all three buttons. We’ll finish off the hand button setup in the next article.
Thanks and stay tuned!
– C. out.
