Thunderjack! HTML5 Game Update: Card Dealing

Hey guys.

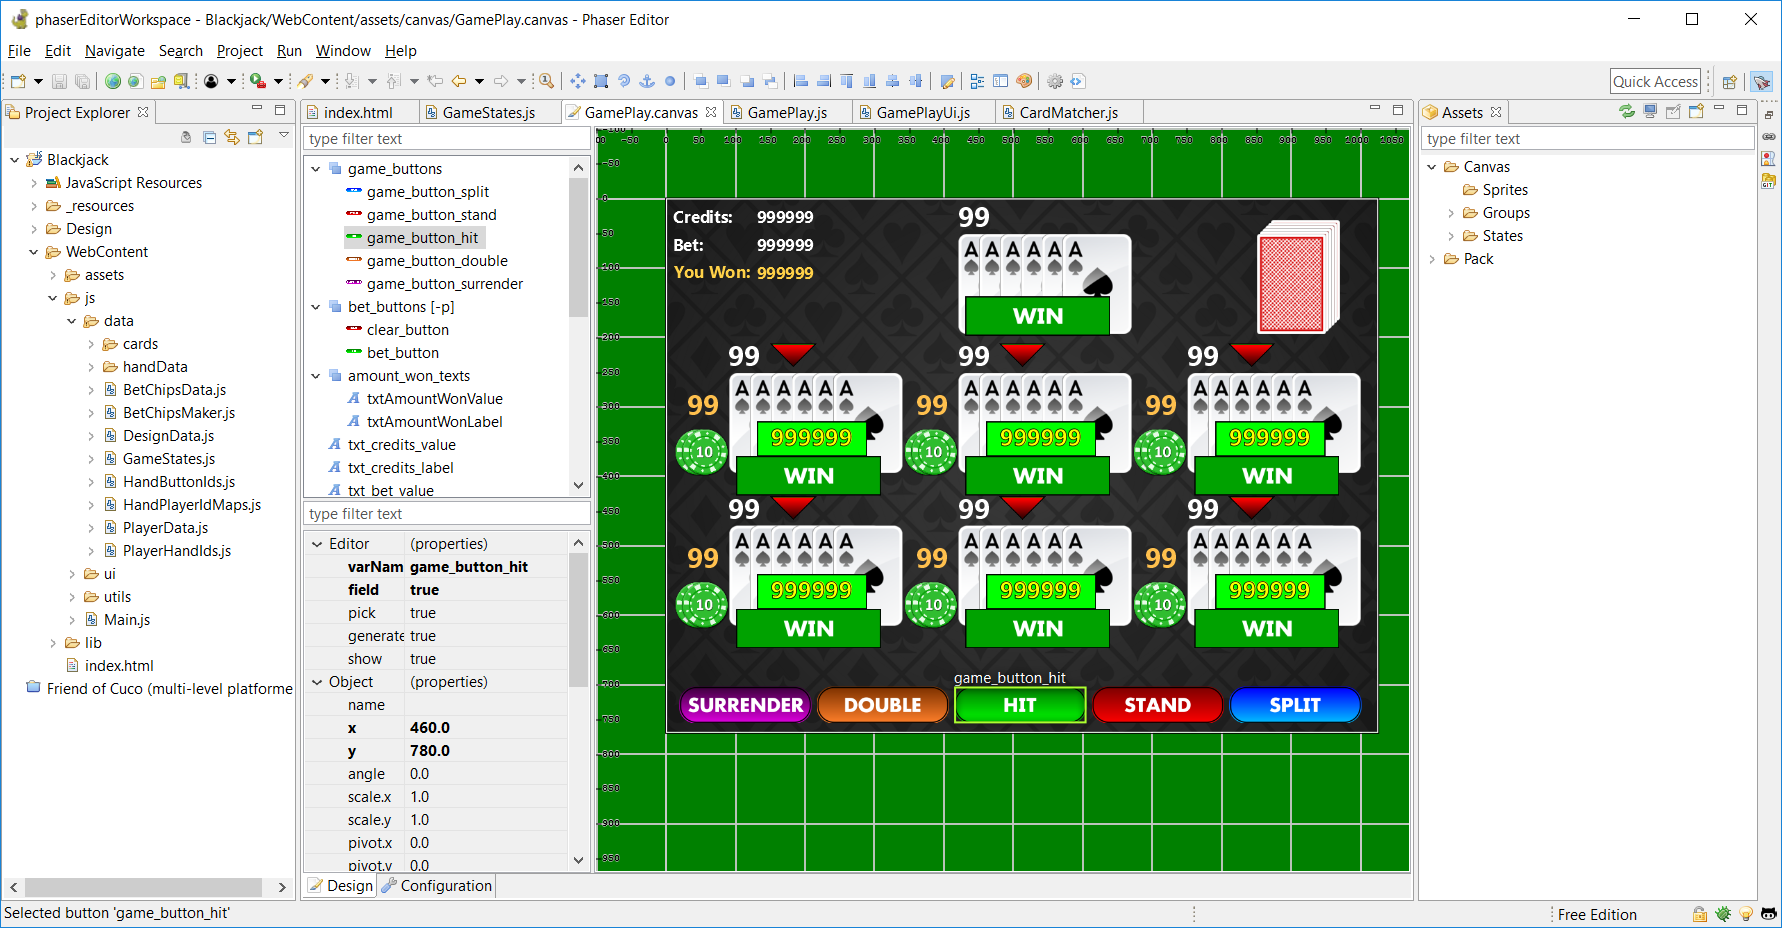
Welcome back to Gameplay Coder. Quite a bit of progress has been made on the HTML5 version of Thunderjack! using Phaser and the Phaser Editor. I’m getting the hang of basic usage of the editor. And it’s great to have a visual editor at your disposal – so you don’t have to place sprites using hard-coded x/y coordinates via trial and error, or reply on some external graphics tool then have to copy/paste those coordinates.

Updates to this game include:

  1. Being able to place bets.
  2. Dealing the cards to the players and dealer.
  3. Updating points for the players.

Hit functionality is currently in the works, as is determining when a player or dealer has a blackjack, and when a player has a Thunderjack.

Use of Fonts

One issue I encountered is with using fonts. In the browser, they don’t appear exactly as the do in the editor. Some features such as stroke, aren’t rendered. So I’ll likely end up using Phaser bitmap fonts instead of fonts, which, on my machine, is a small set of Windows fonts that the editor has access to. Furthermore, there is no guarantee that the fonts used in the project will be installed on the machine of someone playing the game.

There is an online Flash tool (at the time of this post), called Littera. This can be used to create bitmap fonts from fonts installed on your machine. What’s also cool about it is, Phaser supports the format, as shown in this example.

Prototypal Inheritance

While I’m no stranger to OOP (object-oriented programming) and classical inheritance in languages like ActionScript 3, C# or Java, I’m fairly new as to prototypal inheritance in JavaScript, so I’m giving it a try in this project. Hell yeah! 💪🏾

I’m using prototypal inheritance with the data that stores the player hands and the dealer hand. There is a ‘base class’ called HandData, whose function constructor looks like this:

HandData class
HandData = function(s_handId) {
  this.cards = [];
  this.handId = s_handId;
  this.score = 0;
  this.hasBlackjack = false;
  this.isBust = false;
};

This is basic data that both types of hands, player and dealer, will contain.

However, player hands will need to store additional data, such as the bet amount, and can perform other moves such as split, double, and surrender. Players can also win via Blitz (6-card Charlie in this game). The dealer does not use any of these functions, and thus doesn’t need access to them.

The player hand data, PlayerHandData, will inherit from the HandData, and looks like this:

PlayerHandData class
PlayerHandData = function(s_handId) {
  HandData.call(this, s_handId);
  this.betValue = 0;
  this.hasThunderjack = false;
  this.isPush = false;
  this.hasBlitz = false;
  this.hasDoubled = false;
  this.hasSurrendered = false;
};

That call() function is like calling the constructor of the parent class. In this case, it sends the parameters that were sent when it was created onto its parent constructor. Also, the this keyword is supplied first, so that the context in which the parent constructor function is being called is set to the inheriting function constructor.

However, PlayerHandData still needs to have its constructor inherit the methods of the parent prototype. This creates a new object based on the parent prototype:

PlayerHandData.prototype = Object.create(HandData.prototype);

And finally, the constructor of our new PlayerHandData prototype needs to point to PlayerHandData instead of HandData. That can be fixed with this line:
PlayerHandData.prototype.constructor = PlayerHandData;

Now when we create data for each the dealer hand, we can write:
var dealerHand = new HandData(s_dealerId);

And for each of the six player hands, we can write something like:
var somePlayerHand = new PlayerHandData(s_playerId);

The player hand will have all the properties of the dealer hand, plus the extras that are required to support the additional game play available to the players.

So when inheriting one “class” from another (I put “class” in quotes because, JavaScript doesn’t have classes. They can be simulated using prototypes.), it’s basically three steps:

1). Within the inheriting function constructor, call the parent constructor function using the call(). Be sure to set this as the first parameter, succeeded by any function constructor parameters.
2). Create a copy of the parent function’s prototype, and assign it to the inheriting constructor function’s prototype.
3). Assign the constructor of the inheriting prototype to the inheriting constructor function itself.

This can be a little confusing, but typing this out can help reinforce learning (though writing it out is better, studies have shown, but I digress (:

But doing is the best way to learn, in my opinion, of course. So, I’ll definitely take more opportunities to apply this so it becomes easier.

Whew!

Well!… Lemme get a sippa water…
* Ahhhhh! *

Moving on, here is a short video of what I have so far. It’s what was mentioned in the updates mentioned near the start of this article.

It’s not much, but under the hood, a lot has been accomplished, and with most of the lower-level code now out of the way, I can start getting into the fun stuff!

Thanks for stick with me guys, and stay tuned for more.

– C. out.

Thunderjack!

Hey guys,

As I mentioned earlier, I recently completed the Android Basics Nanodegree program offered by Udacity. During the course, I decided to create a side project, completely independent of the course material. The project not only uses some of the concepts from the course, but also expands on concepts beyond the scope of the course. This is where the real fun is, because these are uncharted waters that present unique challenges.

This project I’m working on – besides Brickout, which is an HTML5 game using Phaser – is a called Thunderjack. It’s Blackjack, but with my own spins on it, mostly just some over-the-top theatrics, and playing around with some of the rules. (:

The awesome Thunderjack!

I’ve been working on this for a few months now, reinforcing my knowledge of Android Studio, Java, and Android development. One caveat I’ve found is, Android Studio is not the most ideal IDE for building an Android game, at least not one that fits well into your typical layout schemes such as Linear, Relative, or Constraint. For the record though, I went with the Constraint layout, mainly because of it’s guides functionality, which can use percentages of the screen, which makes designing a responsive app much easier.

One problem I ran into was trying to fit all the blackjack elements on the display. They include:

1). Three lower player hands
2). Three upper player hands. Each hand can split, so you can play up to six hands at a time
3). Positioning the cards so they cascade atop each other, but still able to see what the cards are
3). Betting chips
4). Dealer’s hand
5). Results (bust, win, etc.)
6). Text for displaying credits, and score of each hand
7). Action buttons (hit, stand, etc)
8). Turn indicator arrows (whose turn it currently is)

As you see imagine, the underlying constraint layout is quite massive! And it’s Landscape orientation only; ain-no way in the hell all this was gonna fit on a Portrait orientation, and still be easy to see, especially on phones.

A peculiar issue I faced was a performance issue that took me a while to track down. It was due to rendering of TextView objects inside the TextView, probably because of all the re-calculating that goes on under the hood. This presented a big problem, because it meant that I would have to scrap the entire Constraint layout! But the constraints allow me to establish that responsiveness across various device sizes! Sigh… shit. Time to get creative…

I didn’t scrap the Constraint layout. Not exactly. What I did was:
1). Start again with a blank constraint layout.
2). Examined each visual element (text, button, image, etc), and cloned it
3). Placed the clone element on the blank layout in the same position of the original element
4). Deleted the constraint layout
5). The blank layout becomes the official layout that is shown.

While this created a lot more work, it also allowed me to re-created the layout with all the responsiveness, but without all performance hit of the constraints. I believe I can get away with this, because of its static nature. Other than the cards, which all move to predetermined positions on the layout, there aren’t any dynamic elements on here. In other words, nothing needs resizing or repositioning.

Another challenge is use of sound effects.

The Android Basics course does talk about use of the MediaPlayer.

As you know, games often play multiple sounds at once, and it seems that MediaPlayer can only play one sound at a time.

So, I found a class called SoundPool class that allows you to load up several sounds, and is designed for smaller sounds. This seemed to be exactly what I was looking for, until I found that it has no notification callback support for when a sound has finished playing, which is also a functionality I need. MediaPlayer however, does have this.

So, the approach I’m taking is a hybrid one. Basically, I’m using SoundPool for all the sounds I can play and forget about, while the MediaPlayer can play those sounds where I need to be notified when they complete, so I can take appropriate actions.

However, SoundPool doesn’t come without its caveats either. You need to specify a max number of sounds it can play at once by loading them into the SoundPool, and if you need to play a sound that isn’t loaded, one of the other sounds must get discarded. I’m currently working on a way around this, because my first implementation introduces a bit of lag when loading some sounds. But, I’m confident I’ll have an unorthodox solution for this. 😉

That’s it for now. I’ll keep you guys updated on the progress of this one. I should have it done and into the Google Play Store later this year.

Thanks!

– C. out.

Received Android Basics Nanodegree!

Hey.

After spending the last eight months (and some late nights) learning, coding, more learning, and more coding, it is done! I have completed the Android Basics course offered by Udacity and Google!

This started at the beginning of the year with a Scholarship Challenge that was open to 50,000 applicants, where you could choose one of the four courses offered:

  • Intro to HTML + CSS
  • Offline Web Applications
  • Android Basics
  • Developing Android Apps.

These courses are three months, and you have the opportunity to qualify for a full Nanodegree scholarship, which I did.

The courses provide an online community led by Udacity Mentors and even student alumni, as well as support from your fellow students.

Some of the criteria for receiving the Nanodegree was not only successful completion of all the course work, but ample participation in the online community. And this was a much bigger challenge for me than the coursework.

As an introvert, I pretty much like to keep to myself, and it can be a challenge for me to open up to people. However, the urgency of this requirement, as well as knowing the material well enough to provide value to others allowed me to get over that hurdle. When Udacity notified me that I received the full scholarship, I was elated!

The full Nanodegree program itself is a collection of courses offered by Udacity, and was more challenging (and longer) than the first three months. You really have to make a schedule and stick to it to stay on track. The community is always there to assist you should you need it. And of course, you can provide assistance to others yourself as well.

While I already have some experience developing Android apps, I’m using Adobe AIR, which can shield you from the inner workings of how Android really works. This course helped me to get deeper into those underlying layers. While I have a better understanding of the development process, there is still much to learn. This Nanodegree program doesn’t go over every detail (it would take forever, heh), it does help teach you how to figure out things on your own. you don’t need to have all the answers up front; but knowing how to research them to find out is crucial to your success as an Android developer (or any type of developer for that matter).

During the course, I was also working on a side project as an additional challenge, using what I’ve learned from this program. It’s a game, of course (of course!). I should have it released later this year, so stay tuned for that!

Thanks to Google and Udacity for this incredible opportunity! I’m so glad I was able to participate in this!

– C. out.