The gameplay is pretty much done. Now it’s time to start polishing up the mechanics and effects. The next steps are:
– Adding particles to broken bricks (This means learning how to use Phaser’s particle system. Cool!)
– Adding a screen flash to bomb explosions. In addition to the a screen tremor, let’s add some impact to those bombs. (User of Phaser’s Graphics – draw primitives, specifically, the rectangle)
– Saver blocks appear gradually instead of all at once (Use of Phaser’s Timer system)
– Adding labels that say what power up item was just collected
– Adding particles to broken saver blocks
– When bricks are cleared with Color Match or Color Blast:
a) gradually destroy the blocks instead of all at once
b) add a screen tremor effect
c) add sound effect (different from the normal brick breaking)
– When serving the ball into play, give the player more control over where it goes. I plan on “sliding” the ball across the paddle, thus giving the player the opportunity to “aim” the ball. Check out this video:
– Adding game over when all lives (balls) are lost.
That should do it. After this, I’ll add a few more levels, and play around with balancing the items (rates of occurrence, duration and intensity of effects, and such [for game balance/feedback purposes]), do a bit more play-testing, then that should be it.
Almost there guys! Thanks for staying tuned, and comment if you’ve any questions on anything.
And for the record, yes, the game will be freely available to play on the site, as well as the source code being released.
As I mentioned earlier, I recently completed the Android Basics Nanodegree program offered by Udacity. During the course, I decided to create a side project, completely independent of the course material. The project not only uses some of the concepts from the course, but also expands on concepts beyond the scope of the course. This is where the real fun is, because these are uncharted waters that present unique challenges.
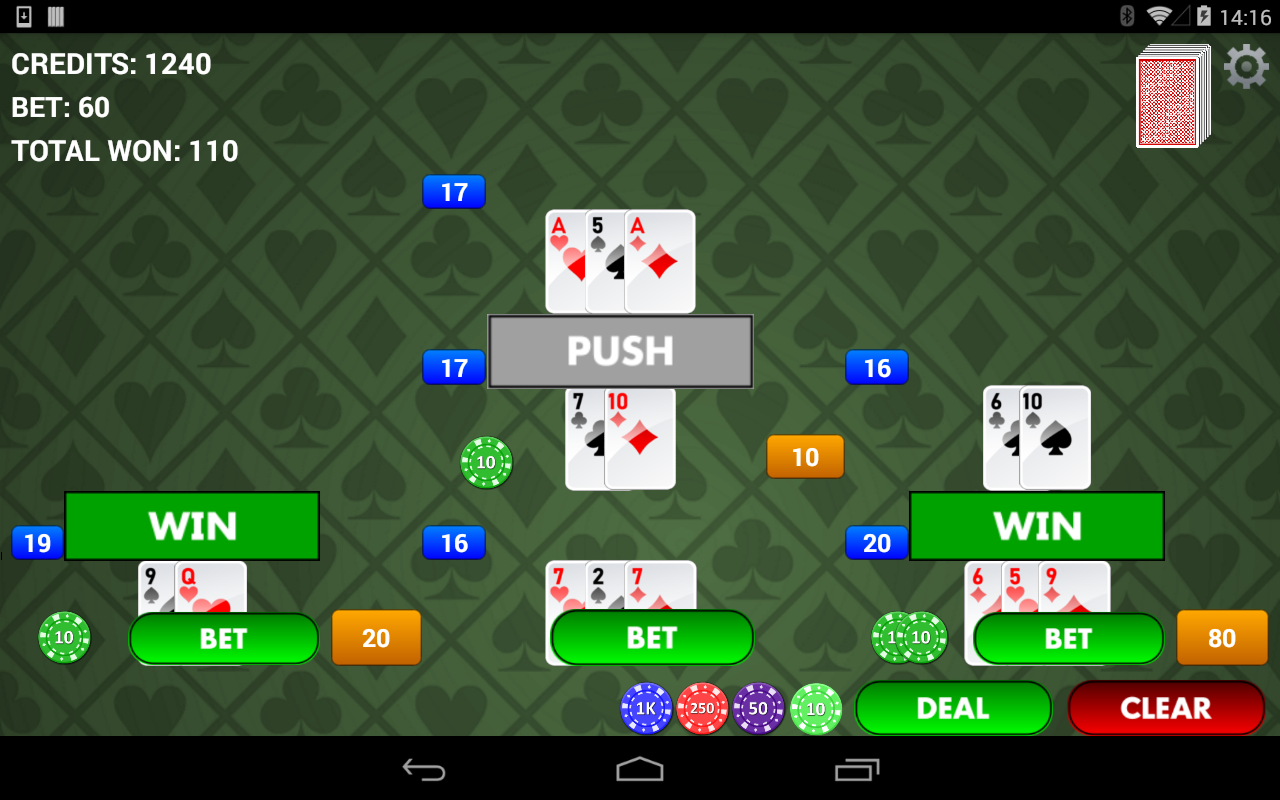
This project I’m working on – besides Brickout, which is an HTML5 game using Phaser – is a called Thunderjack. It’s Blackjack, but with my own spins on it, mostly just some over-the-top theatrics, and playing around with some of the rules. (:
The awesome Thunderjack!
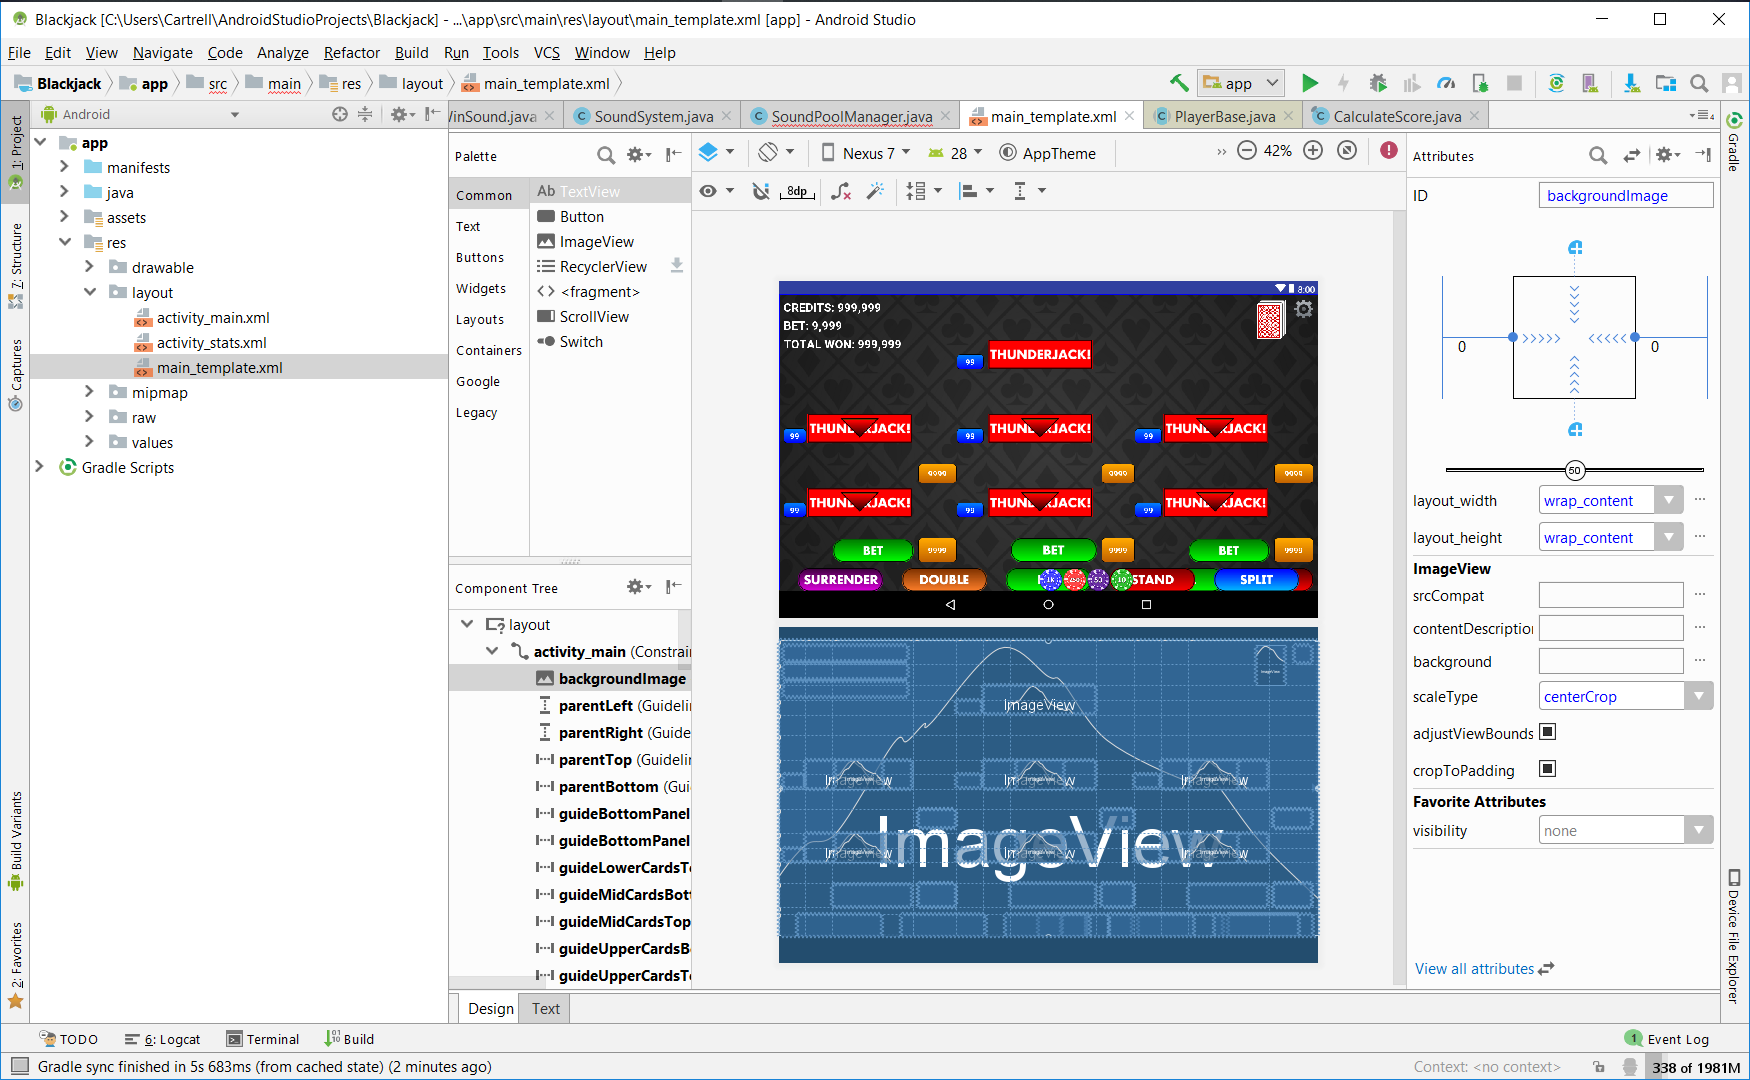
I’ve been working on this for a few months now, reinforcing my knowledge of Android Studio, Java, and Android development. One caveat I’ve found is, Android Studio is not the most ideal IDE for building an Android game, at least not one that fits well into your typical layout schemes such as Linear, Relative, or Constraint. For the record though, I went with the Constraint layout, mainly because of it’s guides functionality, which can use percentages of the screen, which makes designing a responsive app much easier.
One problem I ran into was trying to fit all the blackjack elements on the display. They include:
1). Three lower player hands
2). Three upper player hands. Each hand can split, so you can play up to six hands at a time
3). Positioning the cards so they cascade atop each other, but still able to see what the cards are
3). Betting chips
4). Dealer’s hand
5). Results (bust, win, etc.)
6). Text for displaying credits, and score of each hand
7). Action buttons (hit, stand, etc)
8). Turn indicator arrows (whose turn it currently is)
As you see imagine, the underlying constraint layout is quite massive! And it’s Landscape orientation only; ain-no way in the hell all this was gonna fit on a Portrait orientation, and still be easy to see, especially on phones.
A peculiar issue I faced was a performance issue that took me a while to track down. It was due to rendering of TextView objects inside the TextView, probably because of all the re-calculating that goes on under the hood. This presented a big problem, because it meant that I would have to scrap the entire Constraint layout! But the constraints allow me to establish that responsiveness across various device sizes! Sigh… shit. Time to get creative…
I didn’t scrap the Constraint layout. Not exactly. What I did was:
1). Start again with a blank constraint layout.
2). Examined each visual element (text, button, image, etc), and cloned it
3). Placed the clone element on the blank layout in the same position of the original element
4). Deleted the constraint layout
5). The blank layout becomes the official layout that is shown.
While this created a lot more work, it also allowed me to re-created the layout with all the responsiveness, but without all performance hit of the constraints. I believe I can get away with this, because of its static nature. Other than the cards, which all move to predetermined positions on the layout, there aren’t any dynamic elements on here. In other words, nothing needs resizing or repositioning.
Another challenge is use of sound effects.
The Android Basics course does talk about use of the MediaPlayer.
As you know, games often play multiple sounds at once, and it seems that MediaPlayer can only play one sound at a time.
So, I found a class called SoundPool class that allows you to load up several sounds, and is designed for smaller sounds. This seemed to be exactly what I was looking for, until I found that it has no notification callback support for when a sound has finished playing, which is also a functionality I need. MediaPlayer however, does have this.
So, the approach I’m taking is a hybrid one. Basically, I’m using SoundPool for all the sounds I can play and forget about, while the MediaPlayer can play those sounds where I need to be notified when they complete, so I can take appropriate actions.
However, SoundPool doesn’t come without its caveats either. You need to specify a max number of sounds it can play at once by loading them into the SoundPool, and if you need to play a sound that isn’t loaded, one of the other sounds must get discarded. I’m currently working on a way around this, because my first implementation introduces a bit of lag when loading some sounds. But, I’m confident I’ll have an unorthodox solution for this. 😉
That’s it for now. I’ll keep you guys updated on the progress of this one. I should have it done and into the Google Play Store later this year.
Brickout now has the sound effects added! I also snuck some of my jazzy musicalskills into many of the sound effects.
A short video with the sounds is below. Things got a bit crazy around the 1:00 mark in the video! I think I’ma keep this aspect of the game design, though. Then it got really boring, trying to hit that LAST brick… dammit! >:D
But, I’m happy that with 41 sound effects added, most of them are done now. (:
Playing sounds using Phaser and its SoundManager class was easier than I thought! I still need to implement callback notifications when a sound has finished playing, because I will need that functionality a little later.
After watching the video, share your opinions in the comments below. I’m curious to know. Thanks!
Paddle Buff: Represented by the blue gem, this item will extend the length of your paddle. This makes it easier for you to hit the ball. However, this effect is only temporary, because it only lasts for so many ball hits.
Paddle Nerf: This “item” you might wanna watch out and avoid. Masquerading as the magenta gem, it reduces the size of your paddle, making it harder to hit balls! But don’t worry; it’s effect is also only temporary. Hopefully, you can last long enough for it to wear off!
But I was thinking, maybe there can be some sort of other benefit while this effect is in active. Since it does create an extra challenge, you will gain bonus points for breaking bricks when your paddle is nerfed. What do you think? Let me know in the comments below!
So that should be it for the items. I don’t plan on adding any more, but if have anything good, let me know, and I’ll consider it.
So next are the oh so important sound effects. Time to give this game some personality!
I’ve been busy working on a bunch more effects to add to Brickout, and got the functionality for six more of them in the engine. Without further ado…
Saver
This item is represented by the blue crystal. When you collect it, a bridge of blocks will form underneath you. These bricks can save you by keeping you from losing a ball. But! (there’s always a “but”)… each brick can only be used once, and the bridge only lasts a short time.
Blitz Ball
Powered by the red crystal, this increases the size of your ball, allowing it to pummel straight through blocks! It only lasts a short time though, but you can do some serious damage with this. I can’t wait to polish up this son of a gun later on!
Bonus Points
What would an action game be without having a way to gain some bonus points? The cyan-colored crystal allows you to do just that. When you collect the first one, you earn an additional 500 points. With each successive crystal you earn, you’ll get an additional 500 added onto it. So 500, 1000, 1500, etc. It caps at 5000, and if you lose a life, it starts over at 500. I plan on allowing you to be able gain an extra life when you earn so many points on your score, so there’s an extra incentive to get lots of points!
Color Match
Similar to the Color Blast item, this one, powered by the light-blue crystal, allows yo to clear may bricks at once. However, this gem works a little differently. When collected, it affects the next ball that you hit. When that ball hits a brick, it clears all the bricks on the board of the same color. The effect can only be used once per gem.
Extra Ball (Life)
Another classic feature of most action games is the ability to gain extra lives. I already hinted there will be a way to do so by scoring points, but with this orange crystal, you gain an extra life immediately when you collect it.
New Ball
Last but definitely not least, is this purple gem. When you collect this, it introduces a new ball into play. Now you’ve got zany task of juggling two (or more) balls! If you miss one of them, you won’t lose any lives until you’ve lost all of them. If you’re good at this (as you can see, I suck at this shit), you can clear boards quickly. I might also add extra points functions here too, where the more balls you can juggle, the more points you get.
So that’s it for now. I’m almost done with the items; I have two or three more to add. Once they’re all in, I’ll start working on additional levels, adding sound effects, UI and polish. Takes a lot to make a fully-functional, polished game.
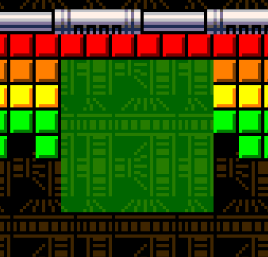
A new item has been added to Brickout. This item is called the “Color Blast”, and to get it you need to collect the purple gem.
What this item does it it will remove the bricks with the most common color. For example, in the demo video below, when the Color Blast gem is collected, it removes all the green bricks, because there are more green bricks than any other color of brick on the board.
This item was fairly easy to implement using the current code engine I’ve already built.
This one was a little challenging, because the explosion collision to clear the tiles wasn’t behaving the way I wanted. It was clearing the bricks along the outside edges of the explosion.
I added a green debugging square that shows the area of the explosion. As you can see from this screen shot, the bricks just outside the square were also cleared, which was not the intended effect.
After some tinkering, I found that Phaser’s Rectangle class performs intersections a little differently than expected.
It’s when the right and bottom edges of a rectangle are calculated, they’re including an extra one unit, instead of subtracting one.
For example, say you have a rectangle located at x=10, and y=14, and it has a width of 16, and height of 5. The right edge would be located at x + width (10 + 16) = 26, and the bottom edge is at y + height (14 + 5 = 19).
I was expecting the right edge to be at 10 + 16 – 1 = 25, and the bottom edge to be at 14 + 5 – 1 = 18. So that extra offset of one was including the bricks around the explosion edge.
Since I didn’t want to modify Phaser’s internal method when determining if two rectangles intersect (it’s solid for everything else; I just needed a specific behavior here), I used a modified version of it by subtracting the offsets from the right and bottom of both rectangles:
I finished the items that speed up and slow down the ball speed. Now, I’m working on a “Bomb”.
When the gem is collected, it will place a bomb somewhere on the bricks. It will explode a short while later, clearing blocks within its blast area.
Hmm, while I’m not going to get into too much design details with these games for the blog, but I was thinking of three ways of how to place the bomb:
Placing it randomly in the bricks (least challenging to implement, but this would add a random [and intentionally polarizing] factor into the game; sometimes the bomb would appear where you want it, other times, it may appear where no bricks are, and be totally useless, pissing you off in the process – which would make the bomb that much more satisfying when it’s helpful, I think);
Temporarily suspending the game, and letting the player place the bomb wherever they want (moderate challenge); or
Writing an algorithm that will automatically place the bomb where the most bricks are, so it has the best chance of clearing out the most bricks when it blows up (most challenging to implement, but if I did this, I’d make the bomb gem more rare)
What do you think? Or maybe you have a different idea altogether. I’d love to hear your thoughts. Leave a comment below!
Just a quick update.
I got basic item spawning added to the game. Items will fall from the top and can be collected by your paddle. No effect functionality yet, but that’s coming next.
Brickout will have some power-up items to make it a little more engaging.
I’ve come up with a way in which the items are created during play. You have to break so many bricks of a certain color to create an item. For example, for to create one item, say you need to break 30 of the green bricks. For another one, you need to break 20 of the blue ones. Something like that. Combine this with the function of bricks descending during play (when they descend, they change color), and it can make some items, especially those which are created by breaking “higher up”-colored bricks, like red or orange, more rare.
When an item is created, it is is shown as a colored orb with an icon inside. For example, one item will look like this:
To collect an item, you would simply move your paddle over it as it falls. All items will fall from the top of the screen, and off the bottom if not collected.
I’m probably got to have about 10 items or so. Stay tuned as I build out basic functionality for each of them.