Thunderjack! HTML5 Game Update: Placing Bets

Hello!

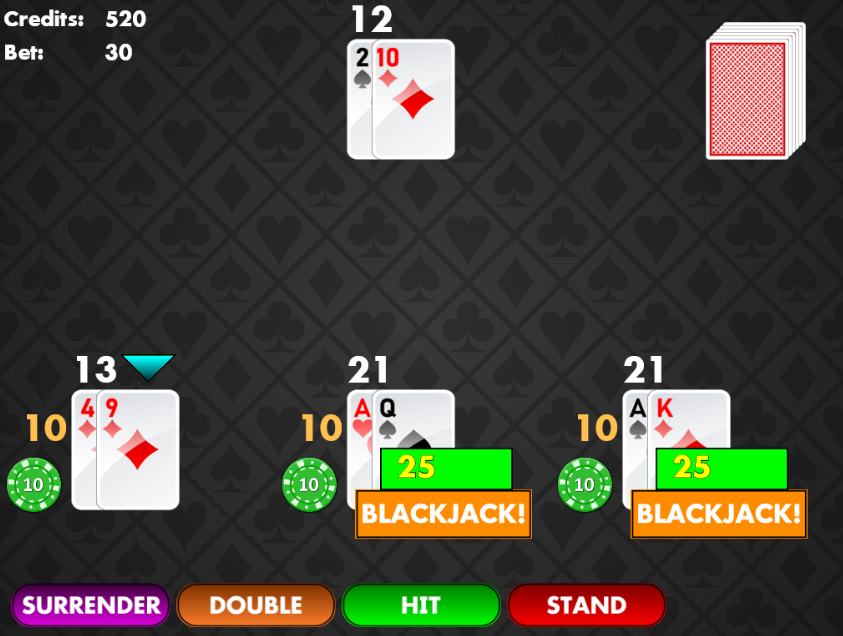
In this article, we’re going to look at how you place your bets before starting a round of Thunderjack!.

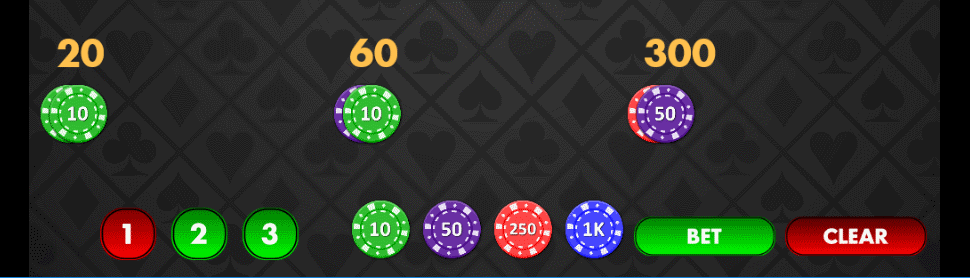
You can play from one to three hands against the dealer, and each hand has its own individual bet.

We’ll accomplish this through the following steps:

  1. Setup the hand buttons
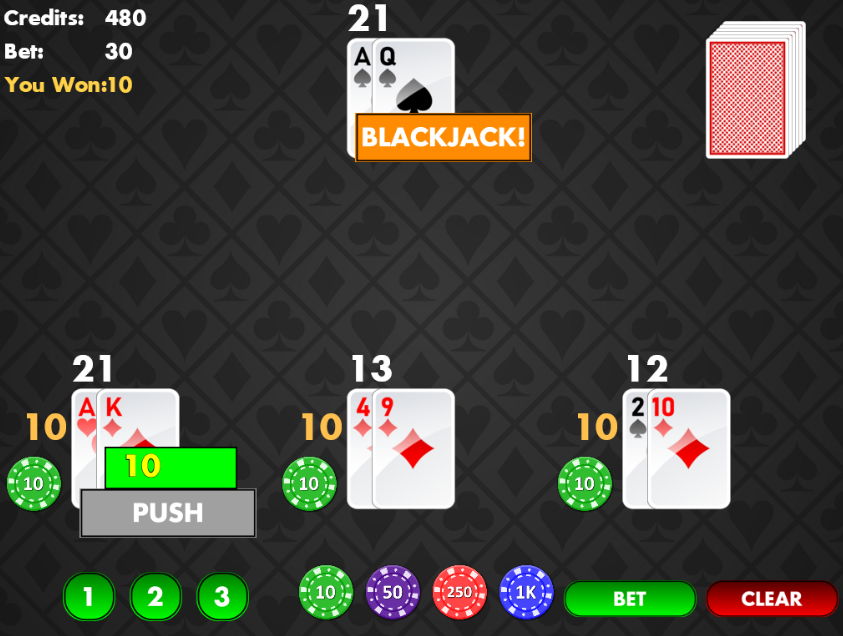
  2. Setup the bet chip buttons
  3. Setup the bet button
  4. Setup the clear button

There’s quite a bit to these four steps, so the first step will be covered in two articles.

1. Setup the hand buttons

First, we’ll start with the three hand buttons. Each of these buttons represents a player hand:

  • button 1 is for the left player;
  • button 2 is for the middle player; and
  • button 3 is for the right player

These are toggle buttons, meaning, like check boxes, you can press them to turn them on, off, and back. This means we will need two images for each button, one to represent each state.

Phaser does not have native support for a toggle button, nor does the Phaser Editor, so we’re going to create our own. We’ll do this by creating two buttons, one for the on state, and one for the off state, and switching their visibility depending whether or not the state is on or off.

Let’s start with button 1.

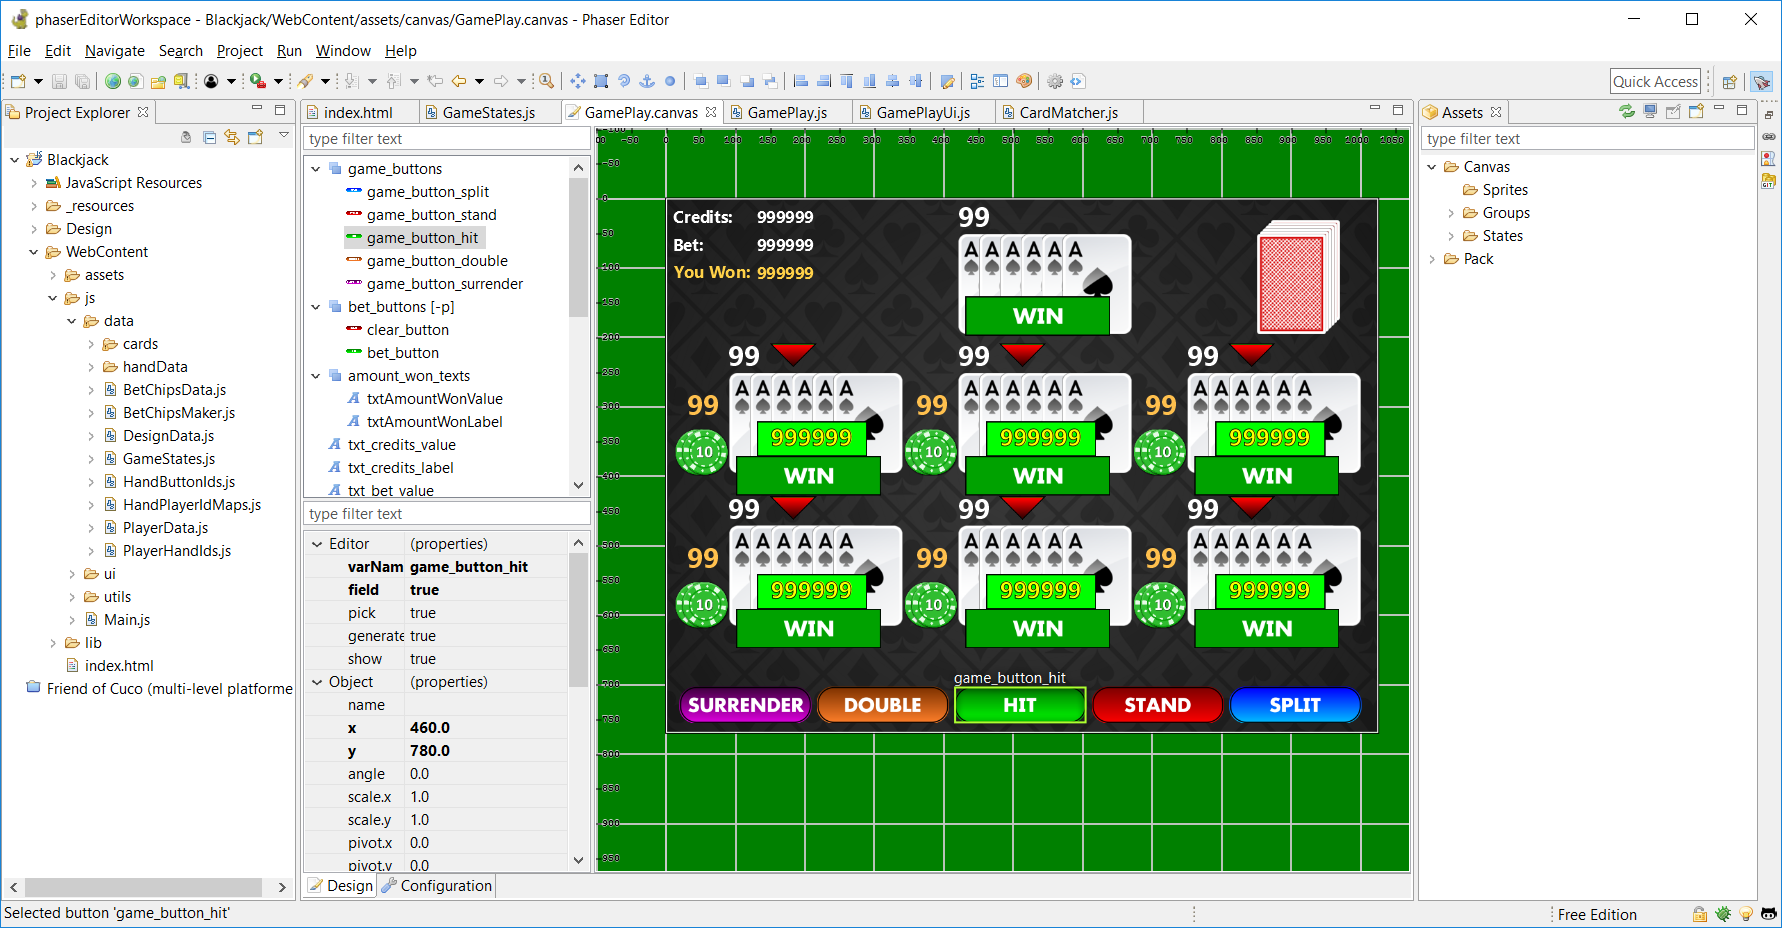
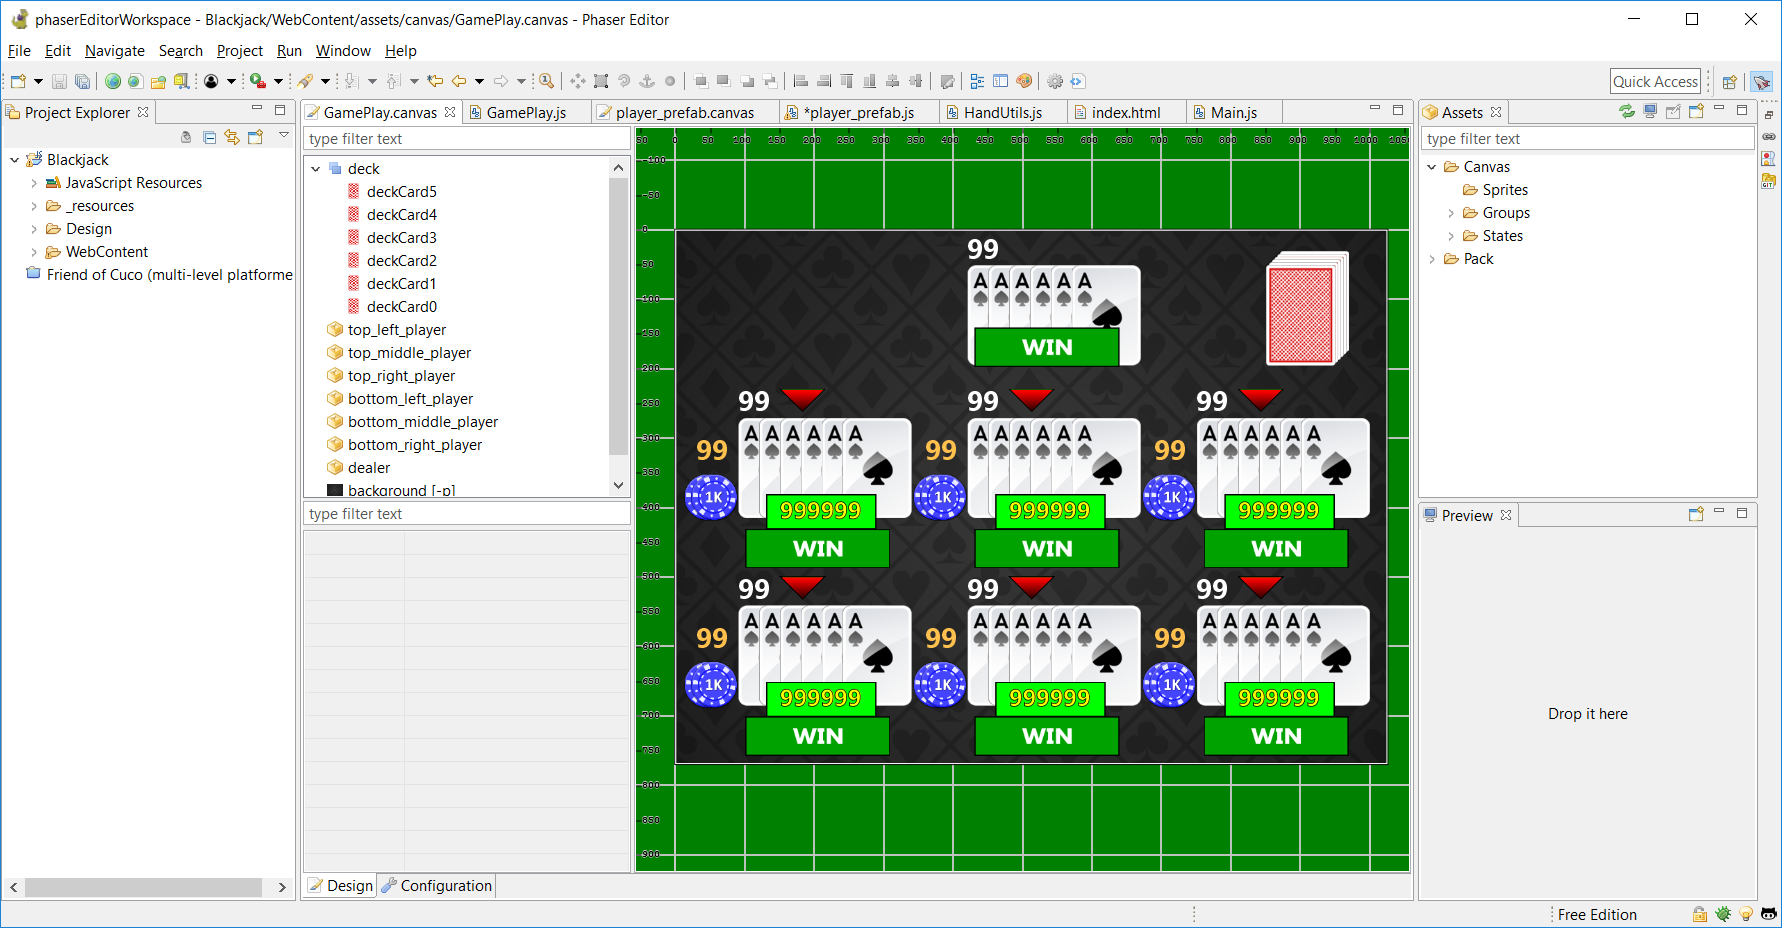
Phaser Editor manages your buttons (and all other UI you create with it) in a JavaScript file, by using its Canvas, which is a visual, WYSIWYG (what-you-see-is-what-you-get) game level/object editor.

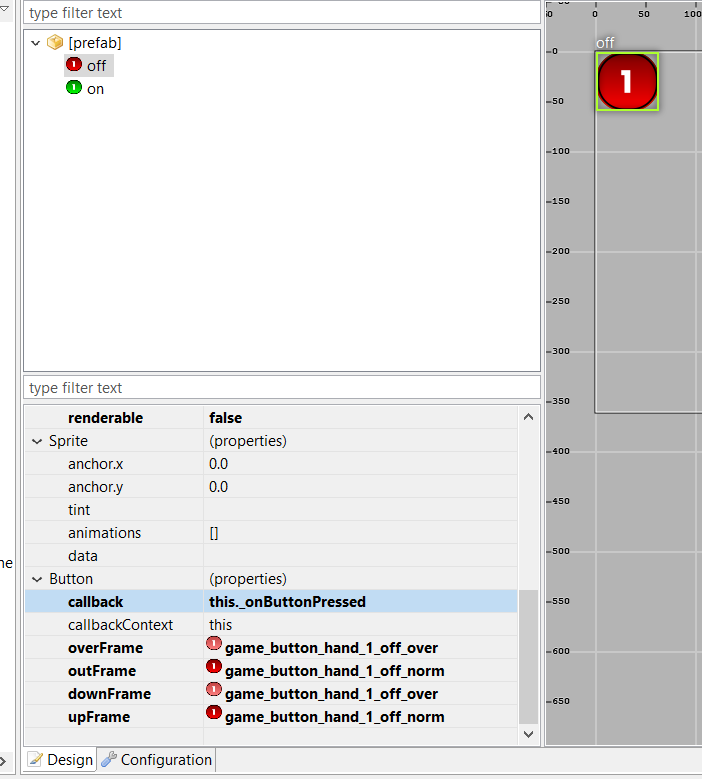
On the Canvas of, you can create a prefab and include in it two buttons. Both buttons should be the same size and shape, and in the same position (at 0,0 in the prefab). For the button that will represent the on state, set its varName to on. Likewise, for the off button, set its varName to off.

Save the canvas UI as hand_button_1_prefab.js.

Important!

Every time you make changes to the UI elements and save the file, the Canvas compiles the UI and updates the JavaScript file corresponding to that UI. This file is the prefab class that represents all the UI on the canvas. Thus, you can only directly modify the file in certain areas, otherwise, your changes will be lost the next time Phaser Editor updates it. The editor adds comments to the code, indicating the areas you can safely modify without your edits being lost.

In the source code, look for this comment:

-- user code here --

You can add your code under those lines.

However, watch for these comments:

/* --- start generated code --- */
...
/* --- end generated code --- */

You may not directly edit code in between these comment lines. If you do, your changes will be overwritten by the canvas compiler the next time you save your .canvas file, which causes it to update the code.

However, you can so indirectly by using the User Code dialog.

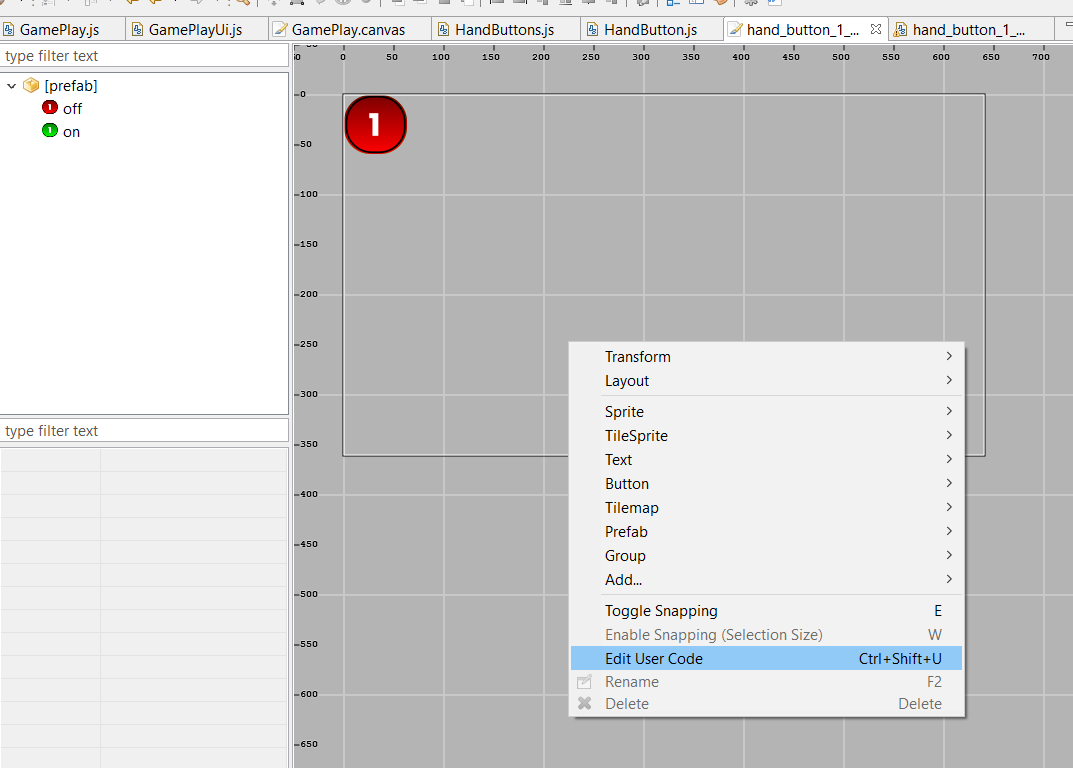
There are two ways you can access this (both from the Canvas UI):

  1. Right click on the Canvas UI and select Edit User Code from the menu; or
  2. Use the keyboard shortcut Ctrl + Shift + U.

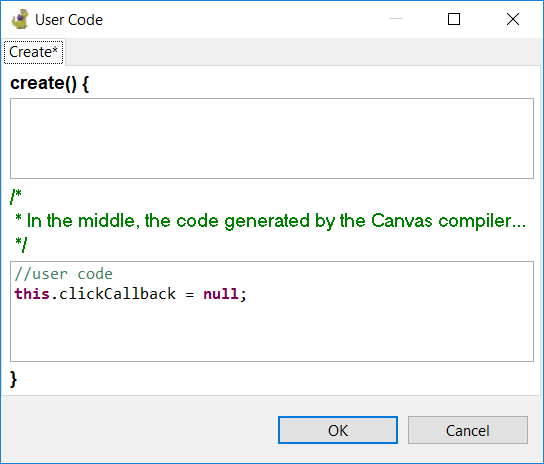
There are two text boxes in the User Code dialog where you can enter text. I recommend adding your own comment at the beginning of each of those, so that you can easily locate where your code was inserted by the Canvas when it rebuilds the JS file.

When you set a varName to a UI object, like we did by naming our buttons “on” and “off”, the canvas compiler will generate attach those objects as properties of the prefab class:

// fields
this.fOn = _on;
this.fOff = _off;

You can reference them in your user code with this.fOn and this.fOff.

This works for any valid varName. For example, if you assigned a varName of myTextBox to a UI object on the canvas. The compiler will assign it to this.fMyTextBox.

You may find yourself needing to add user code for things like custom initialization or responding to button callbacks.

If you’d like more information on the Canvas Editor, please see here. For more on User Code, see here.

We also want to be notified when either the on or off button is pressed, so that we can switch buttons. We do this by adding a callback function to each button.

To do this:

  1. Click on a button on the Canvas.
  2. The properties for the button will appear in the properties panel. Look for “Button”.
  3. In the “callback” field, add this._onButtonPressed (You can name the button whatever you want, but be sure to precede it with this.).
  4. In the “callbackContext” field, add this.

Follow the above steps for the other button as well.

In user code, add the following button click callback function:

hand_button_1_prefab.prototype._onButtonPressed = function() {
  if (this.clickCallback !== null) {
    this.clickCallback.dispatch(this);
  }
};

You’ll notice a this.clickCallback that we haven’t seen before. We’re going to use this as a Phaser.Signal. The signal will allow us to be notified from another location (which we’ll setup later) that a hand button has been clicked. Let’s create a reference to the click callback and set it to null in the middle section of the user code:

this.clickCallback = null;

Why we’re setting up to be notified from another location

I’m a firm believer that the UI code should be separated from the logic code as much as possible. Sure, we could put all the code in this hand_button_1_prefab class, but it would a jumble of the UI code (which what the Canvas compiler uses), and our logic code. I’d rather put the logic code into another file, and leave the prefab files to handle the UI and user code (which should also be kept to a minimum as much as possible, in my opinion).

You can create a new class, for example, HandButton.js, and place it in the WebContent/js folder of your project. The constructor might look something like this:

HandButton = function(s_handButtonId, handButtonPrefab) {
  this._id = s_handButtonId;
  this._handButtonPrefab = handButtonPrefab;
  
  //here's the same clickCallback we setup in the user code of the hand_button_1_prefab canvas.
  this._handButtonPrefab.clickCallback = new Phaser.Signal();
  this._handButtonPrefab.clickCallback.add(this._onButtonCallback, this);
  
  this._isOn = false;
  this.callbackSignal = new Phaser.Signal();
};

The other two hand buttons will eventually use this HandButton class, so this is not exclusive to hand button 1.

You’ll see a this._onButtonCallback referenced when setting up the signal. That’s the function that the signal will call when it’s dispatched in the button prefab user code. (See this.clickCallback.dispatch(this); in the hand_button_1_prefab.prototype._onButtonPressed function written previously.)

HandButton.prototype._onButtonCallback = function(button) {
  this.setIsOn(!this._isOn);
  this.callbackSignal.dispatch(this._id);
};

What this does is toggle the _isOn property between true (on) and false (off) each time the hand toggle button is clicked. We also have yet another signal, this.callbackSignal, which passes notification onto the main logic of the game that the button has been pressed. Another reason that we setup the first this._handButtonPrefab.clickCallback is so that we can provide the UI function of toggling between the button states. We’ll handle this callbackSignal at a later time.

Next, we’ll handle the functionality that updates the current state of the toggle button.

HandButton.prototype.setIsOn = function(b_value) {
  this._isOn = b_value;
  this._handButtonPrefab.fOn.visible = this._isOn === true;
  this._handButtonPrefab.fOff.visible = this._isOn === false;
};

Here, we’re referencing the buttons setup in the canvas, so that we can change their visibility. When one is visible, the other is not.

This covers most of the hand button functionality for all three buttons. We’ll finish off the hand button setup in the next article.

Thanks and stay tuned!

– C. out.

Thunderjack! HTML5 Game Update: Completed the Logic for Thunderjack Hands

Hey there.

Welcome back!
Next we’re going to add what happens when a player gets a hand of the same name as the game itself: a Thunderjack!

PFCHSHSH-KCGHOGHOGHOUGHOGHOUGHWGHWGHW… “THUNDERJACK!!” (spelling of a thunder sound effect)

A Thunderjack is a suited (both cards have the same suit) Blackjack, and the non-ace card is a Jack or higher. The following hands are examples of Thunderjack hands:

Ace Clubs + Jack Clubs
Queen of Hearts + Ace of Hearts
King of Spades + Ace of Spades

However, an Ace of Diamonds and 10 of Diamonds is not a Thunderjack, but a regular Blackjack, even though the cards are of the same suit.

There are also some additional criteria for a Thunderjack:

  1. Only one player hand can get a Thunderjack. If more than one player gets a Thunderjack, those affected hands cancel each other out and push.
  2. The one player with a Thunderjack is payed out immediately.
  3. That player also does not play against the dealer.
  4. If the dealer gets a Blackjack, the player is still paid the Thunderjack payout. The result is not a push.
  5. The dealer can not get a Thunderjack. Even if the dealer gets a suited Blackjack with the non-ace card being a Jack or higher, the result is still a Blackjack.

Just like checking for a regular Blackjack, we will check for a Thunderjack after all the players and dealer have received been dealt their first two cards. We’ll need to change our original code that involves checking the opening hands for Blackjack. If you recall from the previous article, the pseudo code looks like this:

if hasBlackjack(dealer) {
   handleDealerBlackjack();
   endRound();
 } else {
   checkIfPlayersHaveBlackjacks();
   setFirstTurnPlayer();
 }

First, we need to store a few variables. We want to determine which player, if any, has a Thunderjack. This code checks every player’s hand for a suited Blackjack where the non-ace card is a face card. The pseudo code now looks like:

var playerWithThunderjack = checkIfPlayerHasThunderjack()
var playersWithBlackjack = checkIfPlayersHaveBlackjacks()
var doesDealerHaveBlackjack = hasBlackjack(dealer)
if playerWithThunderjack {
  handleThunderjack(playerWithThunderjack)
  endRound()
} else {
  if doesDealerHaveBlackjack {
    handleDealerBlackjack()
    endRound()
  } else {
    setFirstTurnPlayer()
  }
}

All of the Thunderjack handling happens in the checkIfPlayerHasThunderjack() function. If there is more than one player with a Thunderjack, all affected players push. If only one player qualifies, we return that player for later use.

function checkIfPlayerHasThunderjack() {
  var playersWithTj = getAllPlayersWithTj();
  if playersWithTj.length > 1 {
    handleMultipleThunderjacks(playersWithTj);
    return null;
  } else if (playersWithTj.length == 0) {
    return null;
  }
  return playersWithTj[0];
}

This function determines all players, if any, that have a Thunderjack, and returns them in an array. The array will be empty if no players qualify.

function getAllPlayersWithTj() {
  var playersWithTj = []; // set up an empty array
  //do not include the dealer here - only the players, because dealer can not get a thunderjack
  for each player in the game {
    if hasThunderjack(player) {
      playersWithTj.push(player); // add this player to the array
    }
  }
  return playersWithTj;
}

If we have more than one player with a Thunderjack, they all push:

function handleMultipleThunderjacks(playersWithTj) {
  for each player in playersWithTj {
    player.handData.isPush = true;
  }
}

The criteria for getting a Thunderjack is defined in this function:

function hasThunderjack(player) {
  return hasBlackjack(player) &&
    isFlush(player) &&
    isLowCardAtLeast(player, Thunderjack.CardValues.JACK);
}

This function handles the one player that has Thunderjack:

function handleThunderjack(player) {
  player.handData.hasThunderjack = true;
}

One requirement for a Thunderjack is that both cards must be the same suit (like a flush in Poker). Since this will only be run against the player’s opening hand of two cards, was can assume indexes 0 and indexes 1 in the player.cardsData array.

function isFlush(player) {
  var firstCardData = player.cardsData[0];
  var secondCardData = player.cardsData[1];
  return firstCardData.suit == secondCardData.suit;
}

We’re using the same two cards. Let’s use a lowestCardValue parameter instead of making a function “isLowCardAtLeastAJack()”. That way, if we want to change this requirement in the future, all we have to do is change what is being passed as lowestCardValue.

function isLowCardAtLeast(player, lowestCardValue) {
  var firstCardData = player.cardsData[0];
  var secondCardData = player.cardsData[1];
  return
    isCardValueAtLeast(firstCardData, lowestCardValue) &&
    isCardValueAtLeast(secondCardData, lowestCardValue);
}

function isCardValueAtLeast(cardData, lowestCardValue) {
  var indexOfLowestCardValue = Thunderjack.CardValues.ALL.indexOf(lowestCardValue);
  var indexOfCardDataValue = Thunderjack.CardValues.ALL.indexOf(cardData.cardValue);
  return indexOfCardDataValue >= indexOfLowestCardValue;
}

In the Thunderjack.CardValues.ALL array, all the card values are defined in order of lowest rank to highest rank (Ace being the highest here). The JavaScript Array class has a method called indexOf, which will search the array for a specified value, and return it’s index, or position, within the array. So, what we do here is get the index of the cardValue of our CardData, and compare it to the index of the specified indexOfLowestCardValue.

The CardData’s index must be at least as high lowCardValue’s in order to qualify. Since we specified Thunderjack.CardValues.JACK as the lowest card value, our CardData’s card value must be at least a Jack, just like it was defined in the Thunderjack requirements.

This completes handling of players with Thunderjacks. After all opening hands have been resolved, and the game has not ended due to a player’s Thunderjack, or a dealer’s Blackjack, we want to set the first turn player.

From the previous article, we had a setFirstTurnPlayer function that sets the turn to the first player eligible to play against the dealer.

function setFirstTurnPlayer() {
  var turnPlayerIndex = getNextTurnPlayerIndex(0); 
  if (turnPlayerIndex !== -1) {
    setTurnPlayer(turnPlayerIndex);
  } else {
    endRound();
  }
}

The function that setFirstTurnPlayer uses to determine which player goes first is getNextTurnPlayerIndex. This function gets the index of the next player that is eligible to play against the dealer. Players are stored in an array, in this order: right, middle, left, dealer. When setFirstTurnPlayer runs, it calls getNextTurnPlayerIndex with startTurnPlayerIndex value set to 0. This allows us to check the first array index.

Note: Later in the game, when we’re moving onto the next player, getNextTurnPlayerIndex will have a value of whatever the current turn player index sent to it, plus one. For now, don’t worry about it. We’ll get to this in the next article.

function getNextTurnPlayerIndex(startTurnPlayerIndex) {
  var index = startTurnPlayerIndex;
  while (index < turnPlayerIds.length) {
    var playerId = turnPlayerIds[index];
    var handData = playerHandsData[playerId];
    if (isPlayingVsDealer(handData)) {
      return(index);
    }
    index++;
  }
  return(-1);
}

The getNextTurnPlayerIndex function in turn, calls isPlayingVsDealer, and this is the function we’re interested in. As shown, a player is eligible to play against the dealer if the player does not have a Blackjack, and has not pushed.

function isPlayingVsDealer(handData) {
  return(
    !(playerHandData.hasBlackjack ||
    playerHandData.isPush));
}

We want to edit this function so that it includes checking if the player does not have a Thunderjack. If so, the player is eligible.

function isPlayingVsDealer(handData) {
  return(
    !(playerHandData.hasBlackjack ||
    playerHandData.isPush ||
    playerHandData.hasThunderjack));
}

The game now allows us to properly determine if any players have a Thunderjack, and to obtain the first turn player, skipping over any players with a Thunderjack (because they are ineligible to play against the dealer).

In the next article, we’ll get into placing bets, which I touched on in an earlier post, but will cover in more detail.

Let me know if you have any questions. Thanks for staying with me, guys. Take care.

– C. out.

Thunderjack! HTML5 Game Update: Completed the Logic for Blackjack Hands

Hello again!

We have more updates available for the HTML5 version of Thunderjack! using Phaser.

This time, we’re covering what happens when one or more players or the dealer gets a Blackjack.

As you may be aware, when a player gets a Blackjack on the opening hand, they are immediately paid, and do not play against the dealer. When the game first starts players who do have Blackjack will have their turns skipped, and the game starts with the first non-Blackjack player. If all players get a Blackjack, then the game ends.

If the dealer gets a Blackjack, then the game ends immediately. If any players also have a Blackjack, their result is a Push (the player gets their original bet back). All non-Blackjack players lose their bets.

Let’s get started on the logic for this might look like.

After all the cards are dealt, here is the basic rundown of the logic:

  1. Calculate the scores of all players and dealer
  2. Determine which hands, if any, have Blackjacks
  3. If the dealer has a blackjack:
    1. For each player that has a Blackjack, result is a push
    2. End game
  4. If the dealer does not have a Blackjack:
    1. For each player that has a Blackjack, is paid immediately, and does not play against the dealer
    2. Game starts with the first non-Blackjack player taking their turn.

We’ll tackle those one at a time.

1) Calculate the scores of all players and dealer

Every time one or more player’s or dealer’s hands change cards, we need to calculate how many points they have. As I hinted in this post, we have a Thunderjack.HandData class

Thunderjack.HandData = function(handId) {
  this.cardsData = [];
  this.handId = handId;
  this.score = 0;
  this.hasBlackjack = false;
};

We’re interested in the cardsData and score properties. The dealer will use this class to store data.

For the player, we need additional data that is exclusive on to the player. The player’s hand class looks like:

Thunderjack.PlayerHandData = function(handId) {
  Thunderjack.HandData.call(this, handId);
  this.isPush = false;
};

Because PlayerHandData inherits from HandData, it here we’re interested in the isPush property. The dealer can never push, which is why this property is nor defined in HandData.

We got into dealing the cards in this post. After the cards are dealt to a player, their cardsData property will contain the array of Thunderjack.CardData objects. The class looks like:

CardData
Thunderjack.CardData = function(cardValue, cardSuit, deckIndex) {
  this.value = cardValue;
  this.suit = cardSuit;
  this.deckIndex = deckIndex;
  this.id = this.value + "_" + this.suit + "_" + this.deckIndex;
};

We also talked Thunderjack.CardValues and the numeric values for each card:

CardPoints
Thunderjack.CardPoints = { };
Thunderjack.CardPoints[Thunderjack.CardValues.TWO] = 2;
Thunderjack.CardPoints[Thunderjack.CardValues.THREE] = 3;
Thunderjack.CardPoints[Thunderjack.CardValues.FOUR] = 4;
Thunderjack.CardPoints[Thunderjack.CardValues.FIVE] = 5;
Thunderjack.CardPoints[Thunderjack.CardValues.SIX] = 6;
Thunderjack.CardPoints[Thunderjack.CardValues.SEVEN] = 7;
Thunderjack.CardPoints[Thunderjack.CardValues.EIGHT] = 8;
Thunderjack.CardPoints[Thunderjack.CardValues.NINE] = 9;
Thunderjack.CardPoints[Thunderjack.CardValues.TEN] = 10;
Thunderjack.CardPoints[Thunderjack.CardValues.JACK] = 10;
Thunderjack.CardPoints[Thunderjack.CardValues.QUEEN] = 10;
Thunderjack.CardPoints[Thunderjack.CardValues.KING] = 10;
Thunderjack.CardPoints[Thunderjack.CardValues.ACE] = 1;

Now let’s wrote some code that figures out the players’ hand scores based on their cards. For the most part, it’s just adding up the values, but things are a little tricky with the ace, since it can be one or eleven.

CalcScore
Thunderjack.CalcScore.ACE_POINTS_REMAINING = 10;
Thunderjack.CalcScore.Eval = function (cardsData) {
  var points = 0;   var containsAnAce = false;
  for (var index = 0; index < cardsData.length; index++) {
    var cardData = cardsData[index];
    cardPoints = Thunderjack.CardPoints[cardData.value];
    if (cardData .value === Thunderjack.CardValues.ACE) {
      containsAnAce = true;
    }
    points += cardPoints;
  }

  if (containsAnAce) {
    var proposedValue = points + Thunderjack.CalcScore.ACE_POINTS_REMAINING;
    if (proposedValue <= Thunderjack.DesignData.BLACKJACK_POINTS) {
      points = proposedValue;
    }
  }
  return(points);
};


We’d call the Thunderjack.CalcScore.Eval function and send it the cardsData property of the hand we’re interested in.

We get the points of an individual card based on its value, then look it up in the Thunderjack.CardPoints object. For aces, we always add 1 point (for now), and we note that we’ve encountered at least one ace with the containsAnAce boolean.

If the hand contains an ace, we know that we can add the remaining 10 points of the high value of the ace to the points, as long as the results doesn’t exceed 21 (Thunderjack.DesignData.BLACKJACK_POINTS).

We eventually stored the returned result in the player’s hand. After all the cards have been dealt, we have these functions:

updateScores
function updateScores() {
  for each player in the game {
    player.handData.score = Thunderjack.CalcScore.Eval(player.handData.cardsData);
  }
  dealer.handData.score = Thunderjack.CalcScore.Eval(dealer.handData.cardsData);
}


Now the have the scores of all the players and dealer, we can evaluate their opening hands.

2) Determine which hands, if any, have Blackjacks. Here’s a quick pseudocode of the logic.

Here’s the break down:

if hasBlackjack(dealer) {
  handleDealerBlackjack();
  endRound();
} else {
  checkIfPlayersHaveBlackjacks();
  setFirstTurnPlayer();
}

Let’s start with determining if has a hand has a blackjack.

hasBlackjack
function hasBlackjack(player) {
  return (player.handData.score === Thunderjack.DesignData.BLACKJACK_POINTS);
}


As long as hasBlackjack is called after the scores have been update, the results will be accurate.

3) If the dealer has a blackjack:
3a) For each player that has a Blackjack, result is a push
3b) End game

We have a function specific to when the dealer has a Blackjack:

handleDealerBlackjack
function handleDealerBlackjack() {
  for each player in the game {
    if hasBlackjack(player) {
      player.handData.isPush = true;
    }
  }
  endRound();
}

Note that when the player has a Blackjack, we did not set the hasBlackjack property to true. Th is because the results is a push, even though the player got a Blackjack on their opening hand, they’re not being paid a Blackjack.

4 If the dealer does not have a Blackjack:
4a) For each player that has a Blackjack, is paid immediately, and does not play against the dealer
4b) Game starts with the first non-Blackjack player taking their turn

However, if the dealer does not have a Blackjack, we have code that handles below:

checkIfPlayersHaveBlackjacks
function checkIfPlayersHaveBlackjacks() {
  var bjHands = []
  for each player in the game {
    if hasBlackjack(player) {
      player.handData.hasBlackjack = true
      add player to bjHands array
    }
  }
  return bjHands
}
setFirstTurnPlayer
function setFirstTurnPlayer() {
  var turnPlayerIndex = getNextTurnPlayerIndex(0);
  if (turnPlayerIndex !== -1) {
    setTurnPlayer(turnPlayerIndex);
  } else {
    endRound();
  }
}

We’ve a some new function with setFirstTurnPlayer. There is a specific order in which the players take their turns. I’ve defined it as:

  1. Right player
  2. Middle player
  3. Left player
  4. Dealer

These are stored in an array called turnPlayerIds, and it will store the values we defined in Thunderjack.PlayerHandIds. These IDs were introduced in this article.

Thunderjack.PlayerHandIds.LOWER_RIGHT = "lowerRight";
Thunderjack.PlayerHandIds.LOWER_MIDDLE = "lowerMiddle";
Thunderjack.PlayerHandIds.LOWER_LEFT = "lowerLeft";
Thunderjack.PlayerHandIds.UPPER_RIGHT = "upperRight";
Thunderjack.PlayerHandIds.UPPER_MIDDLE = "upperMiddle";
Thunderjack.PlayerHandIds.UPPER_LEFT = "upperLeft";


So, assuming that all three player hands are active, turnPlayerIds would look like:

turnPlayerIds
turnPlayerIds = [
  Thunderjack.PlayerHandIds.LOWER_RIGHT,
  Thunderjack.PlayerHandIds.LOWER_MIDDLE,
  Thunderjack.PlayerHandIds.LOWER_LEFT,
  Thunderjack.PlayerHandIds.DEALER
];

(The “upper” hands are used for splitting, which we’ll go over in a later article.)

The first turn player will be the one who is eligible to play against the dealer. This is the player who did not get a Blackjack on their opening hand.

getNextTurnPlayerIndex
function getNextTurnPlayerIndex(startTurnPlayerIndex) {
  var index = startTurnPlayerIndex;
  while (index < turnPlayerIds.length) {
    var playerId = turnPlayerIds[index];
    var handData = playerHandsData[playerId];
    if (isPlayingVsDealer(handData)) {
      return(index);
    }
    index++;
  }

  return(-1);
}

The playerHandsData variable is an object that can store the player hands, indexed by their player IDs.

The isPlayingVsDealer function is what we can use to determine if a player will play vs the dealer. It looks like:

isPlayingVsDealer
function isPlayingVsDealer(handData) {
  return(!
    (playerHandData.hasBlackjack ||
    playerHandData.isPush));
};


If a player does not have a Blackjack or a push, they will play against the dealer. If there is no player to play against the dealer (getNextTurnPlayerIndex would return -1), then the game would end.

That’s it for this post. We covered quite a bit in these few steps, but most of the opening hand logic is done. In the next article, we’ll add my special feature to this game – winning a hand via Thunderjack! Stay tuned, and take care.

– C. out.

Thunderjack! HTML5 Game Update: Cheating? Yes But No

Hey guys. We’re into getting into some of the updates mentioned from my past post – mainly checking if an opening hand has a Blackjack, and eventually other specific combinations of cards in the hand. And there’s just one little problem… it can take all day to get the cards we need in order to test.

So, we’ll need a way to control the order in which cards are drawn. Otherwise, we may waiting a long time before we’re dealt the cards we want. So, we’ll have to cheat and pull a fast one here.

But before we get into that, let’s take a look at how the game sets up the cards and the deck.

Card Suits And Values

As you know, there are four suits and we have values from 2 to Ace. Let’s start with the suits first.

In Thunderjack!, we have a class called CardValues that acts like an enumeration, similar to what you might see in C# or Java. Except, we’ll be storing strings instead of integral values.

Thunderjack.CardSuits.HEARTS = "h";
Thunderjack.CardSuits.DIAMONDS = "d";
Thunderjack.CardSuits.CLUBS = "c";
Thunderjack.CardSuits.SPADES = "s";
Thunderjack.CardSuits.ALL = [
  Thunderjack.CardSuits.HEARTS,
  Thunderjack.CardSuits.DIAMONDS,
  Thunderjack.CardSuits.CLUBS,
  Thunderjack.CardSuits.SPADES
];

The ALL array is useful in iterating through all of the suits, which we’ll do later.

When storing the card values, you may think we’d use a number. However, we’ll going to use both string and number. The strings for suits and values will be used when creating unique IDs. We’ll get into these later, but for now, let’s have a look at the values.

We also have another ALL array for iterating through all of the values.

The CardPoints object stores the values, indexed by the string values defined above.

Thunderjack.CardValues.TWO = "2";
Thunderjack.CardValues.THREE = "3";
Thunderjack.CardValues.FOUR = "4";
Thunderjack.CardValues.FIVE = "5";
Thunderjack.CardValues.SIX = "6";
Thunderjack.CardValues.SEVEN = "7";
Thunderjack.CardValues.EIGHT = "8";
Thunderjack.CardValues.NINE = "9";
Thunderjack.CardValues.TEN = "10";
Thunderjack.CardValues.JACK = "j";
Thunderjack.CardValues.QUEEN = "q";
Thunderjack.CardValues.KING = "k";
Thunderjack.CardValues.ACE = "a";
Thunderjack.CardValues.ALL = [
  Thunderjack.CardValues.TWO,
  Thunderjack.CardValues.THREE,
  Thunderjack.CardValues.FOUR,
  Thunderjack.CardValues.FIVE,
  Thunderjack.CardValues.SIX,
  Thunderjack.CardValues.SEVEN,
  Thunderjack.CardValues.EIGHT,
  Thunderjack.CardValues.NINE,
  Thunderjack.CardValues.TEN,
  Thunderjack.CardValues.JACK,
  Thunderjack.CardValues.QUEEN,
  Thunderjack.CardValues.KING,
  Thunderjack.CardValues.ACE
];
Thunderjack.CardPoints = { };
Thunderjack.CardPoints[Thunderjack.CardValues.TWO] = 2;
Thunderjack.CardPoints[Thunderjack.CardValues.THREE] = 3;
Thunderjack.CardPoints[Thunderjack.CardValues.FOUR] = 4;
Thunderjack.CardPoints[Thunderjack.CardValues.FIVE] = 5;
Thunderjack.CardPoints[Thunderjack.CardValues.SIX] = 6;
Thunderjack.CardPoints[Thunderjack.CardValues.SEVEN] = 7;
Thunderjack.CardPoints[Thunderjack.CardValues.EIGHT] = 8;
Thunderjack.CardPoints[Thunderjack.CardValues.NINE] = 9;
Thunderjack.CardPoints[Thunderjack.CardValues.TEN] = 10;
Thunderjack.CardPoints[Thunderjack.CardValues.JACK] = 10;
Thunderjack.CardPoints[Thunderjack.CardValues.QUEEN] = 10;
Thunderjack.CardPoints[Thunderjack.CardValues.KING] = 10;
Thunderjack.CardPoints[Thunderjack.CardValues.ACE] = 1;

You may also notice that Ace only stores the value of 1 not 11. We’ll be using the 11 at another time, when we calculate how many points are in a player’s hand than contains an Ace. We won’t be using the CardPoints in this post, but we’ll need it soon.

Card Data Structure

Now that we have suites and values defined, we want a card data object that can store these. In Blackjack, more than one deck is commonly used, and Thunderjack! is no exception. This introduces the problem of having multiple cards with the same suit and value, and we want to be able to uniquely identify every card in each deck.

This is where the card ID that I mentioned earlier comes into play. We’ll be storing that in our data object, as well as the zero-based array index that identifies which deck the card represented by the card data object comes from.

This is what our card data object class looks like:

Thunderjack.CardData = function(s_cardValue, s_cardSuit, i_deckIndex) {
  this.value = s_cardValue;
  this.suit = s_cardSuit;
  this.deckIndex = i_deckIndex;
  this.id = this.value + "_" + this.suit + "_" + this.deckIndex;
};

As you can see, we’re forming our card ID as a string using the following format:
[card value] _ [card suit] _ [deck index]

For example, the seven of clubs from the third deck would look like this:
"7_c_2"

Deck Structure

Every card is represented by a card data object, and a deck is simply an array of 52 of these card data objects. We have a simple class for “dealing” and shuffling cards, as well as a few other utility functions.

Starting out, the deck data class looks like this:

//===========================================================================================
//"public"
//=========================================================================================== 

//===========================================================================================
//ctor
//===========================================================================================
Thunderjack.DeckData = function(i_numDecks) {
  //data: Thunderjack.CardData
  this._cardsData = [];
  this._init(i_numDecks);
};

//-------------------------------------------------------------------------------------------
//getLength
//-------------------------------------------------------------------------------------------
Thunderjack.DeckData.prototype.getLength = function() {
  return(this._cardsData.length);
};

//-------------------------------------------------------------------------------------------
//popCardData
//-------------------------------------------------------------------------------------------
Thunderjack.DeckData.prototype.popCardData = function() {
  return(this.getLength() > 0 ? this._cardsData.pop() : null);
};

//-------------------------------------------------------------------------------------------
//shuffle
//-------------------------------------------------------------------------------------------
Thunderjack.DeckData.prototype.shuffle = function() {
  Phaser.ArrayUtils.shuffle(this._cardsData);
};

//===========================================================================================
//"private"
//===========================================================================================

//-------------------------------------------------------------------------------------------
//_init
//-------------------------------------------------------------------------------------------
Thunderjack.DeckData.prototype._init = function(i_numDecks) {
  var i_decksCount;
  if (typeof i_numDecks === "number") {
    i_decksCount = i_numDecks;
  } else {
    return;
  }

  for (var i_deckIndex = 0; i_deckIndex < i_decksCount; i_deckIndex++) {
    for (var i_valueIndex = 0; i_valueIndex < Thunderjack.CardValues.ALL.length; i_valueIndex++) {
      var s_value = Thunderjack.CardValues.ALL[i_valueIndex];
      for (var i_suitIndex = 0; i_suitIndex < Thunderjack.CardSuits.ALL.length; i_suitIndex++) {
        var s_suit = Thunderjack.CardSuits.ALL[i_suitIndex];
        this._cardsData.push(new Thunderjack.CardData(s_value, s_suit, i_deckIndex));
      }
    }
  }
};

You can see in the _init method is where we create the CardData objects for each card in every deck. This is where we use the ALL arrays from CardSuits and CardValues.

Note that, instead of using those ALL properties, we could have also iterated through them using a for…in statement, but the arrays are useful in other parts of the game, which we won’t get into right now.

The method we’re interested in when dealing cards is DeckData.popCardData(). This will remove the last CardData object from the _cards array and return it to us. This is the basic structure of the DeckData class. There are other methods in this class as well, and they’ll be added as we need them.

You’ll also notice a shuffle method. Phaser already provides for us an ArrayUtils class, and so happens to have a shuffle method that randomizes the order of items in an array. We don’t have to write one ourselves. Remember, coders are lazy. (:

Get off yo ass and write some code!
Dealing Cards to Each Player

With the deck and cards set up, we can now begin to deal cards to the players and dealer.
Some psuedocode looks like this:

function dealCardsToPlayers() {
  while (numberOfCardsDealtToEachPlayer < 2) {
    for each player in the game {
      dealCardToPlayer (player);
    }
    
    dealCardToPlayer (dealer);
    numberOfCardsDealtToEachPlayer++;
  }
}

When a card is dealt in dealCardToPlayer, it looks something like this:

function dealCardToPlayer (playerData) {
  var cardData = deckData.popCardData();
  playerData.cardsData.push(cardData);
}
Controlling the Order in Which Cards are Drawn (To Cheat!)

Now, if we’re trying to test out certain combinations of cards in a player’s hand, such as a Blackjack on the opening hand, we can be waiting a long ass time before we get what we’re looking for. This is where che~~~ ahem, controlling the order of the cards comes in.

The plan is like this:

  • Setup an array of card ID strings that will specify the order in which we want the cards to be drawn.
  • Shuffle the deck (if necessary)
  • After the cards have been shuffled, set the order of the cards in the deck according to the array of card Ids in step one.

Let’s setup each of these steps.

1). Setup an array of card ID strings that will specify the order in which we want the cards to be drawn.

We can set the array up that will hold the card IDs we want to use in the following:

debugCardIds = [
  "4_h_0",  //first card that will be dealt to the player
  "a_d_0",  //first card that will be dealt to the dealer
  "5_c_0",  //second card that will be dealt to the player
  "10_s_0"  // second card that will be dealt to the dealer
];

Say we have only one player and the dealer. From the card dealing snipped above, all players are dealt a card, then the dealer. Then this process continues until each player and the dealer has two cards.

2). Shuffle the deck (if necessary)

If we’re just starting the game, we’ll want to shuffle the deck. We can do that using the shuffle method of the DeckData class mentioned earlier.

deckData.shuffle();

3). After the cards have been shuffled, set the order of the cards in the deck according to the array of card Ids in step one.

function aceUpSleeve() {
  var s_cardId = _debugCardIds.shift();
  var i_swapIndex = _deckData.getLength();
  while (s_cardId) {
    _deckData.swap(s_cardId, --i_swapIndex);
    s_cardId = _debugCardIds.shift();
  }
}

What we’re doing here is using the shift method of JavaScript’s Array class to retrieve and remove the first card ID.

When dealing cards, remember that we retrieve and remove the last CardData object from the deck. So when setting up the deck in the order we want, we swap out the last card data object in the deck with debug card ID. Then, we work our way backwards, towards the beginning of the deck, until our debugCardsId array is empty.

The i_swapIndex variable represents the array index within the DeckData where we will place the CardData represented by our debug card ID. This is where a new method for DeckData, swap(), comes in:

Thunderjack.DeckData.prototype.swap = function(s_cardId, i_indexToSwapAt) {
  if (i_indexToSwapAt < 0 || i_indexToSwapAt >= this.getLength()) {
    return;
  }

  var i_indexOf = this.indexOfId(s_cardId);
  if (i_indexOf > -1) {
    var cardData = this._cardsData[i_indexToSwapAt];
    this._cardsData[i_indexToSwapAt] = this._cardsData[i_indexOf];
    this._cardsData[i_indexOf] = cardData;
  }
};

What this method does is first, locate the index within the _cardsData array of the CardData represented by our card debug ID, Then, it will swap the elements of the _cardsData array; the card data found at our requested swap index with the card data at the located index.

So now, our dealCardsToPlayers() method looks like this:

function dealCardsToPlayers() {
  //do this first – assume cards have been shuffled already in some other function
  aceUpSleeve();

  while (numberOfCardsDealtToEachPlayer < 2) {
    for each player in the game {
      dealCardToPlayer (player);
    }
    
    dealCardToPlayer (dealer);
    numberOfCardsDealtToEachPlayer++;
  }
}

Also, if we don’t want to control the order of dealing cards, we can set debugCardIds to an empty array.

The problem with this is, we have to keep editing the code when we want to control the order. Later on in development, I’ll build a user interface that allows us to manipulate the debug card Ids. Adding a debug/diagnostic interface like this is not something you’d put in a release version of your game, but they are invaluable when debugging, testing, and demoing your game.

Yes, they are a little bit of a detour, but it’s worth it. If you’re testing the game with someone else, they’ll be able to easily control the order of the deck without having to change the code. For my clients, they wouldn’t want to anyway – they just want something that’s easy for them to use without having to poke around in the code. That’s my job. 😉

Finally, you can watch this video of the *cough*cheat’n’*cough* in action. You may want to view the video at full-screen so you can see the edits I’m making in code. Also, after the opening cards are drawn each time, feel free to pause the video to check that the order of the cards drawn does indeed match with the _debugCardIds array (they do):

So that’s it for now. This was a long one, and thanks for reading all the way to the end. I can’t wait until this game is finished for you all to play!

– C. out.

Thunderjack! Playing Against The Dealer

Hey there, and welcome back for another update on the HTML5 Phaser version of Thunderjack!.

The project is starting to get interesting, because most of the UI is done, and I have begun working on the game mechanics and logic.

Updates include:

  1. Hit and Stand functions are complete.
  2. The dealer now plays (dealer AI) if there are any eligible players remaining.
  3. At the end of the round, winners are determined by comparing hands.
  4. A new round can now be played.

Let’s go over each of these in a little more detail.

1. Hit and Stand functions are complete

When taking a hit, the bust functionality is now complete. If a player’s score exceeds 21, the player will bust, and the Bust indicator will appear. The game then moves to the next available player.

Likewise, the player can stand. If they do so, the game then moves to the next available player.

A few notes on available players.

Thunderjack! Will allow you to place bets on one to three players. Since splitting is supported in this game, it is possible for you to split the hands to play a total of six hands in a round.

I assigned a “player ID” to each of the six players. This ID is a string that is used when referencing any of the player data, such as:

  • cards in hand
  • score
  • status (bust, blackjack, Thunderjack, etc.)
  • bet amount

The player ID is also used to reference the graphical UI for each player. Things like:

  • card graphics;
  • textfield for the score;
  • textfield for the bet value;
  • chips that represent the bet value; and
  • result label (won, bust, blackjack, etc.)

The player IDs are setup in code like this:

PlayerHandIds.LOWER_RIGHT = "lowerRight";
PlayerHandIds.LOWER_MIDDLE = "lowerMiddle";
PlayerHandIds.LOWER_LEFT = "lowerLeft";
PlayerHandIds.UPPER_RIGHT = "upperRight";
PlayerHandIds.UPPER_MIDDLE = "upperMiddle";
PlayerHandIds.UPPER_LEFT = "upperLeft";

When starting a round, you can play on any of the three “lower” hands. The “upper” hands are used for splitting, which will be implemented later.

There are also some additional IDs:

PlayerHandIds.DEALER = "dealer";
PlayerHandIds.DECK = "deck";
PlayerHandIds.DISCARD_DECK = "discardDeck";

The ID, PlayerHandIds.DEALER, is very similar to the six players, except that it does not use betting information, and it cannot split or double-down.

The ID, PlayerHandIds.DECK, is used when moving cards back into the deck (for reshuffling)

The ID, PlayerHandIds.DISCARD_DECK, is used at the end of each round when all players place all the cards in the hand into the discarded deck.

2. The dealer now plays (dealer AI) if there are any eligible players remaining

The logic for the dealer is simple. If if has less than seventeen points, it will take a Hit. Otherwise, it will stay. Also, the dealer does not double-down or surrender.

The dealer will play its hand only if there are any eligible players remaining to play against it.

An eligible player is a player who:

  • did not bust
  • did not get a blackjack, Thunderjack, or blitz
  • did not surrender

If there are no eligible players, the round ends, and the dealer does not play.

3. At the end of the round, eligible players now play against the dealer

When all players and the dealer have completed their turns, the hands of eligible players are compared against the dealer’s to determine winners.

4. A new round can now be played

After the round has ended, you can play a new round with the same bets, or you can set new bets on your hands. When you start a new game, all cards in the players’ and dealer’s hands are moved to the discard deck, then players are dealt new hands from the deck.

Have a look at this video to see the current progress:

Following Updates

As you can see, the game is coming along nicely. You may have noticed a few other details I didn’t mention, such as showing how much player’s won, or the credits in the upper-left corner of the screen are now being deducted when starting a game. Or, maybe you noticed that the credits didn’t increase when players win!

Ha! No, I’m not trying to put the shit on anybody; I just haven’t gotten to that part yet.

But let me go ahead and state some of the updates to come in the game:

  • Credits increase when players win.
  • Finish showing all the result indicators. Bust and Win show, but the others, like Blackjack or Push, show. Which brings me to the next to-do items.
  • Complete logic for Blackjack for player. If a player gets a Blackjack, that player’s turn immediately ends, he/she receives an immediate payout, and it becomes the next eligible player’s turn. A player who gets a blackjack becomes ineligible to play against the dealer.
  • Complete logic Blackjack for dealer. If the dealer gets a Blackjack, the game immediately ends and and player hands are compared against the dealer. Any player who has a blackjack results in a push. Players who get a Thunderjack! Will actually beat the dealer (this will be implement a bit later on). Otherwise, all other players don’t win the round.
  • If a player’s hand results in a push, they get their original bet back.
  • As cards are added to or removed from the deck, visually update it’s deck accordingly.
  • As cards are added to or removed from the discard pile, visually update it’s deck accordingly.
  • If too many cards have been used from the deck, before dealing the next wave of cards to the player and dealer, all discarded cards will be returned to the deck, the deck will be shuffled.

If you like where this is going, please leave me a comment saying what you like. Of course, if you don’t like it, that’s cool, too. (:

If you want be to build a Blackjack-style type of game for you (or a breakout style game like this or that), then please contact me here, contact me directly at cartrell@gameplaycoder.com, or look me up on LinkedIn.

That’s all I have for you for now. Thanks, and stay tuned for the next update.

– C. out.

Thunderjack! HTML5 Game Update: Card Dealing

Hey guys.

Welcome back to Gameplay Coder. Quite a bit of progress has been made on the HTML5 version of Thunderjack! using Phaser and the Phaser Editor. I’m getting the hang of basic usage of the editor. And it’s great to have a visual editor at your disposal – so you don’t have to place sprites using hard-coded x/y coordinates via trial and error, or reply on some external graphics tool then have to copy/paste those coordinates.

Updates to this game include:

  1. Being able to place bets.
  2. Dealing the cards to the players and dealer.
  3. Updating points for the players.

Hit functionality is currently in the works, as is determining when a player or dealer has a blackjack, and when a player has a Thunderjack.

Use of Fonts

One issue I encountered is with using fonts. In the browser, they don’t appear exactly as the do in the editor. Some features such as stroke, aren’t rendered. So I’ll likely end up using Phaser bitmap fonts instead of fonts, which, on my machine, is a small set of Windows fonts that the editor has access to. Furthermore, there is no guarantee that the fonts used in the project will be installed on the machine of someone playing the game.

There is an online Flash tool (at the time of this post), called Littera. This can be used to create bitmap fonts from fonts installed on your machine. What’s also cool about it is, Phaser supports the format, as shown in this example.

Prototypal Inheritance

While I’m no stranger to OOP (object-oriented programming) and classical inheritance in languages like ActionScript 3, C# or Java, I’m fairly new as to prototypal inheritance in JavaScript, so I’m giving it a try in this project. Hell yeah! 💪🏾

I’m using prototypal inheritance with the data that stores the player hands and the dealer hand. There is a ‘base class’ called HandData, whose function constructor looks like this:

HandData class
HandData = function(s_handId) {
  this.cards = [];
  this.handId = s_handId;
  this.score = 0;
  this.hasBlackjack = false;
  this.isBust = false;
};

This is basic data that both types of hands, player and dealer, will contain.

However, player hands will need to store additional data, such as the bet amount, and can perform other moves such as split, double, and surrender. Players can also win via Blitz (6-card Charlie in this game). The dealer does not use any of these functions, and thus doesn’t need access to them.

The player hand data, PlayerHandData, will inherit from the HandData, and looks like this:

PlayerHandData class
PlayerHandData = function(s_handId) {
  HandData.call(this, s_handId);
  this.betValue = 0;
  this.hasThunderjack = false;
  this.isPush = false;
  this.hasBlitz = false;
  this.hasDoubled = false;
  this.hasSurrendered = false;
};

That call() function is like calling the constructor of the parent class. In this case, it sends the parameters that were sent when it was created onto its parent constructor. Also, the this keyword is supplied first, so that the context in which the parent constructor function is being called is set to the inheriting function constructor.

However, PlayerHandData still needs to have its constructor inherit the methods of the parent prototype. This creates a new object based on the parent prototype:

PlayerHandData.prototype = Object.create(HandData.prototype);

And finally, the constructor of our new PlayerHandData prototype needs to point to PlayerHandData instead of HandData. That can be fixed with this line:
PlayerHandData.prototype.constructor = PlayerHandData;

Now when we create data for each the dealer hand, we can write:
var dealerHand = new HandData(s_dealerId);

And for each of the six player hands, we can write something like:
var somePlayerHand = new PlayerHandData(s_playerId);

The player hand will have all the properties of the dealer hand, plus the extras that are required to support the additional game play available to the players.

So when inheriting one “class” from another (I put “class” in quotes because, JavaScript doesn’t have classes. They can be simulated using prototypes.), it’s basically three steps:

1). Within the inheriting function constructor, call the parent constructor function using the call(). Be sure to set this as the first parameter, succeeded by any function constructor parameters.
2). Create a copy of the parent function’s prototype, and assign it to the inheriting constructor function’s prototype.
3). Assign the constructor of the inheriting prototype to the inheriting constructor function itself.

This can be a little confusing, but typing this out can help reinforce learning (though writing it out is better, studies have shown, but I digress (:

But doing is the best way to learn, in my opinion, of course. So, I’ll definitely take more opportunities to apply this so it becomes easier.

Whew!

Well!… Lemme get a sippa water…
* Ahhhhh! *

Moving on, here is a short video of what I have so far. It’s what was mentioned in the updates mentioned near the start of this article.

It’s not much, but under the hood, a lot has been accomplished, and with most of the lower-level code now out of the way, I can start getting into the fun stuff!

Thanks for stick with me guys, and stay tuned for more.

– C. out.

Laser Stryker Deluxe

Hey guys.

Let me introduce you to a new game I’m working on (besides the Android and HTML5 versions of Thunderjack!).

This is the next project from the Unity course over on Udemy called Complete C# Unity Developer 2D – Learn to Code Making Games. It’s a space shooter game that teaches you about moving objects in such a way that is independent of frame rate, coroutines, moving objects along a predefined path, using for-each loops, and backgrounds that scroll indefinitely.

I decided to call my version of this game “Laser Stryker Deluxe” as it’s a sort of spin-off to Laser Strykyer, a Flash game I made a while back (which pays homage to a game on the ColecoVision called Beamrider).

LDeluxe will feature most of the graphics from the original Laser Stryker. Because the game in the Unity course resembles the mechanics of a classic vertical shooter, Deluxe will use a similar setup. It will also feature power-ups, such as additional weapons, speed, armor, and maybe weapon charging – many of the features that are found in games of this genre.

I’m learning a lot in this 2D Unity course, and I’m super-excited to bring this game to life!

Although I’ve completed this section of the course, I want to expand on LDeluxe before moving on the the next section.

Here’s a quick look at the very early stages of development process so far. I can’t wait until I’m finished so I can show this bad boy off.

– C. out.

Thunderjack! (HTML5 Version) and Phaser Editor

Hey there.

In addition to the Android version of Thunderjack! that I’m working on, I’ve also started a browser version, using HTML5. Flash is reaching its end-of-life, but browser games are still a thing. So, HTML5 is the next step for me, and I’ve been improving my skills to produce web-based games that do not use a plugin.

I found Phaser, an HTML5 game development library, and started learning it. This library is incredible! I’ve used it to create my first HTML5 game, Brickout.

Sure, I’m not the biggest fan of JavaScript (I took this course to get some quick JavaScript training), but that’s a relatively small hurdle to overcome – especially if you were like me – ego and attitude was keeping you from learning JavaScript.

I also wanted some sort of WYSIWYG IDE for designing the visual aspects of HTML5 games, similar to Adobe Flash/Animate. Eventually, I found the Phaser Editor.

Giving this software a try, I’m really liking most of what I’m finding with this editor. When you add visual objects the canvas scene, Phaser Editor generates the JavaScript code that creates those Phaser objects. No more having to hard-code things like the x/y positions of objects and line up your objects using trial and error.

You can even create custom, re-useable objects (known as prefabs in Phaser Editor), which can really facilitate the building process.

While the learning curve isn’t too steep, though I would have liked to see a tutorial that creates a game using the editor from scratch, rather than a pre-made game.

This editor also comes with its own JavaScript coding editor, with many of the standard features you’d expect from an editor, such as auto-completions, listing of JavaScript and Phaser API methods, code refactoring, and more.

Phaser Editor comes in two flavors: free and paid. The free version has some limitations, but not enough to stop you unless you’re building a massive game.

Overall, this is a very handy tool, and I’m excited about integrating it into my workflow as I add HTML5 game coding to my list of services.

More updates on Thunderjack! will be in the coming weeks. Stay tuned.

Talk to you soon.
– C. out.

Brickout Is Ready!

Hey!

Brickout is finally ready for first release! Yeah!!

Only thing is… I need to figure out how to add a portfolio that my current theme can use!! Or, maybe switch themes. Welp, let me figure that part out.

In the meantime, here is a video play through, although I didn’t get very far, haha!

On to the next game project! Thanks for staying with me!

Of course, I can make games like this for you too. If you’re interested, please get in touch with me by clicking here or e-mailing me directly at:
cartrell@gameplaycoder.com.

Thanks,

– C. out.

Brickout: Polish Update

Hey there.

Polish can easily be overlooked when developing a game. It’s that last 10 percent or so where you smooth out the rough edges, focus on the intricacies of mechanics or functionality, and sharpen up audio, visuals and feedback. Polish is what can turn a bad game into a good game, and a good one into a great one, all else being equal.

No, not that kind of polish.

A bit of progress has been made to add polish to Brickout. Let’s demonstrate what’s done so far.

Added particle effects to broken bricks.

Getting into Phaser’s particle system wasn’t too difficult. I created a simple graphic that represents a broken piece of the brick, and used that as the particle. Every brick has its particles that match its own color.

Extra Impact to Bomb Explosions

When a bomb explodes, it now produces a screen flash and tremor.

This one was a lot of fun to add. The flash made use of Phaser’s graphic primitive functionality. In this case, I used a colored rectangle that fills the entire screen.

The tremor was super-easy. Interestingly enough, there is a “shake” method on Phaser’s Camera object that you can call, and specify the intensity and duration of the tremor. In previous games I’ve made for clients, I’ve always had to do this manually, and I was expecting to do that here. Thankfully (or unfortunately, if you’re a crazy coder (:  ), that’s a task I’m relieved of for this game. (:

There is also a “shattering” sound that is played if the bomb happens to clear any bricks within its blast area.

Saver Blocks Gradually Appear Instead of All at Once

When the saver bridge is forming itself, it now does so once brick at a time. So, you’re not out of the woods yet, and you can still lose a ball while the bridge is forming!

Also added particles to broken saver bricks as well.

Adding Labels to Identify the Item Collected

When you collect gems, an animated label will briefly appear. For some items, such as the bomb or saver bridge, this is not necessary.

Alright! Let’s see this shit in action!  😀

Now, more work to do!

– C. out.