Hey what’s up!
We’re continuing working on the bet placing functionality. Looking at our four-step process, we’re now on step two, setting up the bet chip buttons:
- Setup the hand buttons
- Setup the bet chip buttons
- Setup the bet button
- Setup the clear button
We recently finished the hand buttons. You can view part 1 and part 2 of this function.
The bet chip buttons work like this: When a bet chip is pressed, it applies its bet value to all the selected hands.
For example, say we:
- Select hand #2
- Press the 10 bet chip. This will add 10 credits onto hand #2
- Select hand #1 (both hands #1 and #2 are now selected)
- Press the 50 bet chip. This will add 50 credits onto hand #1, and hand #2. The total credits of hand #2 is now 10 + 50 = 60.
Building the bet chip buttons and functionality put into four parts, explained below.
First, let’s add the chip buttons to the canvas.
- Right-click on the canvas, then select Add…, then Button.
- From the Add Sprite dialog, select the image you want to use as the main button sprite, then press OK.
- This will add a button to your canvas. You can drag it to position it where you want.
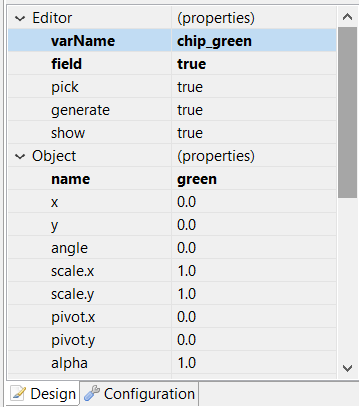
In the button’s properties, set the field property to true . This will create a reference to the button in the code that the canvas compiler generates, allowing you to reference it as well (which we’ll do later). - Set a name for the bet chip button. I decided to use the name that matches the color of the bet chip.
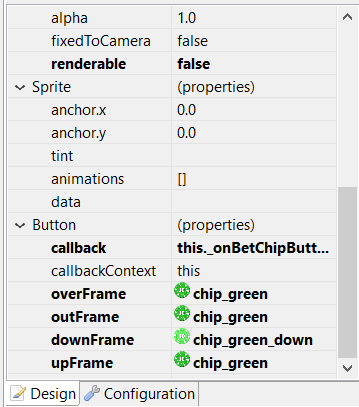
- Set the callback to this._onBetChipButtonPressed, and set the callbackContext to this.
- Set the four “Frame” properties to the appropriate sprite images, so that the button appears responsive when the it is moused over, pressed, and released.
- Follow these steps for the other bet chip buttons.
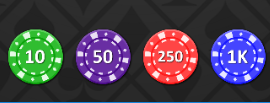
Second, once you have all the bet chip buttons made, we’ll turn them into a single prefab. You can select all the chip buttons, convert them to a group, then create a group prefab from the group. When creating my prefab, I named it bet_chips_prefab. The editor then created bet_chips_prefab.canvas, and the bet_chips_prefab.js source file. My bet chips prefab canvas looks like this:
Once you have the prefab added to your main canvas, set a varName for the prefab (I used bet_chips), and set the field property to true. In the main canvas, the canvas compiler will create a reference to this prefab as this.fBet_chips (which we’ll use later).
Third, we need to add some custom code to the bet_chips_prefab JS class file. We want to be able to fire a notification each time a chip button is pressed. A Phaser signal will be added as a property of this class to be referenced from other functions. The following code is added under the -- user code here -- comment:
bet_chips_prefab.prototype.init = function(buttonClickCallback, context) {
  this.buttonClickSignal = new Phaser.Signal();
  this.buttonClickSignal.add(buttonClickCallback, context);
};
This code is meant to be called once from the outside – from the code that sets up the UI. Supply the callback function that is called each time the signal fires, and the context in which that callback is used.
bet_chips_prefab.prototype._onBetChipButtonPressed = function(button) {
  this.buttonClickSignal.dispatch(button.name);
};
This function is the callback function we assigned to each button as their callback property in the editor. Each time a bet chip button is pressed, this function is called. It then dispatches the signal, which in turn, fires the buttonClickCallback function that was passed into the init function.
We need to identify which button was pressed. So, the buttonClickCallback function accepts one parameter of type string, which is the name of the button. This is the same as the name property used when creating each button.
This finishes the setup of the bet chip buttons. The fourth and final step is initializing the bet_chips_prefab and handling what happens when a bet chip button is pressed.
When setting up your main canvas, you can initialize the bet chips prefab class. In the user code (under the -- user code here -- comment), add this:this.fBet_chips.init(this.onBetChipPressed, this);
This is the init function we created earlier on the bet_chips_prefab class earlier. The onBetChipPressed function, which we’ll create next, will be called by the bet_chips_prefab signal each time a bet chip button is pressed.
function onBetChipPressed(s_betKey) {
  var selectedPlayerIds = this.handButtons.getSelectedHands();
  for (var s_playerId in selectedPlayerIds) {
    this.addToPlayerBet(s_playerId, s_betKey);
  }
}
The s_betKey is the name of the bet chip button that was pressed. This is the parameter we pass onto the buttonClickSignal of the bet_chips_prefab._onBetChipButtonPressed when the signal is dispatched.
There is a new function on the handButtons object called getSelectedHands. From this previous article, we defined a HandButtons class that manages the three hand buttons for selecting which player hands that we want to apply bets to.
The getSelectedHands function will return an array of string IDs of all the player hand buttons that have been selected. Let’s add the getSelectedHands to the HandButtons class, which looks like this:
HandButtons.prototype.getSelectedHands = function() {
  var ids = [ ];

  for (var s_id in this._handButtonsById) {
    var button = this._handButtonsById[s_id];
    if (button.getIsOn()) {
      ids.push(s_id);
    }
  }

  return(ids);
};
Back to the onBetChipPressed function, we now know which player hands have been selected at the time the bet chip button was pressed. We can now add the bet value of the selected bet chip to these selected hands with this function:
GamePlay.prototype.addToPlayerBet = function(s_playerId, s_betKey) {
  var i_betValue = BetChipValues[s_betKey];
  this.playerData.addBet(s_playerId, i_betValue);
  this.updateTotalBet();
};
There is a BetChipValues object which we’ll define as a key/values pairs, where we’ll map the bet chip ID (which we’ll define as the name of the bet chip) to its bet value:
BetChipValues = {
  green: 10,
  purple: 50,
  red: 250,
  blue: 1000
};
The PlayerData class
There is also this.playerData.addBet method. This function adds the value of the bet to each selected hand. The playerData is an object that we’ll create from a PlayerData prototype:
PlayerData = function() {
  //key: string (player id)
  //data: PlayerHandData
  this._hands = this._initPlayerHands();
};

PlayerData.prototype._initPlayerHand = function (playerHands, s_handId) {
  playerHands[s_handId] = new PlayerHandData(s_handId);
};

PlayerData.prototype._initPlayerHands = function () {
  var playerHands = {};

  this._initPlayerHand(playerHands, PlayerHandIds.LOWER_RIGHT);
  this._initPlayerHand(playerHands, PlayerHandIds.LOWER_MIDDLE);
  this._initPlayerHand(playerHands, PlayerHandIds.LOWER_LEFT);
  this._initPlayerHand(playerHands, PlayerHandIds.UPPER_RIGHT);
  this._initPlayerHand(playerHands, PlayerHandIds.UPPER_MIDDLE);
  this._initPlayerHand(playerHands, PlayerHandIds.UPPER_LEFT);

  return(playerHands);
};
Inside the user code of the game play canvas (in this project, we’re using GamePlay, you can add playerData as a property of that prefab class like this:this._playerData = new PlayerData();
We are using values from the PlayerHandIds object we set up earlier, as well as the PlayerHandData, which stores data about each individual hand.
With the this.playerData.addBet(s_playerId, i_betValue); function, we want to first retrieve the PlayerHandData that matches the player ID, then add the specified bet amount to its betValue property.
You can eventually go on to update the UI with bet chips. This is what the updateTotalBet() function is reserved for. Your bet interface can include elements, such as:
- the player’s credits
- the player’s total bet value
- the bet amount for each hand
I’ll leave that as an exercise to you, but if there is enough demand for it, I’ll post an article on it.
The final result here does include the updated UI. In the next update, we’ll set up the bet and clear buttons.
Thanks for reading, and stay tuned!
– C. out.


