In the last article, we discussed the first part of step one of allowing the player to place bets. We broke the process into four steps, which I’ll reiterate here:
- Setup the hand buttons (we are finishing up this one in this article)
- Setup the bet chip buttons
- Setup the bet button
- Setup the clear button
We left off with being able to toggle the hand button 1 on and off. So that it does this:
Next, we’ll create toggle buttons to represent hand buttons 2 and 3.
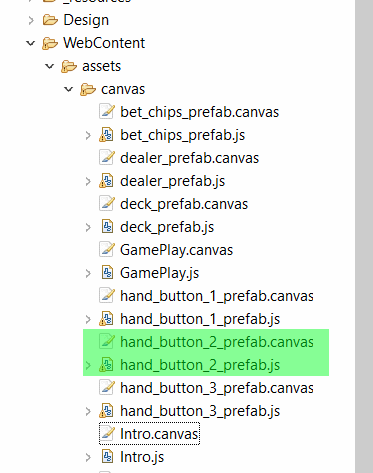
For hand button 2, first in the Project Explorer of Phaser Editor, copy and paste the file hand_button_1_prefab.canvas, renaming it to hand_button_2_prefab.canvas. Then copy and paste hand_button_1_prefab.js, renaming it to hand_button_2_prefab.js.
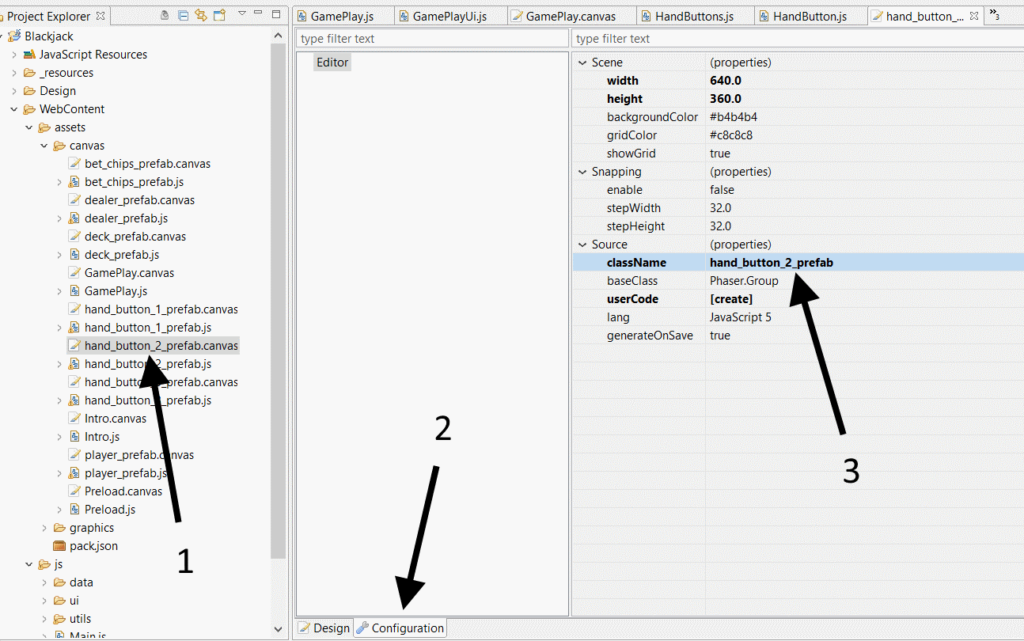
Next, open the hand_button_2_prefab.canvas file in the editor. Click on the Configuration tab at the bottom. Under the Source section, look for a className property. Change it’s value to hand_button_2_prefab, then Save the file.
What this does is allow the proper class name (which is hand_button_2_prefab) in the corresponding hand_button_2_prefab.js file to be to be written when the canvas compiler automatically generates the code.
Next, click the Generate Code icon in the top toolbar of the editor. It looks like a gear. When you are changing configurations and update the canvas file, it may not automatically update the corresponding JavaScript file. Clicking this button forces it to do so.
Remember, however, our user code is not touched by the canvas compiler, so we’ll need to update part manually. If you look inside hand_button_2_prefab.js, it has updated generated code to use hand_button_2_prefab, but hand_button_1_prefab in our _onButtonPressed user code. So, you’ll want to update all occurrences of hand_button_1_prefab with hand_button_2_prefab in your user code. Then save the JavaScript file.
hand_button_2_prefab.prototype._onButtonPressed = function() {
  if (this.clickCallback !== null) {
    this.clickCallback.dispatch(this);
  }
};
For hand button 3, follow the same steps for hand button 2 above, except you’d use the class name, hand_button_2_prefab.
Once you have all three hand button toggle button prefabs set up, you can add them to your game’s main canvas. Here are two quick ways to add a prefab to your canvas.
The first is:
- Right-click on the canvas
- Mouse over Prefab from the context menu
- Choose Add… from the secondary menu
- Select one of the hand button prefabs from the list, and click OK.
Alternatively, you can use a very similar method:
- Right-click on the canvas
- Mouse over Add… from the context menu
- Choose Prefab from the secondary menu
- Select one of the hand button prefabs from the list, and click OK.
Once you’ve done that, the prefab should appear on your canvas. You can then drag it to position it wherever you like.
Managing the Hand Buttons
Now that we have all the hand buttons created, we need a way to manage them.
As mentioned in the last article, we place a bet by selecting one or more hands, then pressing a bet chip button to place bets on those hands. But what happens if none of the hand buttons are selected when you press one of the bet chip buttons?
Well, we could provide some kind of “error” feedback, or simply not place the bet. But this might create a slight frustration for your end users. In my opinion, it would be better to prevent all three buttons from being turned off. So this implies two things:
- One of the buttons must always be on by default (it can be any button you want, but for our purpose, let’s have hand button 2 on by default; or
- If only one hand button is on, disable that button, so that it cannot be turned off. If another button is then turned on, that button can then be re-enabled.
Yes, this is little more work on our part, but it creates a smoother user experience, in my opinion, of course.
Having a “manager” class that works with all the hand buttons would be very helpful here, so let’s create that class:
HandButtons = function(gameCanvas) {
  //this is the game canvas that you pass in when you construct your `HandButtons` object
  this.gameCanvas = gameCanvas;

  //here's another key-value object that references all three hand buttons by their id
  //key: string (button id)
  //data: HandButton
  this._handButtonsById = { };

  this._init();
};
There is an _init function that sets up all three hand buttons, and it looks like this:
HandButtons.prototype._init = function() {
  //setup the three hand buttons
  this._initHandButton(Thunderjack.PlayerHandIds.LOWER_LEFT, this.gameCanvas.fHand_button_1);
  this._initHandButton(Thunderjack.PlayerHandIds.LOWER_MIDDLE, this.gameCanvas.fHand_button_2, true);
  this._initHandButton(Thunderjack.PlayerHandIds.LOWER_RIGHT, this.gameCanvas.fHand_button_3);

  //enable/disable buttons as necessary
  this._updateButtons();
};
Each hand button is setup in an _initHandButton function, as in:
HandButtons.prototype._initHandButton = function(s_playerHandId, handButtonPrefab, b_isOn) {
  var handButton = new HandButton(s_playerHandId, handButtonPrefab);
  handButton.setIsOn(b_isOn === true);
  handButton.callbackSignal.add(this._onHandButtonPressed, this);

  this._handButtonsById[s_playerHandId] = handButton;
};
We’re creating a HandButton object from the class we created here. The toggle button will will be turned on if b_isOn is true.
The click callback, which is a Phaser Signal, is assigned the method, this._onHandButtonPressed, which we’ll look at later in this article. Finally, the button is added to the collection of buttons, indexed by the player hand ID.
There’s another function being called in the _init function, and that’s _updateButtons:
HandButtons.prototype._updateButtons = function() {
  var button = this._getLoneOnButton();
  if (button !== null) {
    button.setEnabled(false);
  } else {
    this._enableAllButtons();
  }
};
Earlier in this article, we discussed disabling a button if it’s the only one on. After the buttons are first set up, and every time the state of the buttons changes, we want to call _updateButtons. In this function, there is a_getLoneOnButton function. I won’t go into details on it, but returns a button if that button is the only one selected. Otherwise, it function returns null.
Finally, from this setup of the buttons, there is the click callback function, _onHandButtonPressed:
HandButtons.prototype._onHandButtonPressed = function(s_id) {
  this._updateButtons();
};
You’ll see that _onHandButtonPressed accepts a single parameter, a string ID. This is the button ID, the same as the property that is being dispatched in the HandButton.prototype._onButtonCallback function we defined in the earlier article. Each time a toggle button is pressed (either turned on or off), we want to update all the buttons. If only one button is left on, that button will be disabled. This prevents the player from turning off all the buttons, which would create a problem when we set up the bet chip buttons in a later article.
That completes adding the functionality of the hand buttons. We can now select which hand (or hands) on which we want to place bets. Also, we made sure that at least one of these hand buttons is on at all times.
In the next article, we’ll set up the bet chip buttons, so we can place bets on our selected hands. Thanks, and talk to you soon.
– C. out.


